home tutorials features parties custom orders
Showing posts with label patterns. Show all posts

Tuesday, May 31, 2016

Gymnastics Outfit with Thread Faction Patterns

If you are looking for some new, fun, modern, simple knit patterns to sew for spring and summer, then you definitely need to check out the latest pattern collection from Thread Faction Studios. In celebration of their latest designs, I'm participating in the Thread Faction SS2016 Blog Tour and sharing how I put together three patterns to make this terrific gymnastics outfit for my daughter.


Disclosure: The patterns and some fabric used in this post were provided to me free of charge in exchange for participation in the blog tour. All statements made in the post are my honest opinions.

Keep reading for more information on these patterns as well as how you can win some fabulous prizes!

Tuesday, June 17, 2014

sewVery Sunny Dress Tester Photos Round-Up

A couple of days ago, I released my first graded digital pdf sewing pattern--for FREE! It's the sewVery Sunny Dress Pattern in Sizes 5, 6, and 7.  Boy, was it a labor of love, but I had so much fun making it that I plan to complete the grading and add a couple of variations to the design.

In order to make sure the pattern pieces were graded properly for a good fit and the tutorial instructions were clear and thorough, I requested the help from a group of ladies via a tester call-out on my sewVery Facebook page.  Didn't they do an amazing job?


Tuesday, May 13, 2014

ModKid Lexi Peplum Top

If you're like me, you are drawn to patterns that have a stand-out feature or unusual detail.  Seems peek-a-boo backs are one of the popular trends for this Spring and Summer, and the large circular cut-out detail is definitely what caught my attention with the ModKid Lexi Peplum Top Pattern that I recently sewed for Ella.


Thursday, April 17, 2014

Surprise! Pattern Tour for Sew Like My Mom + New Pattern Sneak Peek

Blogging and sewing have blessed me with an amazing gift of friendship and community.  Honestly, I've never experienced anything quite like it.  Today, a group of friends (myself included) decided to throw Sew Like My Mom a Surprise Pattern Tour because we think she (and her patterns) are pretty awesome!


I had a conflict with the actual posting date for the Surprise Pattern Tour, so my new Sew Like My Mom look is being shared a couple of days late.  If you click the sewVery link in the pattern tour list above, it will show you one of the previous Sew Like My Mom creations that I've made--the Darling Daisy top.  I've also sewn up the Busy Lizzy Dress, and after seeing some of the short sleeved and sleeveless versions my friends have made as part of the tour, I now need to make Ella one, too!

Today, I'm showing you the new Darling Daisy top I made Ella and an exclusive sneak peek at Melissa's soon-to-be-released Oakley Shorts & Capris pattern (she is just now releasing it to testers).


Tuesday, October 29, 2013

Visiting with The Cottage Mama

Blogging has afforded me the opportunity to meet so many great people including several amazing new designers/bloggers.  One such person that I think most of you may know already is Lindsay Wilkes, aka The Cottage Mama.

When I first discovered Lindsay's blog, I fell in love with the beautiful outfits she was making, and when she first began selling paper patterns, I bought The Janey Jumper right away (absolutely great pattern)! Here's the post on the first Janey Jumper I made.


Since then, Lindsay's brand, blog, and pattern collection have grown immensely, and I was fortunate enough along the way to be a very small part of it.  Several months ago, I tested one of her latest amazing patterns, The Matilda Dress and Top, and I got the opportunity to meet Lindsay in person and have dinner with her.  So much fun!

Here's my post on my Miss Matilda Dress.


All this brings me to today where I can proudly say that I'm a guest contributor at Lindsay's blog, The Cottage Mama.  Please come visit me there and check out my tutorial on how to use up some of the decorative trims in your stash drawer!


Oh, and I'd love it if you'd leave a comment over there letting me and Lindsay know what you think about my project!

Have a great day, and have fun sewing!

Follow on Bloglovin

Monday, September 30, 2013

Fall & Winter Pattern Sale Starts NOW!

Today's the day!  The Sew Fab Fall and Winter Pattern Bundle Sale starts right now!  These are 26 amazing patterns all for only $29.95!  Wow!  That's just a little more than $1.15 per pattern!

These patterns are all really wonderful!  I know because I've already made at least 5 of them (and some of those multiple times) as shown below.  Keep reading to see who the designers are and what patterns are included in the bundle.  Then please, please, please use my affiliate link by clicking the "Buy the Bundle Here" buttons below to purchase your Sew Fab Pattern Bundle!  Oh, and there are prizes, too!


This post contains affiliate links.  When you purchase the Sew Fab Pattern Bundle through those links, I earn a percentage of the sale.  Thanks so much for your support!


 Welcome to the Fall and Winter 2013

Sew Fab e-pattern Sale Event!

Last February was the first ever Sew Fab e-pattern Sale and it was so successful and was so well received that Jenny Yarbrough of The Southern Institute, the creator and administrator of the sale, decided to have more! This sale is bigger and better than the first, with plenty of patterns to get you through the fall and winter (if you live on this side of the hemisphere), and a few warm weather patterns thrown in for those of you who live on the other side of the world. You'll also find more gender neutral patterns for those of you who are sewing for boys. And what about you? Of course there are a few women's patterns thrown in for some selfish sewing too! Over the past several weeks a lot of behind the scenes planning has taken place to bring you this newest bundle of ePatterns from many of the top established and up and coming online sewing pattern designers. The result is a bundle of 26 PDF sewing patterns that you're going to love! For one week only, twenty-six pattern designers have come together to bring you 26 of their best PDF patterns, valued together at well over $2oo.oo, for the incredible price of $29.95!!! That’s over 80% off of the combined retail value! Plus you can enter to win a dream of a giveaway with several prize packages from some of your favorite online fabric shops!
For less than $30.00 you will have a library of resources that you can use over and over again.
The designers that have joined this sale are experts in their craft. Each designer has contributed one of their favorite patterns to create a bundle that is sure to please! Whether you are sewing for your own family or making gifts for others, these are patterns that you will love to use.
If you’ve never sewn with a PDF pattern before, let me tell you how great it is! After downloading your pattern instructions and your pattern, you will print out the pattern itself, creating pattern tiles, if you will. Simply tape the tiles together to create the full pattern! At that point you can cut out the size that you need and pin the paper pattern directly to your fabric, or you can trace the pattern size that you need onto sewing paper or tracing paper and cut it out, saving the paper pattern for later when you need to sew another size. Pdf patterns are so convenient because you can print them out as many times as you need!


Now for the good stuff... the PATTERNS!

26 amazing ePatterns from 26 well-known and up and coming designers are instantly accessible to you by PDF download upon purchase of the Sew Fab e-Pattern Bundle. Here are the patterns that you will receive (click on the links below the images for more information about each pattern.):


Reversible Zippy Hoodie from Kitschy Coo, Ananda Pants from CHOPSTIX, The Sally Dress from Very Shannon, Best Harem Pants from Too Sweets , Notebook Slipcover from Gingercake, Junebug Dress from Craftiness Is Not Optional, Fancy Pants Leggings from Titchy Threads, Skinny Jeans from peek-a-boo, Pajama Eaters from Sew Fearless, Ruffle Dress from Sumo's Sweet Stuff, Go To Cape for Women, Sadie Grace Nightgown from Seamingly Smitten, Vintage V-Neck from Blank Slate Patterns, Zermatt Bow Swing Coat from See Kate Sew, Tumble Tee from imaginegnats, Nituna Jacket from Figgy's, Greenpoint Cardigan from Hey June, Gathers and Giggles Quilt from Sew Much Ado, Billy Car Play Mat and Roll Up from Handmade Therapy, Bimaa Sweater from LouBee Clothing, Candy Carousel Dress from Molly Blossom, Convertible Clutch from LBG Studio , Infinity Sweater from One Girl Circus, Undies Pattern from From the Red Kitchen, Owl Backpack from The Sewing Loft, Ethan Shirt from the Scientific Seamstress

This Sew Fab e-Pattern Bundle is only available for one week and will never be available again! You can purchase the bundle from September 30th at 8 a.m. EST through October 8th at 8 a.m. EST and there will be no late sales offered. Due to the nature of the sale there are no refunds.
You don’t want to miss this unique opportunity to purchase a ready made collection of 26 PDF sewing patterns from 26 of the best designers out there!
 

And now for The Sew Fab Giveaways!

I'm so excited about these giveaways! Can’t buy the pattern bundle? It’s okay… purchase is not required to enter. Each of these prizes will inspire you in your sewing as well as keep you stocked with what you need for your upcoming projects. There are lots of chances to win and each entry applies to all of the giveaway packages. Just use the Rafflecopter widget below the prize descriptions to enter as many times as you want, no purchase necessary.
#1: $50 Gift Card to Fat Quarter Shop
The Fat Quarter Shop was founded in 2003 by Kimberly Jolly who began her shop as a side business, cutting, packing and shipping right out of her house during evenings and weekends. From the very beginning, she was committed to delivering top-notch service for every single order and customer. You'll still find the same level of service at Fat Quarter Shop, along with an extensive selection of high quality fabrics at great prices.
 
#2: $50 Gift Card to Girl Charlee Fabrics
Girl Charlee Fabrics is your retail and wholesale source for unique knits fabrics at the best price. Browse their wide selection of fabrics and specially select knit specific sewing patterns from independent designers.
 
#3: $50 Gift Card to Modern Yardage
Modern Yardage has a curated team of talented designers who design fabric exclusively for them. They print your fabric on-demand and offer their prints in small, medium, and large scale and as many as 10 different color options. Designs are printed in the standard 44" width on 58" wide, pre washed, 100% cotton quilting weight fabric, and they use the 12" margin to print features about their designers, free projects and patterns for you, and other fun goodies!
 
#4: $50 Gift Card to Michael Levine, Inc.
Located in the heart of the Los Angeles garment and fashion district, Michael Levine, Inc. is one of the Largest fabric retailers and wholesalers in the nation. With two retail outlets and a super stocked warehouse, Michael Levine, Inc. is the place to buy fabric.
 
#5: $50 from Finch Sewing Studio
Finch Sewing Studio provides a curated selection of modern fabrics and cool tools. Our classes are offered in our physical shop in Loudoun County, VA. We offer fun, on-trend classes for beginner and experienced sewists alike. We teach the skills and provide the materials to make beautiful, handmade goods.
 
#6: $50 Gift certificate from Fabricworm

Fabricworm offers a selection of fresh, modern fabrics that you'll love, including organic fabrics and japanese import fabrics.  You'll find children's fabrics, fabric bundles, quilt kits, and free sewing patterns when you visit Fabricworm's shop.  Come by and search their great selection today!
Sign up for the Sew Fab Newsletter to get the latest Sew Fab News! Winners will be announced in the newsletter as well as upcoming sales and other news pertaining to the Sew Fab Sale and the world of pdf patterns. a Rafflecopter giveaway

The Sew Fab e-Pattern Sale!

Sew Much Inspiration right at your finger tips…

only $29.95!

Get your bundle now!

  *Patterns included in the Sew Fab Pattern Bundle are intended for personal use only. The selling of patterns without designer's permission is prohibited and punishable by law. Please contact individual designers for licensing requirements if you desire to create and sell clothing from patterns that have been purchased through this sale. **For answers concerning sale terms and customer service questions, please see the FAQ page.

Wednesday, September 25, 2013

Time for Another Sew Fab Pattern Sale!

Please be sure to come back to my blog, sewVery, next week for more info and to purchase the latest Sew Fab Pattern Bundle!

Coming next week...

http://thesoutherninstitute.com

  For one week only, twenty-six pattern designers will be joining together to combine their best PDF sewing patterns (valued together at over $200.00) and selling them to you for the incredible price of $29.95! That’s over 80% off of the combined retail value!
Grab the bundle when it goes on sale next week and you'll be all set to sew for school and the coming holiday season! You'll have to wait until next week to see which patterns are included in this fall's bundle, but I can tell you right now that you won't be disappointed!

See you bright and early on Monday morning!


Monday, May 6, 2013

Fabric Match Up Giveaway & Pattern Contest

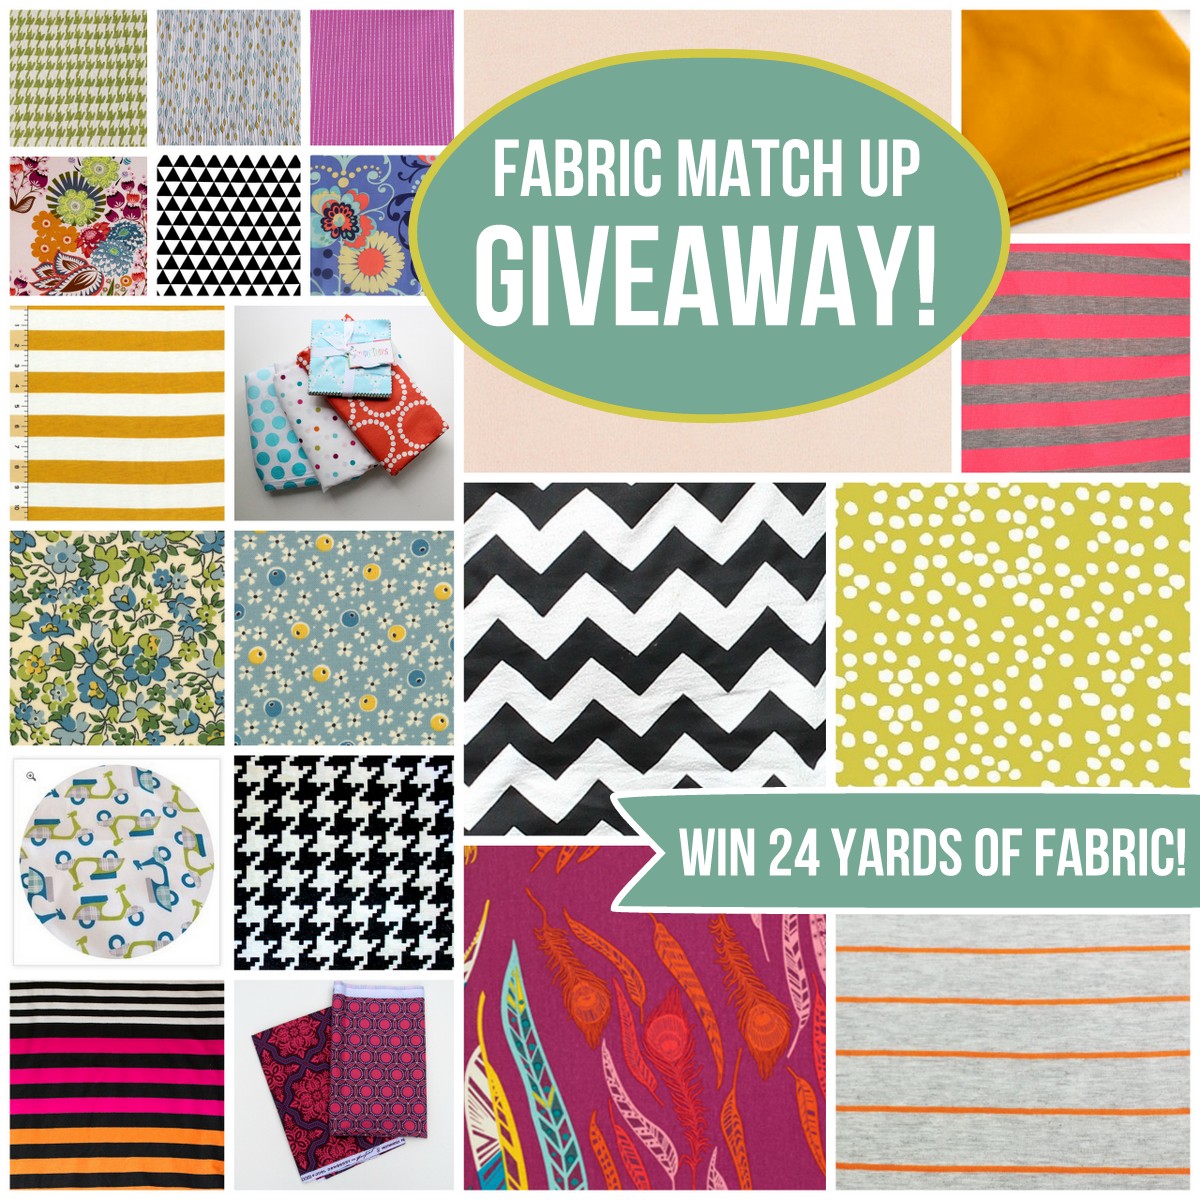
Today is the start of Sew Mama Sew Giveaway Day, and I'm participating in an exciting fabric giveaway hosted by 18 of your favorite bloggers!  There's a total of 24 yards of fabric that will all go to one lucky winner!  

Here's the catch.  You have to match the fabric to the blogger giving it away!  We are calling it the Fabric Match Up Giveaway!  Keep reading below on how to enter...

fabric match up giveaway- win 24 yards of fabric from your favorite bloggers!

Have you ever wished that your favorite sewing bloggers would go fabric shopping for you? Or seen a project on a blog and thought, "I could really use a yard or two of that fabulous fabric." If so, today is your lucky day!

Eighteen sewing bloggers picked out a yard (or two!) of a fabric from their stash and we're giving them ALL away to one lucky winner!

To win this awesome stash of fabric goodness, just match the fabric swatch to the blogger (hint- most of us have used the fabric we chose in a recent project, so our recent posts are your fast track to fabric matching success). The first person to correctly match all of the swatches will receive ALL of the fabric shown!

  fabric matching giveaway- win 24 yards of fabric from your favorite sewing bloggers!
A- 1.5 yards, Mini Dot in Sunspray by Lotta Jansdotter, B- 1 yard, Paradise Garden in Periwinkle by Amy Butler, C- Florescent Pink & Gray Striped Jersey Knit, D- 1/2 yard Heirloom Tile Flourish in Garnet and 1/2 yard Heirloom Opal in Fuchsia both by Joel Dewberry, E- 1 yard, Houndstooth in black by Michael Miller, F- Pink/Orange Stripe knit, G- 1 yard, Orange and Light Heather Gray Stripe Cotton Jersey Knit, H- 1 yard, Light pink linen, I- 1 yard, Mustard and Ivory Stripe by Girl Charlee, J- 1 yard, Rally Cream/Grass by Dan Stiles, K- 1 yard Riley Blake Ombre Dots in Aqua, 1 yard Target Polka Dot Sheet Fabric, 1 yard Lizzy House Pearl Bracelet in Persimmon and Michael Miller Happy Tones Charm Pack, L- 1 yard, Remix Triangles B/W by Ann Kelle, M- 1 Yard, Novella Rain Rayon in Aqua by Valori Wells, 1 yard, Lush Running Stitch in Purple by Patty Young, and 1 yard, Porcelain Tile Garden Wall in Olive, M- 1 yard, Mustard cotton sateen, O- 1 yard, Summer Totem in Grapefruit by Anna Maria Horner, P- 1 yard, Black and white chevron, Q- 1 yard, Parenthetical in Berry by Anna Maria Horner, R- 2 yards (1 yard each), ABC 123 by American Jane for Moda


Here is the list of bloggers (just in case you have a little research to do)

Boy, Oh Boy, Oh Boy crafts       The Cottage Mama                crafterhours
Craftiness is not Optional            delia creates                          girl. inspired.
icandy handmade                       If only they would nap...        imagine gnats
kojodesigns                               Melly Sews                            Nap Time Crafters
See Kate Sew                            Sew Country Chick                The Sewing Rabbit
sewVery                                    Sumo's Sweet Stuff               The Train to Crazy

pattern bundle giveaway

And just to sweeten the pot a little, every reader who submits a guess will be entered in a fabulous pattern bundle giveaway. 

The prize:
The Sugarplum Top + Dress pattern by See Kate Sew
The Surfer Slacks Lounge Pant pattern by See Kate Sew
The Casual Lady Top and Dress  pattern by Go To Patterns,
Two "Winner's Choice" patterns by Blank Slate Patterns,
Pattern 5 Pack ("Winner's Choice") by Peek-a-boo Pattern Shop,
Riding Pants pattern by the Sewing Rabbit, 
Roly Poly pattern by imagine gnats, and the
Ruby Ruffle dress pattern by The Cottage Mama

WOW!

Good luck!  Oh, and I would love it if you would become a follower of my blog and Facebook page, too!  

Check back here tomorrow for another giveaway I'll be hosting!  Here's a hint:  I'll be giving away a purse I made using some of the same fabric I'm giving away in the Fabric Match Up Giveaway!  

*Fabric Match Up Giveaway and Pattern Bundle Giveaway end at midnight MST on Friday, May 10, US residents only.

Monday, April 15, 2013

Hosh Pants & Skater Sweater Refashion

I am so behind in posting all the things I've made Ella over the last couple of months, so I hope this little outfit will inspire someone who is having cooler weather right now.  It's already warming up here in the south which really limits the days she has left to wear outfits like this.

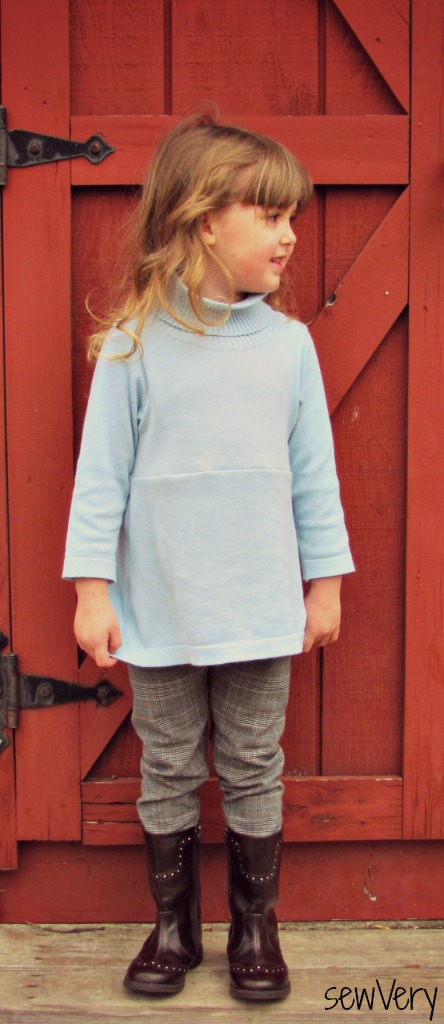
Today I'm featuring the Hosh Pants Pattern by Lou Bee Clothing and a ladies' turtleneck refashioned into a girl's turtleneck using the Skater Dress Pattern by Kitschy Coo.


First, the pants are incredibly simple to make using Sarah's Hosh Pants Pattern.  The pattern has one piece for the legs, so there are no side seams.  Plus she shows you in detail in the pattern photos how to make an adjustable waistband using buttonhole elastic.  Since the pants have a flat front and my daughter's waistline measurement hasn't changed much, I opted to keep things even simpler and just make a casing to run regular elastic through the back waistband.

After consulting the pattern's sizing chart, I opted to make Ella the size 4T and added about an inch and a half to the length (she's tall for her age).  The fabric is a polyester/spandex suiting remnant that I bought from Joann's ages ago.  The fabric is so soft and was a breeze to sew.  Another plus is that it does not wrinkle!  I wash them and then hang them up to dry.  They have never needed ironing!

To make these pants look a little dressier, I added a pocket flap to the back.


All I did was take two rectangles of fabric, place them right sides together, and sew around the edges leaving an opening for turning.  Turn right side out, press, and then topstitch all the way around the rectangle closing the opening in the process.  I then stitched it on the back of the pants and sewed a button on it to keep it down.  No buttonhole required!


Since the legs are tapered and narrow at the bottom, these are perfect to wear inside tall boots.  The whole outfit looks like she is ready for a horse riding lesson!


I have a lot of sweaters that were once my mom's, but they are too big for me.  I've been holding on to them for so long and just can't seem to part with any, so I decided I would take some and try to refashion them into things for Ella.  

The sweater started out as a Land's End Fine Gauge Turtleneck Sweater in a women's size medium.


I thought about using the Bimaa Sweater Pattern from Lou Bee Clothing for the refashion, but I didn't have enough fabric from the sweater to make it.  It's a great pattern, too.  You can see the first one I made here, and I'll be blogging about a second one I made later this week.

Instead, I decided to use the Skater Dress Pattern from Kitschy Coo for the turtleneck refashion.  The Skater Dress is an awesome pattern that I got to try out as part of the pattern blog tour earlier this month.  Here is the link to the Skater Dress I made for Ella.

Sorry I didn't take pictures of the process, but it was really simple to do.  First, I cut off the sleeves along the armhole seam.  Then I used the bodice pattern piece and matched up the existing shoulder seam to the top of the shoulder on the pattern while positioning the pattern fold line along the center of the sweater.  This allowed me to keep the original turtleneck.

Next, I used the Skater Dress skirt pattern piece to determine the top and bottom width of the skirt and estimated the length needed.  Ella had tried the sweater on before I began cutting, so I knew roughly how much of the length I needed to remove.

I then cut the seam of the sleeves open so to give me flat pieces of fabric.  I then used the sleeve pattern piece by cut out the sleeves that fit Ella.  I made sure to use the hemmed edge so I wouldn't have to do any hemming!

Sewing the sweater together was quick (like maybe 30 minutes) and all on the serger.  When I finished the ensemble, Ella exclaimed that she now had a Moma outfit!  She was so giddy!


I just love the fit and overall look of this entire outfit.  It quickly became one of Ella's favorite things to wear, so I hope it will all still fit in the Fall.  She loves the softness of the pants fabric, and the fit is so good that she does not constantly tug at the back to pull up the pants after she squats down to play.

I'll definitely use both of these patterns--the Hosh Pants and the Skater Dress--again in the near future.  In fact, I might just make a pair of Hosh Shorts and a Skater Tank Sweater for this Spring/Summer.

I hope you'll come back all this week to see other pants I've made Ella recently.  At the end of the week, I'll post a round-up of all of the pants posts I've done on sewVery!  See you tomorrow!

Tuesday, February 12, 2013

The Teardrop Bag


After days of sewing and multiple roadblocks, I have finally finished my Teardrop Bag!


I bought this pattern months ago from my friend, Janelle, at Emmaline Bags and Patterns.  I have really enjoyed using her patterns, and I can now say I have completed the Emmaline Bags and Patterns trifecta--The Emmaline Bag, The Steph in the City Bag, and now The Teardrop Bag!  I feel like I deserve a really big prize, especially after conquering this last one.

As you know, not all projects go smoothly from start to finish.  In fact, most of mine rarely (if ever) are done without some sort of issue (whether it's human error or machine error), but my Teardrop Bag endeavor had more than its fair share of challenges.

First, I printed out the pattern months ago when I purchased it.  I read through the instructions on my computer then, too, but opted to not print them out.  No big deal.  I do that all the time to save paper, ink, and space. However, I can only guess that I failed to check the scale of the pieces I had printed out and taped together.  I discovered this error only after I had cut out all the lining pieces and the rectangle pieces of fabric used to cut out the outer bag.  My pattern pieces were 3/4" shorter in width than the fabric!

What I then learned is that when printing out pdf patterns on my HP Deskjet 1050 printer, I have to use an A4 paper size instead of Letter and make sure that I check the actual size option.  I've been having issues with pattern printing for a while now in the form of some lines being cropped from the print area (but the pieces are normally to scale).  I have no idea why I suddenly thought to try printing them out on A4 paper, but it seems to have solved all those printing problems!  Yay!

Ok.  So back to the issue at hand.  Since I had already cut out several pieces using the scaled down pattern version, I had to run with it, which ended up being just fine because this bag is huge!

Now I've finished cutting out all my pieces, and I go to the ironing board to starting fusing the fusible fleece to the outer bag when I discover that my fabric has faded spots all over it on one panel.  I then inspect the left over fabric more carefully and realize that roughly 1 1/4 yards out of the 2 yards of the Joel Dewberry Aviary 2 Bloom Granite fabric I ordered online was flawed! Luckily, there was enough undamaged fabric to cut out duplicate pieces of the ones that I had to replace.  Ugh!

Next hurdle was deciphering the pattern instructions.  You see, I opted to make my Teardrop Bag with both the optional gusseted zipper opening and the o-ring handle mounts--both of which were additions to the original pattern instructions.  Because of this, you have to skip some of the original steps and jump to a different page here and there.  With two children constantly running around and interrupting me, it's a wonder I got this bag finished at all!


I'm glad I made a gusseted zipper opening since I never have, and Janelle's written instructions and photographs made understanding each step of the process very clear.


However, I'm not sure I really like the gusseted zipper opening on this bag after all.  I thought it would be nice to have since the opening of the bag is so large, but I find it somewhat awkward to zip and unzip.  It actually requires both hands which sometimes can be a bother.

At first, I goofed up and sewed the zipper in wrong for the inner pocket.  I was distracted by my children, (so they get the blame for this, too!) but I picked it out and fixed it.  I learned how to sew a zipper pocket from Janelle's tutorial that is included with all her patterns. It's really a great tutorial!


I also added a slip pocket to store my phone and tin of mints.  No problems with this step!  Whew! But I wish I had sewn it in a little lower.  The gusset zipper gets in the way of the top of the slip pocket.


I used a lot of pins to secure the outer bag to the lining before sewing them together.  Because I used canvas fabric for the lining, the overall bag was rather stiff and at times a challenge to maneuver under my sewing foot.  I have never been poked by pins as much as when I was sewing the outer bag to the lining!

All was going well on the third and final day of bag construction when I had to use the seam ripper to remove one stray stitch where I had sewn on the o-rings.  I guess I don't know my own strength, because I pushed the seam ripper so hard that it slipped and sliced open the top of my left hand index finger.  It began to bleed immediately, and I thought I would faint!  I can't stand the sight of my own blood.

I'm not so sure I agree with Janelle's difficulty rating for the Teardrop Bag. She has it listed as Easy -- For Advanced Beginners.  Now, like I said earlier, I've made all three of her bags, and the other two were listed as Intermediate to Advanced which I agree with her on that.  But with the gusset zipper and o-ring handle options that I chose to tackle, I believe that the Teardrop Bag rating is most definitely an Intermediate to Advanced bag.  Without those options, then I would agree with her rating.  Would that distinction on her pattern have deterred me from tackling the exact same bag I made?  Most definitely not!

Overall, I'm very excited about this bag and have really enjoyed using it the past several days.  The exterior fabric is gorgeous, and I really love how nice the bag looks with the way I pieced the coordinating fabrics together.


This is the first time I have ever used canvas as the lining of a bag, and although it was a little challenging at times to sew, I'll use it again.  I like how it makes the bag have more structure without using interfacing.  In fact, the only other thing I used was some fusible fleece on the back side of the outer fabric in order to give it a little more strength.

So, there you have it!  That all said, this is one whopper of a bag!  I'd say it's the biggest I've ever made.  Even bigger than this Sweet Pea Tote I made last year!  Although I made my bag slightly smaller than the regular sized version (due to my printing error), Janelle's pattern offers you an option to make it even bigger!  I think she refers to it as the XL size!


It's so much larger than what I would normally carry that I made up a matching zipper pouch to keep small items neat and tidy inside the larger Teardrop Bag.  I also threw together a matching tissue holder.   Since this post is now way too long, I'll share more about them another day.

Oh, and the bag matches the Commuter Cowl I made, too.  Ella took this picture of me--not bad considering she's not even 4 yet!


Linking up at these parties as well as others shown here.

Sumo's Sweet Stuff

125

This bag has been featured at these fun parties!  Thank you!

125Photobucket


Monday, February 11, 2013

Meet Bella and Lou


I recently purchased the Sew Fab e-pattern bundle, and one of the first things I made was a Ruby Lou doll for my daughter.


The Ruby Lou Doll pattern is by Sew Much Ado and is one of 18 patterns included in the sale (read below how to purchase it along with 17 other patterns).  The pattern was so easy to follow because of the well written instructions and all the information included on the pattern pieces themselves.

I wanted my version to be as cute as the one on the pattern cover, so I laid out several fabric combinations and let Ella choose her favorite.  She picked out fabrics from Anna Marie Horner.  The body of the doll is Clippings in Cherry while the sleeves and one side of the skirt are Buoyancy in Butterberry.  The collar and leggings are Hugs and Kisses in Lime while the reverse side of the skirt is Triflora in Lipstick.


I didn't have any wool felt on hand at the time, so I just used craft felt for the shoes and hair.  I did check on wool felt at the store after I finished the doll, but it is very pricey even for the wool blended variety.  The craft felt seems to be holding up just fine.


To my surprise, when I gave the Ruby Lou doll to my daughter, my son was disappointed that I didn't make one for him.  He's 8 years old, and although he loves stuffed animals still, I had no idea he would have wanted a doll.  I immediately offered up to make him a boy version.

But here's the thing--the Sew Much Ado Ruby Lou Doll pattern only comes with a girl version of the doll!  No problem!

To make the boy version, I simply left off the strands of hair, skirt, the cutouts on the shoes, and eyelashes.  I then drafted a quick jeans pattern and whipped up a pair.  I also drafted a pattern piece to make a hood for the doll's shirt and cut out a couple of extra pieces of fabric to make a kangaroo style pocket on the front of the shirt.


When he's not wearing his jeans, he has on pj's (according to my son).


What I ended up with was this adorable boy doll that made my son's face light up (and my heart melt).  My son named him Lou.

Oh, and I forgot to mention.  Ella named her doll, Bella!  Meet the newest members of our family!


Linking up at these parties as well as others shown here.

Sumo's Sweet Stuff