home tutorials features parties custom orders
Showing posts with label Contest. Show all posts

Monday, October 6, 2014

How I Flipped the BG Hattie Dress Pattern!

I'm so so excited to kick-off the October edition of Frances Suzanne's Flip This Pattern Series with how I flipped the Brownie Goose Hattie Dress Pattern!


Keep reading for all the details of my flip to create this gorgeous Hattie Coat and the rest of Ella's stylish outfit.

Tuesday, October 8, 2013

Superhero Cuddle Wash Cloths + Fabric Giveaway!

A few weeks ago, I made several baby wash cloths as part of a custom order for a friend plus a couple of extras for my own kiddos.  I used Cuddle and Terry cloth fabrics from Shannon Fabrics. My children love using them so much, I decided to make a few more, but this time, I used some images from the Superhero Comic Strip Cuddle Panel to make them a set of Superhero Cuddle Wash Cloths!


The rest of the Superhero Comic Strip Cuddle Panel was used to make my son a really cool and super soft Superhero blanket to match his Superhero floor pillow.  See my guest post at My Cuddle Corner for a tutorial on how to make the floor pillow.


Aren't these wash cloths fun!  I used my free tutorial found HERE and modified the dimensions to be 9" x 9" since that is what the Superhero squares measured.  The Cuddle fabric side lathers up a lot and because it is so soft, it's ideal for washing over sensitive boo-boos.  The Terry cloth fabric side is soft, too, and feels just like a typical wash cloth (great for scrubbing off dirt, and markers, and temporary tattoos, etc.).


I added a little pocket that you slip your finger tips into to help make it easier to grip the cloth when washing a baby or toddler.  The pocket can be flipped to either side of the wash cloth.


Now we have a whole collection and enough to use every day without me having to wash clothes!


Want to make some of these super simple Cuddle wash cloths for your own kids or as a gift?  Then be sure to check out my sewVery Simple Baby Wash Cloth Tutorial for step-by-step instructions. You won't believe how simple these are to make!


Also, I'm giving away to two lucky winners a Quarter Kozy Party Kit (pictured below) and a quarter yard of Terry cloth so you can make your own wash cloths!  Whoo hoo!  Just enter below! (Contest open to US Residents only).

Quarter Cozy Party Kit:  Photo from Shannon Fabrics


a Rafflecopter giveaway
Thanks to Shannon Fabrics for providing the prizes.  Please be sure to check out the Shannon Fabrics' blog, My Cuddle Corner, for tons of inspiring Cuddle projects and tutorials!

Follow on Bloglovin

Monday, September 16, 2013

Craft Book Month - Little Things to Sew

Have you been following Craft Book Month at Craft Buds this September?  If not, then you are missing lots of valuable information on great sewing and crafting projects!  Plus, there's a contest with great prizes!

When my super-duper sweet friend and soon-to-be new mom, Lindsay, asked me to contribute to the Craft Buds' Craft Book Month tour, I knew right away which project I would make:  the Baby Doll Carrier in the book Little Things to Sew by Oliver + S.


My daughter loves stuffed animals and baby dolls, and when she saw this Baby Doll Carrier in the pattern book Little Things to Sew, she begged me to make one for her.  Of course I agreed, and in a couple of hours, I had it finished!  


This book is full of wonderful O + S patterns for clothing, accessories, bags, toys, and more.  If you've ever sewn an Oliver + S clothing pattern, then you know the high quality of the patterns, the instructions, the pictures, and the graphics.  This book is no different and does not disappoint.

Picture Source:  Oliver + S Website
Ella loves wearing her favorite baby doll or stuffed animal around in the carrier like a real mom would.  The baby doll carrier is sized to hold a small (shown) or large doll or stuffed animal and has two different sets of buttons and velcro tabs to make the sizing adjustment when needed.  


It crisscrosses in the back and has a small little pocket in the front to hold a baby spoon or coupon when play shopping!


If you are like me, both storage space and funds are limited around my house.  Before I make the plunge and actually purchase most craft or sewing books, I normally check to see if my local library has it available.  If it does, I'll check it out and peruse it at my leisure, perhaps make a project or two, and then decide if it is really something I want to own.  That's exactly what I did for this book, Little Things to Sew by Liesl Gibson of Oliver + S.  When I did purchase it, I found it at Joann's Fabric & Craft Store and used a 40% off coupon!  Big score!

To learn more about Craft Book Month, the Craft Buds Blog Hop, and the contest, keep reading below. Also, be sure to check out the other Blog Hoppers to see what projects and craft books they've been using.  You might just find a few things to add to your wish list!

Craft Book Month

It's time for the 3rd Annual Craft Book Month at Craft Buds! This year, we're excited to celebrate all month log with a blog hop of your inspirational craft book projects, a crafty contest, free patterns and prizes!

Don't let those craft books sit on your shelf and collect dust! We want to see what you've been making. That's why I've teamed up with some fabulous bloggers who will be showing off their projects made from craft books, all month long!

Blog Hop

Week One
Monday 9/2: Fabric Mutt / LRstitched
Tuesday 9/3: Stitch This! The Martingale Blog / Stitched in Color
Wednesday 9/4: Fabric Seeds / Pile O Fabric
Thursday 9/5: The Feisty Redhead / Rae Gun Ramblings
Friday 9/6: Sew-Fantastic / Clover + Violet
Saturday 9/7: A Prairie Sunrise / Small Town Stitcher

Week Two
Monday 9/9: Hopeful Threads / Go To Sew
Tuesday 9/10: The Sewing Rabbit / Sewing Mama RaeAnna
Wednesday 9/11: Marci Girl Designs / imagine gnats
Thursday 9/12: Sew Sweetness / amylouwhosews
Friday 9/13: Lindsay Sews / 13 Spools
 Saturday 9/14: Inspire Me Grey / Angela Yosten 

Week Three
Monday 9/16: Sew Very / Craftside
Tuesday 9/17: The Littlest Thistle / CraftFoxes  

9/1-9/30: Link up your craft book project at Craft Buds from your blog or Flickr account, and enter to win prizes. Winners will be announced on Tuesday, October, 1!


To participate in the month-long contest, just link up any project you've made from a pattern in a craft book. That easy! You'll tell us a little about the book, the project, how you personalized it, etc.

Rules

1) One entry per person. 
2) Your craft book project must have been completed in 2013. 
3) Create a new blog post or Flickr photo (dated September 1, 2013 or later) and link back to Craft Buds/Craft Book Month in your post or photo description. In your post or photo description, make sure to list the craft book you used and provide a link if possible.
4) All winners chosen via Random.org. Some prizes available to international winners, so please join us!

Prizes

Visit Craft Buds and link up your craft book project during the window of Sept 1-30 and you'll automatically be entered to win some fantastic prizes from the Craft Book Month sponsors!

No time to make a project? You can also follow Craft Buds all month long for your chance to comment and win some new sewing and quilting books for your library.

 Craft Book Month at Craft Buds

Thanks for stopping by today!  Have fun sewing!

Follow on Bloglovin

Wednesday, June 12, 2013

Win 100 Size & Care Labels from Forever Threads 2!

Are you in the mood for a giveaway?  I thought so!  Keep reading to find out how to enter to win 100 size and care labels from Forever Threads 2!


About a year ago, I decided it was time to start putting some size and care labels in the items that I make for my daughter.  Her handmade wardrobe was growing exponentially, and I could no longer keep track of when I made what and by what size!  Plus, if I ever decide to sell or give away any of these pieces, I wanted to correctly represent their size.

So I went in search of a good online source for size and care labels that could be purchased in small quantities and not cost a fortune.  That's when I came across Forever Threads.  I ordered a variety pack of 100 labels for sizes 2T through 8 plus three different care labels.

I use them in almost every item I make now, and they hold up perfectly wash after wash.  They are woven labels that are soft and not scratchy, and Ella has never complained about them making her itch.


Fast forward several months when I saw a post on Facebook announcing that the Forever Threads' shop was closing so that the owner could spend more time teaching sewing classes through My Sew for Hope!  I immediately began counting labels to see what I needed to replenish, but to my relief, the owner Rita, decided to transfer the business on to her sister, Elise.

Since Etsy would not allow her to transfer the business name to her sister, Elise opened a new shop called Forever Threads 2!  She is now open for business selling the same size and care labels at the same amazing prices.  And to kick off the grand opening, all labels and buttons are 25% off through June 30th with coupon code WELCOME.  When you order labels from Elise, you'll also receive a coupon code good through June 30th for 25% off all items remaining in Rita's original shop Forever Threads (which will be closed after June 30th).


And since Rita was feeling so generous, she's offering up a 100 label assortment pack to two of my sewVery readers!  Thanks, Rita and Elise!

Two winners will each receive their choice of size and care labels in multiples of 10, 25, or 100 for a total of 100 labels.  Here's the selection to choose from...


Just enter the Rafflecopter widget below and two winners will be announced next Wednesday, June 19th!

a Rafflecopter giveaway

Follow on Bloglovin

If you can't wait that long or don't want to take the chance, you can always go ahead and purchase a pack of labels from Forever Threads2 and use coupon code WELCOME through June 30th for 25%!

Thursday, May 16, 2013

Roly Poly Pinafore + Pattern Giveaway

This pattern name is so fun to say--Roly Poly Pinafore--and it was a lot of fun to make, too!  The Roly Poly Pinafore is the first of what I know will be many great patterns by the multi-talented Rachael of Imagine Gnats.  In fact, if you saw my post from Tuesday, you know she already has a second pattern (the Tumble Tee) in testing that will be released soon.

Today though, I'm sharing with you my version of the Roly Poly Pinafore as part of the Roly Poly-along blog tour that is happening through the end of May.


When I first signed up to make a Roly Poly Pinafore for the blog tour, I had considered sewing together strips of a jelly roll and using the yardage created as the fabric for the top.  However, after sewing together all 40 strips of fabric (ugh!), I decided that it just wasn't the look I wanted to give this fun, playful top.  So, I riffled through my fabric stash and came across this colorful novelty print I bought last year called Woodland Friends by Ellen Crimi-Trent for Clothworks.  The reverse side is a quilting cotton I bought at the same time but have no idea of the name.


The Roly Poly Pinafore is so sweet and simple, yet the single pleat in the front and the cross over panels in the back set it apart from a basic a-line top or dress and add a touch of whimsy to the look.  This top is also apparently the perfect thing to wear for a day out at the playground!


The pinafore is completely reversible with no exposed seams, and both sides have their own set of in-seam pockets although I couldn't get my model to use them for any pictures!


Rachael has done an excellent job with this pattern.  I made Ella a size 5, and as you can see, it fits perfectly.  The pattern includes sizes 6 months to size 10, but the pattern pieces are separated out into two groups so you won't waste ink and paper printing out multiple sizes you don't need.  The pattern instructions also show you how to cut out the fabric with the pocket piece attached to the bodice pieces already or as separate pieces that you sew on.

Reversible tops and dresses are so easy to make and eliminate the need for pressing under hems and using the serger to finish raw edges.  Plus, if your child spills something on one side, you simply flip it over and they look all clean again!  Magic!

The overlap design in the back is ideal for climbing and swinging from monkey bars because it doesn't constrict your child's movement.  Plus, when the weather really heats up this summer, Ella can wear the Roly Poly Pinafore without the extra polo shirt underneath yet still be covered up.


Thanks, Rachael, for having me roll along in the Roly Poly-along Blog Tour!  It's been fun!

Can't get enough of the Roly Poly Pinafore?  Then you are in luck!  There are more Roly Poly sightings scheduled for every weekday for the rest of May.


5.13 Jill Made with Moxie / Stephanie The Crafty Kitty
5.14 Stephanie NeurosesGalore / Cherie you & mie
5.15 Ari Max California / Caila Caila Made
5.16 Veronica SewVery / Tara Girl like the sea
5.17 Nancy owen's olivia / Adrianna Crafterhours

5.20 Ajaire Call ajaire / Sarah EmmylouBeeDoo
5.21 Laura Craftstorming / Jessica a little gray
5.22 Frances Miss Matatabi / Nicke kiss kiss quilt
5.23 Amy formwork design / Kat Sew Chibi
5.24 Joanne Rose & Dahlia / Amanda Kitschy Coo

5.27 Celina Petit a Petit and family / Delia Delia Creates
5.28 Christy a.Amelia handmade / Carolyn Fake It While You Make It
5.29 Bonnie Fishsticks Designs / Maria La Inglesita
5.30 Jane Buzzmills / Kate Things for Charlie
5.31 Polly Jack & GeeGee / Molly Rose & Odin


Plus, you can enter my contest below for a chance to win your own copy of the Roly Poly Pinafore pattern, compliments of Rachael at Imagine Gnats!  Winner will be announced on Monday, May 20th!

a Rafflecopter giveaway

Follow on Bloglovin

Tuesday, May 7, 2013

Purse Giveaway!

Contest is now over!  Thank you for being a follower and for entering my contest!  Congratulations to Kristy of Hopeful Threads for being the winner!

In celebration of hitting a milestone of over 200 blog followers and almost 400 Facebook Likes, I've decided to give away a purse I made last year that I've never used.  It's beautiful and deserves to be used by one of my followers!

Read my original post about it here, and enter the contest below.  Contest is open to US Residents only.


I'm also participating in a huge fabric and pattern giveaway along with 17 other bloggers.  Pay careful attention to the bag above, and you should be able to figure out which fabric I've donated to the Fabric Match Up Giveaway.  It's from my favorite fabric designer, Joel Dewberry!

Thanks so much for stopping by!  I hope you'll decide to become a follower of my blog and my Facebook page so you can keep up to date on all the latest sewing projects I've finished and contests I am hosting. I can't wait to discover a few new blogs myself!


a Rafflecopter giveaway

Monday, May 6, 2013

Fabric Match Up Giveaway & Pattern Contest

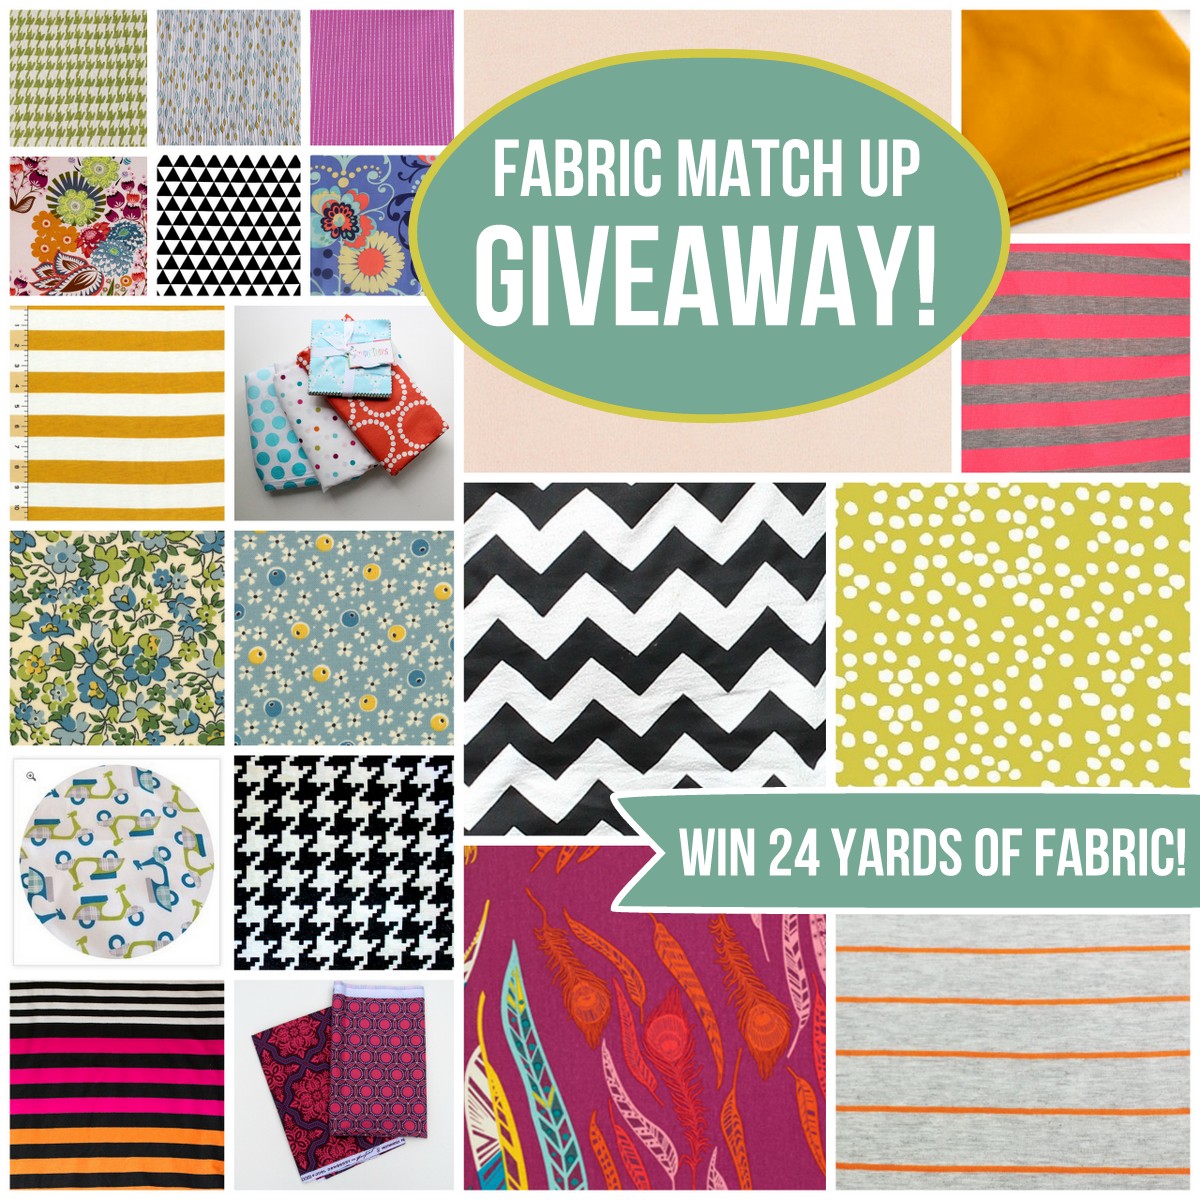
Today is the start of Sew Mama Sew Giveaway Day, and I'm participating in an exciting fabric giveaway hosted by 18 of your favorite bloggers!  There's a total of 24 yards of fabric that will all go to one lucky winner!  

Here's the catch.  You have to match the fabric to the blogger giving it away!  We are calling it the Fabric Match Up Giveaway!  Keep reading below on how to enter...

fabric match up giveaway- win 24 yards of fabric from your favorite bloggers!

Have you ever wished that your favorite sewing bloggers would go fabric shopping for you? Or seen a project on a blog and thought, "I could really use a yard or two of that fabulous fabric." If so, today is your lucky day!

Eighteen sewing bloggers picked out a yard (or two!) of a fabric from their stash and we're giving them ALL away to one lucky winner!

To win this awesome stash of fabric goodness, just match the fabric swatch to the blogger (hint- most of us have used the fabric we chose in a recent project, so our recent posts are your fast track to fabric matching success). The first person to correctly match all of the swatches will receive ALL of the fabric shown!

  fabric matching giveaway- win 24 yards of fabric from your favorite sewing bloggers!
A- 1.5 yards, Mini Dot in Sunspray by Lotta Jansdotter, B- 1 yard, Paradise Garden in Periwinkle by Amy Butler, C- Florescent Pink & Gray Striped Jersey Knit, D- 1/2 yard Heirloom Tile Flourish in Garnet and 1/2 yard Heirloom Opal in Fuchsia both by Joel Dewberry, E- 1 yard, Houndstooth in black by Michael Miller, F- Pink/Orange Stripe knit, G- 1 yard, Orange and Light Heather Gray Stripe Cotton Jersey Knit, H- 1 yard, Light pink linen, I- 1 yard, Mustard and Ivory Stripe by Girl Charlee, J- 1 yard, Rally Cream/Grass by Dan Stiles, K- 1 yard Riley Blake Ombre Dots in Aqua, 1 yard Target Polka Dot Sheet Fabric, 1 yard Lizzy House Pearl Bracelet in Persimmon and Michael Miller Happy Tones Charm Pack, L- 1 yard, Remix Triangles B/W by Ann Kelle, M- 1 Yard, Novella Rain Rayon in Aqua by Valori Wells, 1 yard, Lush Running Stitch in Purple by Patty Young, and 1 yard, Porcelain Tile Garden Wall in Olive, M- 1 yard, Mustard cotton sateen, O- 1 yard, Summer Totem in Grapefruit by Anna Maria Horner, P- 1 yard, Black and white chevron, Q- 1 yard, Parenthetical in Berry by Anna Maria Horner, R- 2 yards (1 yard each), ABC 123 by American Jane for Moda


Here is the list of bloggers (just in case you have a little research to do)

Boy, Oh Boy, Oh Boy crafts       The Cottage Mama                crafterhours
Craftiness is not Optional            delia creates                          girl. inspired.
icandy handmade                       If only they would nap...        imagine gnats
kojodesigns                               Melly Sews                            Nap Time Crafters
See Kate Sew                            Sew Country Chick                The Sewing Rabbit
sewVery                                    Sumo's Sweet Stuff               The Train to Crazy

pattern bundle giveaway

And just to sweeten the pot a little, every reader who submits a guess will be entered in a fabulous pattern bundle giveaway. 

The prize:
The Sugarplum Top + Dress pattern by See Kate Sew
The Surfer Slacks Lounge Pant pattern by See Kate Sew
The Casual Lady Top and Dress  pattern by Go To Patterns,
Two "Winner's Choice" patterns by Blank Slate Patterns,
Pattern 5 Pack ("Winner's Choice") by Peek-a-boo Pattern Shop,
Riding Pants pattern by the Sewing Rabbit, 
Roly Poly pattern by imagine gnats, and the
Ruby Ruffle dress pattern by The Cottage Mama! 

WOW!

Good luck!  Oh, and I would love it if you would become a follower of my blog and Facebook page, too!  

Check back here tomorrow for another giveaway I'll be hosting!  Here's a hint:  I'll be giving away a purse I made using some of the same fabric I'm giving away in the Fabric Match Up Giveaway!  

*Fabric Match Up Giveaway and Pattern Bundle Giveaway end at midnight MST on Friday, May 10, US residents only.

Wednesday, April 10, 2013

My Boyd St. Bowling Bag + Giveaway!

If you follow my blog regularly, you probably already know that I am a HUGE fan of the bag patterns from Emmaline Bag and Patterns.  Janelle does the most amazing job from conceptualizing a bag design, to creating the pattern pieces, to photographing and explaining in detail each step of construction.  In other words, she's very talented!

Well, Janelle's latest pattern for the Boyd St. Bowling Bag does not disappoint.  She teased everyone about a month ago with a picture of her test bag, and I knew immediately that I had to have it!

At some point this past year, Janelle and I started exchanging emails about bag hardware, fabrics, and other sewing related things.  So when I saw a message in my inbox from Janelle a few weeks ago, I wasn't surprised to hear from her, but I was surprised that she wanted ME to test out her pattern for the Boyd St. Bowling Bag!  I was so excited!


Immediately, I knew I wanted to the handles out of faux leather or vinyl.  I had never sewn with that material before--until now!  I was also drawn to the shape and style of bag which is a departure from all the other bags I have ever made.  I'll discuss my experience with sewing vinyl a little later in the post, but first, let's go over more of the actual bag details.

After making the Teardrop Bag, another pattern I purchased from Emmaline Bag & Patterns months ago, I knew I wanted to use canvas or duck cloth again for the lining.  I really like the way the duck cloth holds up without adding any interfacing to it, and it's not difficult to sew with even when layered with the outer bag fabric.


The inside also has a slip pocket and a zipper pocket both made from quilting cotton lined with a medium weight fusible interfacing.  I sewed down the middle of the slip pocket turning it into two smaller pockets perfect for holding my cell phone on one side and mints and lipstick on the other.


For the exterior of the bag, I used two different printed duck cloth fabrics in shades of off white, yellow, and gray that I purchased at Hobby Lobby.  This duck cloth is considerably thinner and softer feeling than the utility grade duck cloth I used for the lining.  I did apply interfacing (Pellon SF101) and fusible fleece to the wrong side of the exterior fabric to help give it more shape and support.


Construction of the bag itself was not difficult and would definitely be suitable for someone who has prior bag sewing skills or an intermediate seamstress.   The design of the bag includes two small pleats on the front plus the curved top piece which is ideal for using a coordinating fabric to match the bottom half of the purse.

Another feature of the Boyd St. Bowling bag that I love is the zipper closure across the curved top with a zipper pull on both ends to make opening and closing easier.  Janelle even shows you a super easy way to cut the fabric for the gusset so that your fabric pattern matches up.  See how the chevrons are all lined up properly in the photo below?


The pattern provides an option and instructions on how to construct a detachable adjustable strap that would hook onto the zipper pulls on either end using a swivel hook and D-rings.  I didn't think I would ever use the strap, so I chose not to make one.

The bottom of the bag is reinforced with a piece of Pellon Peltex 71.  This was my first time to use this type of interfacing, and I was quite pleased with the results.  Again, Janelle's instructions made sewing the bottom together a breeze!  The bottom of the bag is firm and sturdy and has six metal purse feet to not only help protect the bottom from wear and tear, but to also give it that more professional look.


To construct just the bag portion of this purse, I sewed on and off over the course of a day and a half.  Not bad considering I had lots of interruptions from Ella and had to run errands and get my son at school!

Now onto the vinyl handles and tabs.  As I mentioned above, this was my first time to ever sew with vinyl, and I was so excited to try it on this bag!  I found some really nice marine vinyl in the remnant bin at Joann's.  This type of vinyl is so soft and supple compared to the normal utility vinyl  that I think of when I hear the word vinyl.

I love how my vinyl handles eventually turned out!  They really make the bag look store bought and professional!  Don't you agree?


Anyway, Janelle gives very detailed instructions with lots of photographs on how to construct the strap tabs and handles--in both fabric and leather/vinyl!  Again, she taught me several new things and introduced me to some new sewing notions (like double sided wonder tape, upholstery thread, and a sewing needle for leather) that I had not tried before.  I always know that after I finish one of Janelle's patterns, not only am I going to have a terrific new bag to use, but I'm also going to be a much more experienced and knowledgeable sewer!


In order to sew the vinyl on my machine, I sometimes used my walking foot, my regular sewing machine foot, and my regular sewing machine foot with scotch tape on the bottom.  I also used a long stitch length of at least 4.  This part of my bag construction was definitely a challenge, but only because my old Bernina Record 830 from 1974 just doesn't have the power needed to sew through multiple layers of the vinyl.  I had to hand turn the wheel often just to get the needle to sew especially when I sewed the strap tabs to the bag body.  I also had to put a piece of stabilizer on the underside of the bag because the fleece was tangling the bobbin thread and not advancing the stitches properly.

After some lengthy email discussions with Janelle, I believe she decided to rate the Boyd St. Bowling Bag Pattern as suitable for an intermediate to advanced sewer with a note stating that prior experience and knowledge of sewing with vinyl or leather is recommended for those who want to make vinyl handles.   If you have a heavy duty or commercial grade sewing machine, then I would think sewing multiple layers of vinyl would be no problem for you!

Of course, her pattern gives full details on how to make the exact same strap tabs and handles using regular fabric which I know I will use the next time!  My machine should have no problem tackling multiple layers of regular fabric and interfacing.

I'm so looking forward to using my new Boyd St. Bowling bag.  It's gonna hold a lot of stuff since it's so big (roughly 16" L x 10"H x 5"W)!

So, what do you think?  Do you want to make a Boyd St. Bowling Bag for yourself?  Well, as of Monday, it's officially for sale at Emmaline Bags and Patterns along with hardware kits to make the bag in case you don't want to run all over town (like me) to find the supplies!

Janelle is also hosting a contest and offering up a copy of the Boyd St. Bowling Bag Pattern and hardware kit to two winners!  How awesome is that?!  You can enter the contest below and the winners will be announced on Wednesday, April 17th.

a Rafflecopter giveaway
Oh, and in case you'd like to see all the other bags I've made using patterns from Emmaline Bags and Patterns, just click the links below.  And Janelle just released another cool pattern for the Necessary Wallet Clutch that I purchased immediately!  Can't wait to try it out, too!


My Boyd St. Bowling Bag has been featured over at The Train to Crazy today!  Thanks, Andrea!

Photobucket