Contest is now over! Thank you for being a follower and for entering my contest! Congratulations to Kristy of Hopeful Threads for being the winner!
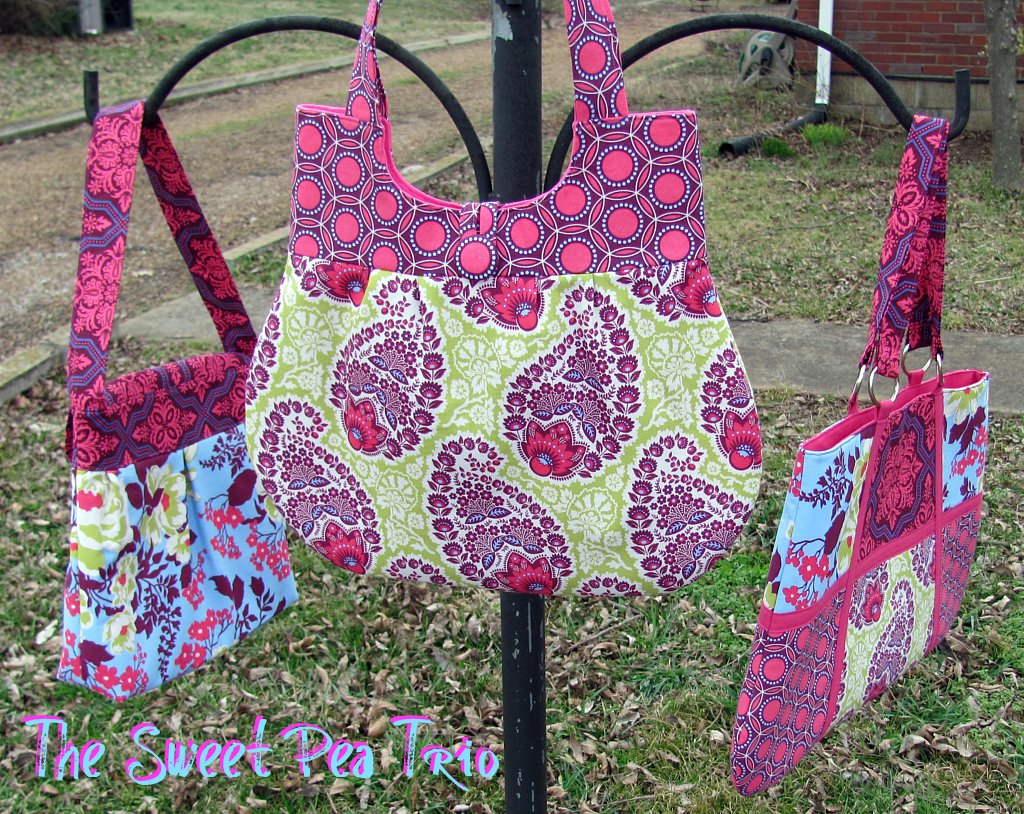
In celebration of hitting a milestone of over 200 blog followers and almost 400 Facebook Likes, I've decided to give away a purse I made last year that I've never used. It's beautiful and deserves to be used by one of my followers!
Read my original post about it here, and enter the contest below. Contest is open to US Residents only.
I'm also participating in a huge fabric and pattern giveaway along with 17 other bloggers. Pay careful attention to the bag above, and you should be able to figure out which fabric I've donated to the Fabric Match Up Giveaway. It's from my favorite fabric designer, Joel Dewberry!
Thanks so much for stopping by! I hope you'll decide to become a follower of my blog and my Facebook page so you can keep up to date on all the latest sewing projects I've finished and contests I am hosting. I can't wait to discover a few new blogs myself!
a Rafflecopter giveaway
Showing posts with label Sweet Pea Tote. Show all posts
Tuesday, May 7, 2013
Tuesday, February 12, 2013
The Teardrop Bag
After days of sewing and multiple roadblocks, I have finally finished my Teardrop Bag!
I bought this pattern months ago from my friend, Janelle, at Emmaline Bags and Patterns. I have really enjoyed using her patterns, and I can now say I have completed the Emmaline Bags and Patterns trifecta--The Emmaline Bag, The Steph in the City Bag, and now The Teardrop Bag! I feel like I deserve a really big prize, especially after conquering this last one.
As you know, not all projects go smoothly from start to finish. In fact, most of mine rarely (if ever) are done without some sort of issue (whether it's human error or machine error), but my Teardrop Bag endeavor had more than its fair share of challenges.
First, I printed out the pattern months ago when I purchased it. I read through the instructions on my computer then, too, but opted to not print them out. No big deal. I do that all the time to save paper, ink, and space. However, I can only guess that I failed to check the scale of the pieces I had printed out and taped together. I discovered this error only after I had cut out all the lining pieces and the rectangle pieces of fabric used to cut out the outer bag. My pattern pieces were 3/4" shorter in width than the fabric!
What I then learned is that when printing out pdf patterns on my HP Deskjet 1050 printer, I have to use an A4 paper size instead of Letter and make sure that I check the actual size option. I've been having issues with pattern printing for a while now in the form of some lines being cropped from the print area (but the pieces are normally to scale). I have no idea why I suddenly thought to try printing them out on A4 paper, but it seems to have solved all those printing problems! Yay!
Ok. So back to the issue at hand. Since I had already cut out several pieces using the scaled down pattern version, I had to run with it, which ended up being just fine because this bag is huge!
Now I've finished cutting out all my pieces, and I go to the ironing board to starting fusing the fusible fleece to the outer bag when I discover that my fabric has faded spots all over it on one panel. I then inspect the left over fabric more carefully and realize that roughly 1 1/4 yards out of the 2 yards of the Joel Dewberry Aviary 2 Bloom Granite fabric I ordered online was flawed! Luckily, there was enough undamaged fabric to cut out duplicate pieces of the ones that I had to replace. Ugh!
Next hurdle was deciphering the pattern instructions. You see, I opted to make my Teardrop Bag with both the optional gusseted zipper opening and the o-ring handle mounts--both of which were additions to the original pattern instructions. Because of this, you have to skip some of the original steps and jump to a different page here and there. With two children constantly running around and interrupting me, it's a wonder I got this bag finished at all!
I'm glad I made a gusseted zipper opening since I never have, and Janelle's written instructions and photographs made understanding each step of the process very clear.
However, I'm not sure I really like the gusseted zipper opening on this bag after all. I thought it would be nice to have since the opening of the bag is so large, but I find it somewhat awkward to zip and unzip. It actually requires both hands which sometimes can be a bother.
At first, I goofed up and sewed the zipper in wrong for the inner pocket. I was distracted by my children, (so they get the blame for this, too!) but I picked it out and fixed it. I learned how to sew a zipper pocket from Janelle's tutorial that is included with all her patterns. It's really a great tutorial!
I also added a slip pocket to store my phone and tin of mints. No problems with this step! Whew! But I wish I had sewn it in a little lower. The gusset zipper gets in the way of the top of the slip pocket.
I used a lot of pins to secure the outer bag to the lining before sewing them together. Because I used canvas fabric for the lining, the overall bag was rather stiff and at times a challenge to maneuver under my sewing foot. I have never been poked by pins as much as when I was sewing the outer bag to the lining!
All was going well on the third and final day of bag construction when I had to use the seam ripper to remove one stray stitch where I had sewn on the o-rings. I guess I don't know my own strength, because I pushed the seam ripper so hard that it slipped and sliced open the top of my left hand index finger. It began to bleed immediately, and I thought I would faint! I can't stand the sight of my own blood.
I'm not so sure I agree with Janelle's difficulty rating for the Teardrop Bag. She has it listed as Easy -- For Advanced Beginners. Now, like I said earlier, I've made all three of her bags, and the other two were listed as Intermediate to Advanced which I agree with her on that. But with the gusset zipper and o-ring handle options that I chose to tackle, I believe that the Teardrop Bag rating is most definitely an Intermediate to Advanced bag. Without those options, then I would agree with her rating. Would that distinction on her pattern have deterred me from tackling the exact same bag I made? Most definitely not!
Overall, I'm very excited about this bag and have really enjoyed using it the past several days. The exterior fabric is gorgeous, and I really love how nice the bag looks with the way I pieced the coordinating fabrics together.
This is the first time I have ever used canvas as the lining of a bag, and although it was a little challenging at times to sew, I'll use it again. I like how it makes the bag have more structure without using interfacing. In fact, the only other thing I used was some fusible fleece on the back side of the outer fabric in order to give it a little more strength.
So, there you have it! That all said, this is one whopper of a bag! I'd say it's the biggest I've ever made. Even bigger than this Sweet Pea Tote I made last year! Although I made my bag slightly smaller than the regular sized version (due to my printing error), Janelle's pattern offers you an option to make it even bigger! I think she refers to it as the XL size!
It's so much larger than what I would normally carry that I made up a matching zipper pouch to keep small items neat and tidy inside the larger Teardrop Bag. I also threw together a matching tissue holder. Since this post is now way too long, I'll share more about them another day.
Oh, and the bag matches the Commuter Cowl I made, too. Ella took this picture of me--not bad considering she's not even 4 yet!
Wednesday, February 15, 2012
My Third Sweet Pea Tote--The Big One!
UPDATE!
This Sweet Pea Tote was just featured on Shwin & Shwin! Please check out their blog and their link up party for more crafty inspiration!
I finally finished my third Sweet Pea Tote today, and it's the Big One! This bag was made using Simplicity Pattern 0387 or 2396 View C or D. Again, I can't say enough good things about these Sweet Pea Tote patterns. They have all been so easy to cut out and put together. The instructions are super simple.
The only reason this one took me so long to finish is that I could not find the 1 1/2" O-rings called for to attach the handles! I tried Michael's and Wal-mart first, only because they are very near my house, and then I had to go to two different Joann's to finally find them! If I decide to make more of these, I will definitely order the rings online. I've already found a shop on Etsy that sells them for a fraction of what I paid!
I'm glad I waited to get the O-rings to finish it instead of improvising with something else. I think they really add a professional touch to the overall appearance of the bag.
Again, I used Joel Dewberry's Heirloom collection of fabrics for the construction of this bag. I knew the coordinating fabrics would be perfect for the six panels on the front and back. The Joel Dewberry fabrics I used are as follows: Rose Bouquet in Sky, Tile Flourish in Garnet, Rose Bouquet in Sky, Opal in Fuchsia, Paisley in Amethyst, and Opal in Fuchsia. The handles are made with more of the Tile Flourish in Garnet.
I used some solid fuchsia cotton to make the lining and the bias tape trimming.
Now I just need to figure out what to do with all these bags! I guess I'll try to sell them. While I love the fabric and the overall bags themselves, I prefer to use basic black or brown purses myself. I'm just boring that way. Maybe I'll change my mind and decide to keep at least one of these pretty Sweet Pea Totes.
Here's the trio! I think I like the one in the middle best. A lot of other people must really like it, too. It's been pinned like 27 times already!
I know. I really need to find a better place to take pictures!
Don't forget to enter my contest for the Cute Little Wallet I made.
Enter the contest here if you haven't already!
Thursday, February 9, 2012
Simplicity 0386 or 2205 Sweet Pea Tote
UPDATE!
This bag has just been featured by KoJo Designs. If you are visiting here by way of Kirstin and Jordan's blog, then thanks for stopping by. I hope you'll come back again and follow along on my sewing adventures!

This bag has just been featured by KoJo Designs. If you are visiting here by way of Kirstin and Jordan's blog, then thanks for stopping by. I hope you'll come back again and follow along on my sewing adventures!
I finished up another great Sweet Pea Tote bag last weekend, but I hadn't taken any pictures of it until today. There were several things I needed to photograph, including Ella in a new outfit, and although it was a beautiful day here, my photos just didn't turn out as well as I had hoped.
Hopefully, you can look past all the flaws of my photography and see this wonderful bag! It really is quite nice, and I am again very impressed with the bag design and pattern by Sweet Pea Totes sold by Simplicity as Pattern 0386 or 2205. Like the last Sweet Pea Tote I made, I picked up this pattern at Joann's on sale for just $1. (BTW, Joann's is having another sale on Simplicity patterns starting on Feb. 17th).
I used some of my Heirloom by Joel Dewberry fabrics (Rose Bouquet in Sky and Tile Flourish in Garnet) that I picked up for a great deal just before Christmas at Modern Fabric Studio . I love, love, love this fabric and just ordered some more with a gift certificate I won there. I hope you all like this fabric as much as I do, because you will definitely see it again in the coming days as I post about some other items I've made.
This bag went together pretty easily; however, I made a mistake (the pattern shows it correctly and I didn't follow them as I should have) and sewed a couple of the pleats in the wrong direction. At first, I thought it was no big deal, but after I attached the top band, I realized that the pleats on the edge were meant to be folded toward the outside. So, I grabbed my handy dandy seam ripper and picked out just enough of the seam to flip the pleats. Now I will always (hopefully) check my pleat direction before basting and attaching other pieces!
Unlike the first Sweet Pea Tote I made, this bag has a flap that completely covers the bag opening. It is secured with a magnetic closure. Sorry I didn't get a picture of the inside of the bag, but the lining is made from a coordinating solid pink cotton fabric with a large pocket.
All in all, I think this is a great, medium sized purse. It's definitely one that I plan on making again!
Now, I've got one more Sweet Pea Tote that is almost finished. I just need to run to Joann's to pick up the hardware called for on the pattern and sew the handles on it. Both Michael's and Walmart (stores closer to my house than Joann's) don't carry purse making supplies anymore. What a bummer!
And here is a sneak peak at an upcoming post! The fabric is familiar, but can you guess what it is?
Also, I've got a contest going on right now. You can enter here for a chance to win this cute Little Wallet I made using more of the Joel Dewberry fabric.
Monday, January 30, 2012
Simplicity 0387 or 2396 Sweet Pea Totes
Last week, I broke down and actually used two pieces of my Joel Dewberry Heirloom fabrics! I figured it's time to start using those gorgeous designer fabrics instead of having them sit in a neatly stacked, yet beautifully combined, pile in my workroom.
A couple of weeks ago, I picked up two new Simplicity bag patterns on sale for a dollar each at Joann's. The bag I'm showing you today was my favorite look and is definitely my style. This was made using Simplicity pattern 0387 or 2396.
I chose to make Bag B (bottom right) on the pattern cover with Paisely in Amethyst and Opal in Fuchsia from Joel Dewberry's Heirloom collection. The lining was made from matching cotton fabric that I've had in my collection for a long time.
I'm thrilled at out the bag turned out! It was so simple to make, and had I been able to sit down and make it all at once, I think I could have finished it in roughly an hour and a half. UKMUMINUSA recently made this bag as well as you can see on her blog Cup of Tea and Slice of Cake (really, you should check out her bag, it is gorgeous!), and I totally agree with her that the most time consuming part of making this bag is cutting out all the pieces, and for me, fusing the interfacing to them. All in all, I thought the instructions were clear and that everything fit together perfectly.
The finished bag is roughly 11" high x 14" wide which is a nice medium size purse for carrying all the things we ladies like to carry. The pocket on the inside is large enough to hold a phone plus lipstick and maybe a pack of mints.
I couldn't believe that I got the fabric perfectly centered when I made the covered button using the circle pattern from the Opal in Fuchsia fabric.
Since I used a solid fabric for the lining, I still have roughly 3/4 a yard of each of my designer fabrics left. Because I bought the fabric on sale at Modern Fabric Studio and the rest of the supplies on sale at Joann's, I've only invested between $7 - $8 of materials in this bag. I think that is pretty good. Don't you?
Here's a sneak peak at some other projects I'm finishing up this morning. I'll be posting about them soon, too.
And I couldn't pass up sharing this photo of Ella with you. We should all be this happy in the morning! Have a great Monday!
Subscribe to:
Posts (Atom)