home tutorials features parties custom orders
Showing posts with label Hosh Pants. Show all posts

Monday, October 7, 2013

Bimaa Hoodie and Hosh Pants

If you've followed my blog for a while, then you've seen me use the Bimaa Top and Hosh Pants patterns a few times.  There's a reason for that--they are amazing patterns!  Both are cute, simple designs that can be sewn up in roughly an hour each!


When Sarah, the designer for Lou Bee Clothing patterns, asked me if I wanted to make another Bimaa top for her pattern tour, I could not resist--especially since she just added a hood option to the pattern! Wow! Now you can make the cowl neck, shawl neck, or hooded versions all with one pattern.  That's another plus in my book.


I had fun mixing directions of the stripes when putting together this top, and amazingly, this Bimaa hoodie only took 1 yard of 60" wide 4-way stretch knit fabric!


From my experiences with making the Bimaa twice before (see HERE and HERE for those posts), I decided to cut the sleeves much shorter this time.  I used the size 5T for everything but the length of the sleeves, and for that, I used just a little more than the 3T length.  Next time though, I think I'll have to use the size 6 (which was also just added to the pattern) for the bodice because Ella is growing so fast!

The Bimaa Hoodie was so easy to sew together.  I used my serger to sew everything except the topstitching around the hood!  If you don't have a serger, then you can still make this pattern using your regular machine and stretch or zig zag stitch.


Be sure to check out all the other blogs in the Bimaa Top Pattern Tour.  I promise you will see some incredible versions from all these talented bloggers!


Well, since I made Ella a new Bimaa top, she needed a new pair of pants to go with it, right?  We just bought these sparkly, black boots, and Ella has not wanted to take them off--at all!  So, she needed some skinny jeans that could fit down inside the boots.  I found this animal print denim fabric in my stash and cut out a new pair of Hosh Pants.  An hour later, the pants were done! Bam!


For the Hosh Pants, I used the size 5T, but again, I used a slightly shorter length (more like the 4T).  I definitely recommend comparing the length of a pair of pants that fit your child already to the pattern piece before cutting out your fabric!  You wouldn't want them too short, and if you are like me, I hate to cut things too long and waste fabric, too.


I added a couple of back pockets to the back to make them look more like store bought jeans. They are well camouflaged with this print though!


The pattern calls for an adjustable waistband, but I prefer to just make a regular waistband and insert elastic all the way around.

So, in about 2 hours times, you can make your special little one an all new outfit too!  Just head over to Lou Bee Clothing for these two great patterns--the Bimaa Top and the Hosh Pants!


Or, you can get the Bimaa Top Pattern as part of the Sew Fab Pattern Bundle!  Today is the last day to buy it, so hurry! The sale ends at 8. a.m. EST on Oct. 8th!

If you buy the bundle for $29.95, you'll get 26 patterns, including the Bimaa, all from different designers, and a whole collection of other amazing pdf patterns to make things like kid underwear, a fold over clutch, a women's cape, kid's cardigans, leggings, and more!  Just click the Buy It Now Button!

I am an affiliate for the Sew Fab Pattern Bundle sale, so when you purchase the bundle using this link, I get a percentage of the sale.  Thanks for your support!


And finally, just thought I would "leaf" you with these amusing pictures of my daughter.  This was pretty much my cue that the photo shoot was over!


Thanks for stopping by!  Have fun sewing!

Follow on Bloglovin

Saturday, May 11, 2013

Hosh Pants - Capri Style! + a Tutorial

One of my newest friends, Sarah from Emmyloubeedoo and Lou Bee Clothing asked me to join in on the fun to Fancy Up Your Hosh Pants.  This is a week long mini-series where other bloggers change up her Hosh Pants Pattern by detailing these already amazing pattern!

For my project, I chose to fancy up my Hosh Pants - Capri Style!


To make the Hosh Pants into a pair of Capri Pants is so simple to do.  For Ella's size 5T pair above, I cut them out as normal everywhere except for the length I used the 2T measurement.  

Now, I didn't stop there.  This fabric is a stretch cotton bottom weight, but as you can see, it's a rather busy print.  So in order to make them a little more interesting, I decided to add piping to a cuff at the bottom of the leg opening.  This is a breeze to do, and I've got a tutorial below to show you how you can do it too.


First, you'll need to cut out the two cuff pieces (1 for each leg opening) that are 3" long x the width of the leg opening. Then follow the steps below to put it all together.


Now wasn't that easy?  I told you so!


After I finished Ella's new Capri Style Hosh Pants, I remembered that I had this "whooneecorn" design from Planet Applique that she has been wanting me to put on a t-shirt.  Appliqueing this design on the shirt took longer than making the pants!  I'm not lying!


The shirt is the perfect compliment to these bright, cheerful capris.  I know this is going to be a favorite outfit for the summer!


These pants are so comfy to wear, and Sarah designed the waistband to prevent underwear from peeking out when little ones bend over or squat down while playing.  In other words, there is full coverage for the tushie!


Plus they have that nice, slim fit but because they are made with fabric that has some stretch to it, they keep their shape and adorable style all day long!


Don't have a copy of the Hosh Pants Pattern yet?  Then head over to Lou Bee Clothing (fast) and save 15% on your total purchase through May 12th using code FANCY15.

Want to see some other ways to Fancy Up Your Hosh Pants?  Then check out the faux pocket I added to a pair earlier this year plus all of the projects posted earlier in the week by other talented bloggers.  Links to their posts are below.  


Max California on May 6
Casa Crafty on May 7
Imagine Gnats on May 8
Alida Makes on May 9
Sew Chibi on May 10
sewVery on May 11
Emmyloubeedoo on May 12

Thanks again, Sarah, for inviting me on the Fancy Up Your Hosh Pants tour!  It was a blast!  Oh, and happy birthday this weekend!

Monday, April 15, 2013

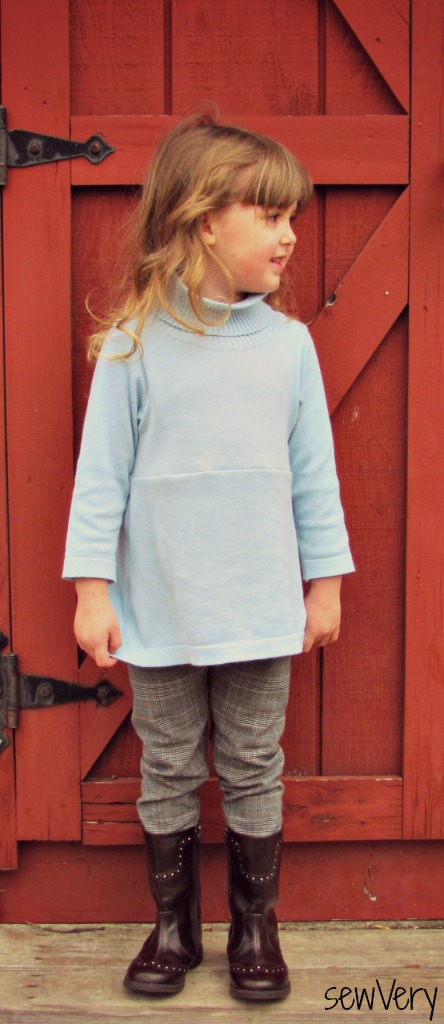
Hosh Pants & Skater Sweater Refashion

I am so behind in posting all the things I've made Ella over the last couple of months, so I hope this little outfit will inspire someone who is having cooler weather right now.  It's already warming up here in the south which really limits the days she has left to wear outfits like this.

Today I'm featuring the Hosh Pants Pattern by Lou Bee Clothing and a ladies' turtleneck refashioned into a girl's turtleneck using the Skater Dress Pattern by Kitschy Coo.


First, the pants are incredibly simple to make using Sarah's Hosh Pants Pattern.  The pattern has one piece for the legs, so there are no side seams.  Plus she shows you in detail in the pattern photos how to make an adjustable waistband using buttonhole elastic.  Since the pants have a flat front and my daughter's waistline measurement hasn't changed much, I opted to keep things even simpler and just make a casing to run regular elastic through the back waistband.

After consulting the pattern's sizing chart, I opted to make Ella the size 4T and added about an inch and a half to the length (she's tall for her age).  The fabric is a polyester/spandex suiting remnant that I bought from Joann's ages ago.  The fabric is so soft and was a breeze to sew.  Another plus is that it does not wrinkle!  I wash them and then hang them up to dry.  They have never needed ironing!

To make these pants look a little dressier, I added a pocket flap to the back.


All I did was take two rectangles of fabric, place them right sides together, and sew around the edges leaving an opening for turning.  Turn right side out, press, and then topstitch all the way around the rectangle closing the opening in the process.  I then stitched it on the back of the pants and sewed a button on it to keep it down.  No buttonhole required!


Since the legs are tapered and narrow at the bottom, these are perfect to wear inside tall boots.  The whole outfit looks like she is ready for a horse riding lesson!


I have a lot of sweaters that were once my mom's, but they are too big for me.  I've been holding on to them for so long and just can't seem to part with any, so I decided I would take some and try to refashion them into things for Ella.  

The sweater started out as a Land's End Fine Gauge Turtleneck Sweater in a women's size medium.


I thought about using the Bimaa Sweater Pattern from Lou Bee Clothing for the refashion, but I didn't have enough fabric from the sweater to make it.  It's a great pattern, too.  You can see the first one I made here, and I'll be blogging about a second one I made later this week.

Instead, I decided to use the Skater Dress Pattern from Kitschy Coo for the turtleneck refashion.  The Skater Dress is an awesome pattern that I got to try out as part of the pattern blog tour earlier this month.  Here is the link to the Skater Dress I made for Ella.

Sorry I didn't take pictures of the process, but it was really simple to do.  First, I cut off the sleeves along the armhole seam.  Then I used the bodice pattern piece and matched up the existing shoulder seam to the top of the shoulder on the pattern while positioning the pattern fold line along the center of the sweater.  This allowed me to keep the original turtleneck.

Next, I used the Skater Dress skirt pattern piece to determine the top and bottom width of the skirt and estimated the length needed.  Ella had tried the sweater on before I began cutting, so I knew roughly how much of the length I needed to remove.

I then cut the seam of the sleeves open so to give me flat pieces of fabric.  I then used the sleeve pattern piece by cut out the sleeves that fit Ella.  I made sure to use the hemmed edge so I wouldn't have to do any hemming!

Sewing the sweater together was quick (like maybe 30 minutes) and all on the serger.  When I finished the ensemble, Ella exclaimed that she now had a Moma outfit!  She was so giddy!


I just love the fit and overall look of this entire outfit.  It quickly became one of Ella's favorite things to wear, so I hope it will all still fit in the Fall.  She loves the softness of the pants fabric, and the fit is so good that she does not constantly tug at the back to pull up the pants after she squats down to play.

I'll definitely use both of these patterns--the Hosh Pants and the Skater Dress--again in the near future.  In fact, I might just make a pair of Hosh Shorts and a Skater Tank Sweater for this Spring/Summer.

I hope you'll come back all this week to see other pants I've made Ella recently.  At the end of the week, I'll post a round-up of all of the pants posts I've done on sewVery!  See you tomorrow!