home tutorials features parties custom orders

Monday, March 11, 2013

Valentine's Day Dolly Outfit Tutorial

Last month, I guest posted over at Nap Time Crafters in Amy's Dressing Up Dolly Series where I shared this fun tutorial on how to make your American Girl doll her own Valentine's Day outfit.  Now that Valentine's Day has come and gone, I thought I would repost this tutorial to give you some inspiration for making your dolly another seasonal outfit--like St. Patrick's Day or Easter!  Have fun!


A few months ago, I visited a friend who asked if I could make her daughter's doll an outfit.  You can read all about the matching skirts and bag here. When Amy announced her series, I thought of that post and decided to make an outfit for another friend's daughter's doll.  I know I could definitely use the practice making these tiny outfits.  This time, I documented each step of how to make the doll skirt and bag so you, too, can make a similar outfit for your little doll's doll!  

First, here's what you'll need to cut out to make the doll skirt and bag.  


Starting with the doll skirt, place the fabric right sides together and sew the side seams (the 7" long sides) using a 1/4" seam allowance .  Finish the seams by your desired method.  I serged the edges.

Before you begin sewing the purse, fold the main fabric and lining fabric in half so that each is now 5 1/2" W x 3" L.  Along the fold, cut out a 1" x 1" square.  Your purse fabrics should now look like those above.

Next, fold the purse main fabric in half as shown below with right sides together and sew the short edges together with a 1/4" seam.  Do the same with the purse lining fabric.  Press open the seams.

To create the purse straps, fold the fabric in half with wrong sides together and press.  Open this back up and fold in the raw edges toward the fold and press.  Fold the strip of fabric in half again along the original seam encasing the raw edges.  Sew along the open edge using a 1/8" seam allowance.


Now to finish the skirt...


Sew around the top using a 3/8" seam allowance making sure to leave at least a 1" opening for inserting the elastic.  Take a 10 1/2" piece of 1/4" elastic and run it through the casing you just created.  Sew the ends of the elastic together and then sew to close the opening in the casing.

Hem the bottom by stitching all the way around the skirt.  The skirt is complete!


Now, to finish up the bag, pinch the fabric at the holes in the bottom with right sides together so that the raw edges line up.  Pin and then sew together using a 1/4" seam allowance.  Do this for both the purse main fabric and the lining.  

Next, cut about 3" off of each purse strap.  We'll use one of these leftover pieces a little later, so don't throw them away just yet!


Sew the main fabric to the lining fabric using a 1/4" seam allowance.  Be sure to leave an opening that is at least 2" wide for turning the purse inside out. Once you have flipped the fabrics the right way, press the opening and then topstitch around the edge of the bag using a 1/8" seam allowance.  This will close the hole you used for turning.

At this point, I decided to make a simple little fob to attach to the purse handle.  Take one of the 3" long pieces that you cut off of the strap earlier and wrap it around one of the purse handles.  Stitch the ends together.  Then cut out two small hearts (mine are approximately 1" x 1").  


Now there are two ways you could do this next part.  I put the two hearts wrong sides together and then stitched around the edges leaving an opening at the top of the heart large enough to insert the end of the fob strap.  I then stitched over the fob strap when I finished sewing the hearts together.

Another way I could have done this is to have cut out a piece of heat and bond lite the same size as the heart and fused it to the back of one heart. Peel the backing off the heat and bond lite and place the end of the fob between the two hearts.  Iron according to the heat and bond lite directions and then stitch around the edge of the heart.


Now onto the t-shirt.  First let me say that I am very new to sewing with knits, and so far, I haven't been very successful.  But I'll keep trying! Anyway, I found an American Girl doll free t-shirt pattern online from Liberty Jane, and I used an old white baby onesie for the fabric.  


I had major problems sewing a nice hem at the bottom and neckline of the t-shirt.  Even though I used a double needle, both areas stretched out as I was sewing.  Also, I realized after the fact that I should have hemmed the sleeves before I sewed them onto the bodice of the shirt (I admit I did not follow the pattern instructions).  I became so frustrated with the neckline stretching out that I opted to just leave the sleeves as is.  The shirt is not a total loss though.  It's just not as nice as I'd hoped it would be!


I cut out two more little hearts and used heat and bond lite to fuse them to the fabric.  For the back closure, I sewed on a narrow strip of velcro.

Now my neighbor's little American Girl Doll, Maggie, is all ready for Valentine's Day! 


Linking up at these parties and others shown here!  

  

   photo blogbutton_zpsb1fa0f6d.jpg

Wednesday, March 6, 2013

Introducing the Bimaa Sweater

Tuesday a week ago was a very interesting day.  I was pleasantly surprised to receive an email from Sarah from EmmylouBeeDoo and LouBeeClothing asking me if I would be interested in testing out a new pattern--The Bimaa Sweater!  My friend, Andrea, from The Train to Crazy, had recommended that she contact me as a pattern tester!  I'm so glad she did.


Sarah has been blogging for a few years, and I have seen some of her projects on link up parties before, so I knew she was talented and had some great ideas.  However, I was a little hesitant to agree to test out her pattern because it is made out of knit.  Now, if you are a regular follower of my blog, then you know I don't sew with knit--at all!  Nope, I don't think I have a single post that includes a knit item.  That is, until now!

After chatting back and forth with Sarah and being up front with her about my fears of sewing with knit, I finally decided to give it a go and test her pattern.  She convinced me by letting me know that the Bimaa Sweater Pattern does not require the use of a regular sewing machine and can be made entirely with a serger!  She even sent me a link to a post of hers that had tips on how to adjust my Brother 1034D serger settings to sew knit fabrics.  

Now, to clarify, the Bimaa Sweater does not have any finished hems (the sleeves are cuffed and the bottom has a waistband), and that is why I was able to just use my serger to sew it together.  If you only have a regular sewing machine, you can certainly make this top with it by using a stretch stitch or zigzag stitch.  A serger is not required, but it definitely made it easy for me!

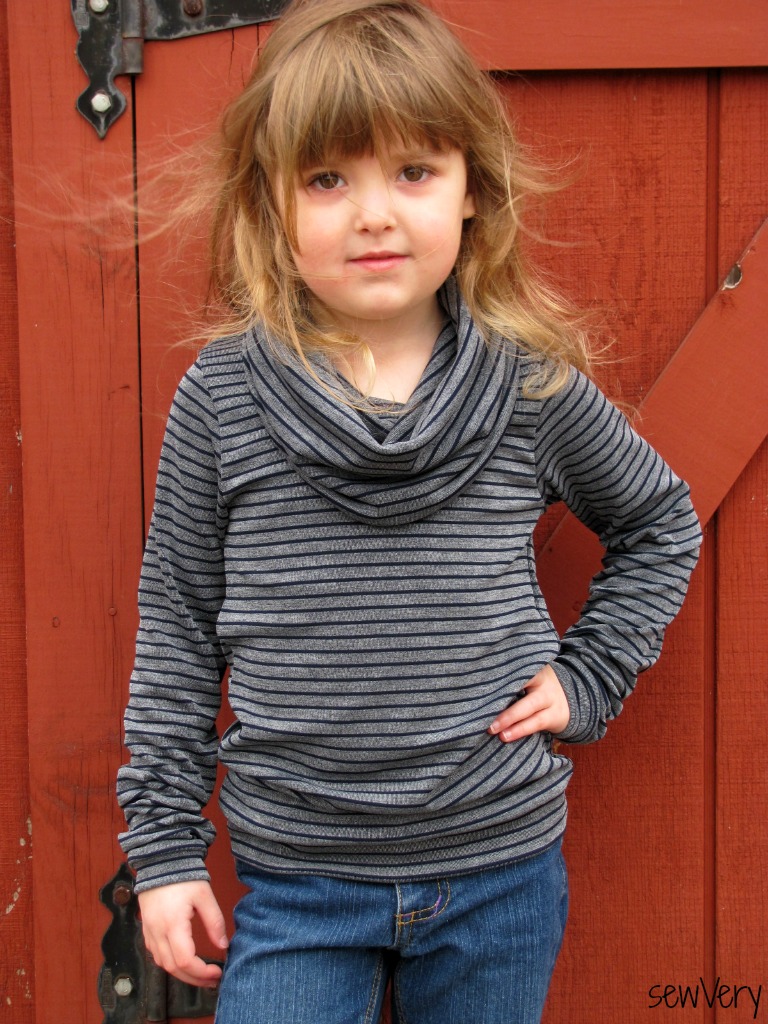
Since I don't sew with knits, I didn't have any knit fabric on hand.  I ran into Wal-mart where I picked up this 4-way stretch knit fabric for a $1.50 a yard!  Yep!  You read that right!  A $1.50 a yard.  Normally, I would never buy fabric from Wal-mart, but I had to turn this pattern test around pretty quickly and didn't have the time to go to Joann's.  Surprisingly, I'm very pleased with this Wal-mart knit.  It's a nice medium weight knit that feels soft and has just the right amount of stretch.

The Bimaa Sweater is such a fun look for little ones.  It has that slightly grown up feel to it without it being too mature.  Ella loves wearing this top and told my husband that I made her a Moma top!


I guess she thinks it looks like something I would wear, and I would if it came in my size.  I might just have to look into purchasing the Renfrew Top pattern to make myself a similar cowl neck top!

The Bimaa Sweater pattern comes in sizes 12 month to 5T.  I made the one Ella is wearing using roughly 1 1/4 yards to make the size 5T, and I was very pleased with the fit.  She'll definitely be able to wear this one again come fall.


I love patterns that give me more bang for the buck, and the Bimaa Sweater Pattern does not disappoint!  The Bimaa offers two different neck finishes--the cowl neck and a shawl collar--and either can be made out of pretty much any type of 4-way stretch knit! Plus, the shawl collar would look adorable sewn in a fun knit print for a boy!

Now I just need to pick up a few more pieces of 4-way stretch knit so I can make Ella a version or two using the shawl collar!  The cowl neck version only took me roughly an hour to make, including the time it took me to cut out and piece the pdf pattern pieces together.  The construction of this top is very straightforward, and Sarah made sure the pattern instructions were a cinch to follow with great photos and step-by-step details.


I'm definitely not as scared of knit as I was a week ago!  I know I'm just a novice knit sewer and still have a lot to learn, but sometimes it just takes the right project to help you overcome your fears!  And I not only learned something new to add to my sewing repertoire, but I made a new sewing friend in the process!

Please visit Sarah's blog, EmmylouBeeDoo, for lots of other inspiring projects and free tutorials, and be sure to stop by her Etsy shop, LouBeeClothing, to purchase the Bimaa Sweater Pattern.  While you are there, pick up her Hosh Pants Pattern for little ones, too.  I think they would look great with the Bimaa Sweater!

I can't wait to see what Sarah will be designing next!

Wow!  My Bimaa Sweater was featured at the following blogs.  Thanks so much!

Threading My Way_Featured

Alida Makes

Tuesday, February 26, 2013

The Envelope Clutch

Have you signed up the See Kate Sew's Envelope Clutch Sew-a-Long yet?  Better hurry.  After you sign up for the sew-a-long, you can find the free pattern here on Kate's blog.

I was a little hesitant to sign up at first thinking that I wouldn't have enough time to put a clutch together, but this bag super quick and easy to make!  Love it when a project is like that!  Don't you?


To make my Envelope Clutch, I used some fabric I had on hand.  The outer fabric is a heavy cotton denim that was a remnant from a pair of jeans I made my daughter a couple of months ago. I fused decor bond to the back of it to help the bag maintain its shape. The way I cut out the bag, the grain of the denim is on the diagonal and gives the finished clutch a little more visual interest.

The interior is a premium quality quilting cotton remnant I picked up at Joann's a while back.  Sorry I don't have the official name, but I think they still sell it.  (Update:  The fabric is a Keepsake Calico print called A Fuji Afternoon Umbrellas) I fused regular light weight interfacing to the back of the lining for a little extra support.  I find the colors and the umbrella pattern to be warm and fun, and it was a nice departure for me to use the print on the interior of the bag and the solid on the outside.  Here are some other purses and bags that I've made--Teardrop Bag, Steph in the City Bag, Emmaline Bag, Patchwork Purse, Charm School Handbag, and these three Sweet Pea Totes (1, 2, and 3).


For my Envelope Clutch, I did change up a couple of the details.  First, I used a magnetic snap in lieu of a button closure.  I avoid making buttonholes at all costs unless it is absolutely necessary!  However, the first time I put the bottom snap on, I measured incorrectly and had it placed way too high!  When I moved the snap down into the correct position, I was left with two small holes to cover up on the exterior--hence the sewVery label strategically placed!

Second, I'm really not a clutch kind of gal.  When I am out and about, I need both hands free in order to grab things at the store or to hold hands with my kids.  So, I added a gold metallic braided trim to the clutch as a purse strap.


To do this, I installed two large gold grommets on the back roughly 1" down from where the top folds over.  I ran the trim through the holes to the inside, zigzagged the ends individually and then seared them with a lighter before overlapping them and stitching them together again.


I'm very pleased with how the strap looks from the outside, but how the two pieces are connected on the inside looks real rough!  After consulting with some friends, I think I've decided to make a little fabric sleeve out of the lining fabric to wrap around the connection.  I just didn't get around to it before I took these pictures and wrote up this post!

Well, that's it!  Pretty simple even with my two slight modifications.  I've already added my photos to Kate's Envelope Clutch Sew-a-Long Flickr group.  Have you?


Saturday, February 23, 2013

Teardrop Bag Zipper Pouch & Tissue Holder

Sorry I haven't shared my matching Teardrop Bag Zipper Pouch and Tissue Holder with you until now. I've been very busy these last few days preparing items for a consignment sale, taking care of a sick little boy, cleaning house, and working on my new blog design.  Whew!

But I'm here today to show you the zipper pouch and tissue holder I made to go with my Teardrop Bag.


These two items were very simple to make. I used Simplicity 9949 Bag E to make both; however, I chose to line the zipper pouch (which the pattern does not do).


Nothing fancy here.  Just pretty plan and simple.  I like the size of this zipper pouch--the finished size is 5" x 8"--and I opted to add a loop and button closure to the tissue holder just for fun.


Again, I used Joel Dewberry's Aviary 2 Bloom in Granite and Ironwork in Granite for the exterior and canvas duck cloth for the lining.  Love these fabrics!

Love them so much that I think I'll make another pouch or two out of it for the Make Because She's Worth It Campaign.


If you haven't heard about this already, it's an effort among the sewing/crafting community to help stop human trafficking and slavery of women and girls.  Other bloggers and readers are combining forces to Make zipper pouches and bracelets to give to those women and girls who are rehabilitating from sexual slavery.

I hope you'll consider joining this worthy effort.  If so, please visit The Train to Crazy or the She's Worth It websites for more information.

Friday, February 15, 2013

Dangerous with Scissors Sewing Bag


My super talented friend, Heather from The Sewing Loft, asked me to test out a new machine stitched embroidery design she developed--Dangerous with Scissors!


It took only 20 minutes to stitch up on my Brother PE770 embroidery machine and another 30 to 40 minutes to make this sewing bag.


What a super cute quick project!  And I needed a little bag just like this to carry some sewing to work on while I wait for my daughter at dance lessons!

If you'd like to snag this fun embroidery design for yourself, head over to The Sewing Loft where Heather is generously offering the file for free when you subscribe to her newsletter!


To make my bag, I cut out two pieces of canvas fabric that were roughly 12" wide by 18" long. Since this fabric is already very thick, I only used a piece of tear away stabilizer as backing for the embroidered side.  After stitching out the design, I sewed the canvas pieces together to make the simple bag then inserted the gussets at the top for the handles.

I had thought I would buy some rope to use for the handles, but at the last minute I decided to just use some fabrics I had on hand that had lots of purple in them which matched the thread I used for the Dangerous with Scissors design.


I cut out three 1" strips of fabric the width of the fabric (roughly 42") and then braided them together. Slip the ends through the gussets and tie them off with a sturdy knot.  These handles ended up being just the right length for me in case I want to carry the bag on my shoulder.


This cute Dangerous with Scissors embroidery design would also be ideal for use on a zipper pouch, apron, pillow, or t-shirt for a sewer or a hair stylist. And don't forget, Heather's offering the design file for free when you subscribe to her newsletter at The Sewing Loft.

Tuesday, February 12, 2013

The Teardrop Bag


After days of sewing and multiple roadblocks, I have finally finished my Teardrop Bag!


I bought this pattern months ago from my friend, Janelle, at Emmaline Bags and Patterns.  I have really enjoyed using her patterns, and I can now say I have completed the Emmaline Bags and Patterns trifecta--The Emmaline Bag, The Steph in the City Bag, and now The Teardrop Bag!  I feel like I deserve a really big prize, especially after conquering this last one.

As you know, not all projects go smoothly from start to finish.  In fact, most of mine rarely (if ever) are done without some sort of issue (whether it's human error or machine error), but my Teardrop Bag endeavor had more than its fair share of challenges.

First, I printed out the pattern months ago when I purchased it.  I read through the instructions on my computer then, too, but opted to not print them out.  No big deal.  I do that all the time to save paper, ink, and space. However, I can only guess that I failed to check the scale of the pieces I had printed out and taped together.  I discovered this error only after I had cut out all the lining pieces and the rectangle pieces of fabric used to cut out the outer bag.  My pattern pieces were 3/4" shorter in width than the fabric!

What I then learned is that when printing out pdf patterns on my HP Deskjet 1050 printer, I have to use an A4 paper size instead of Letter and make sure that I check the actual size option.  I've been having issues with pattern printing for a while now in the form of some lines being cropped from the print area (but the pieces are normally to scale).  I have no idea why I suddenly thought to try printing them out on A4 paper, but it seems to have solved all those printing problems!  Yay!

Ok.  So back to the issue at hand.  Since I had already cut out several pieces using the scaled down pattern version, I had to run with it, which ended up being just fine because this bag is huge!

Now I've finished cutting out all my pieces, and I go to the ironing board to starting fusing the fusible fleece to the outer bag when I discover that my fabric has faded spots all over it on one panel.  I then inspect the left over fabric more carefully and realize that roughly 1 1/4 yards out of the 2 yards of the Joel Dewberry Aviary 2 Bloom Granite fabric I ordered online was flawed! Luckily, there was enough undamaged fabric to cut out duplicate pieces of the ones that I had to replace.  Ugh!

Next hurdle was deciphering the pattern instructions.  You see, I opted to make my Teardrop Bag with both the optional gusseted zipper opening and the o-ring handle mounts--both of which were additions to the original pattern instructions.  Because of this, you have to skip some of the original steps and jump to a different page here and there.  With two children constantly running around and interrupting me, it's a wonder I got this bag finished at all!


I'm glad I made a gusseted zipper opening since I never have, and Janelle's written instructions and photographs made understanding each step of the process very clear.


However, I'm not sure I really like the gusseted zipper opening on this bag after all.  I thought it would be nice to have since the opening of the bag is so large, but I find it somewhat awkward to zip and unzip.  It actually requires both hands which sometimes can be a bother.

At first, I goofed up and sewed the zipper in wrong for the inner pocket.  I was distracted by my children, (so they get the blame for this, too!) but I picked it out and fixed it.  I learned how to sew a zipper pocket from Janelle's tutorial that is included with all her patterns. It's really a great tutorial!


I also added a slip pocket to store my phone and tin of mints.  No problems with this step!  Whew! But I wish I had sewn it in a little lower.  The gusset zipper gets in the way of the top of the slip pocket.


I used a lot of pins to secure the outer bag to the lining before sewing them together.  Because I used canvas fabric for the lining, the overall bag was rather stiff and at times a challenge to maneuver under my sewing foot.  I have never been poked by pins as much as when I was sewing the outer bag to the lining!

All was going well on the third and final day of bag construction when I had to use the seam ripper to remove one stray stitch where I had sewn on the o-rings.  I guess I don't know my own strength, because I pushed the seam ripper so hard that it slipped and sliced open the top of my left hand index finger.  It began to bleed immediately, and I thought I would faint!  I can't stand the sight of my own blood.

I'm not so sure I agree with Janelle's difficulty rating for the Teardrop Bag. She has it listed as Easy -- For Advanced Beginners.  Now, like I said earlier, I've made all three of her bags, and the other two were listed as Intermediate to Advanced which I agree with her on that.  But with the gusset zipper and o-ring handle options that I chose to tackle, I believe that the Teardrop Bag rating is most definitely an Intermediate to Advanced bag.  Without those options, then I would agree with her rating.  Would that distinction on her pattern have deterred me from tackling the exact same bag I made?  Most definitely not!

Overall, I'm very excited about this bag and have really enjoyed using it the past several days.  The exterior fabric is gorgeous, and I really love how nice the bag looks with the way I pieced the coordinating fabrics together.


This is the first time I have ever used canvas as the lining of a bag, and although it was a little challenging at times to sew, I'll use it again.  I like how it makes the bag have more structure without using interfacing.  In fact, the only other thing I used was some fusible fleece on the back side of the outer fabric in order to give it a little more strength.

So, there you have it!  That all said, this is one whopper of a bag!  I'd say it's the biggest I've ever made.  Even bigger than this Sweet Pea Tote I made last year!  Although I made my bag slightly smaller than the regular sized version (due to my printing error), Janelle's pattern offers you an option to make it even bigger!  I think she refers to it as the XL size!


It's so much larger than what I would normally carry that I made up a matching zipper pouch to keep small items neat and tidy inside the larger Teardrop Bag.  I also threw together a matching tissue holder.   Since this post is now way too long, I'll share more about them another day.

Oh, and the bag matches the Commuter Cowl I made, too.  Ella took this picture of me--not bad considering she's not even 4 yet!


Linking up at these parties as well as others shown here.

Sumo's Sweet Stuff

125

This bag has been featured at these fun parties!  Thank you!

125Photobucket