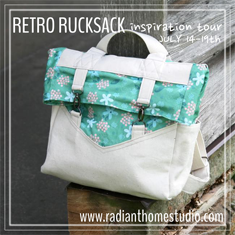
I really enjoy sewing purses and bags. They are typically projects that are more involved and challenging than sewing a typical child's garment. When I sewed my first purse more than two years ago, I was pleasantly surprised by how much I enjoyed making it, and to this day, I continue to love the challenge of a purse or bag pattern!
Recently, I had the privilege of meeting Sara from Radiant Home Studio. She contributed her Water Bottle Tote pattern to the Perfect Pattern Parcel #3 bundle, and I chose to sew one up for the pattern tour. As you can read in my post about my Water Bottle Tote, I was very impressed with Sara's pattern and design skills, so when she asked me to be a part of her Retro Rucksack Pattern tour, I did not hesitate to say yes!
Until now, I've never sewn a backpack style bag. I enjoy wearing/carrying backpacks when I'm at the zoo with the kids or on vacation and walking around in a city. They are comfortable to wear and ideal for transporting all the items a mother needs to have on hand.
The Retro Rucksack provides plenty of storage, especially when the top is unfolded, and ample security when folded and buckled close.
Sara's Retro Rucksack Pattern is a unique design that contains some fun features. As mentioned before, it can be worn as a backpack, but the way the straps are installed on the bag, the top strap can adjust and become a shoulder strap or a regular carrying handle. I left my strap fairly long so that I could comfortably wear it on my shoulder.
Sara's instructions were easy to follow and the bag came together fairly quickly. However, I did make a few slight changes to my bag from her original design. I also opted not to add any interior pockets.
First, I added Pellon Shape Flex SF101 interfacing to the all the Echino linen/cotton blend fabric that I used on the bag. This helped provide the bag with a bit more structure without making it too stiff.
Second, since I was using a directional print for the "V" shaped fabric that is on the front and back, I cut it in two pieces adding seam allowance at the bottom. I also added a bottom support insert to give the bottom of the bag a defined shape. I made it using a tip I learned from the Totes Ma Tote Pattern by Emmaline Bags that I made recently. Basically, it's a piece of Pellon 72F fused between two pieces of Shape Flex. I really like the resulting form it gave the bag bottom.
Next, I opted to not create the recessed zipper opening and left the top like a large zipper pouch! I just fold that top portion under roughly 4" when I want to buckle the bag shut.
Finally, I decided to used plain old d-rings to create a simple belt-like buckle closure for the straps on the front of the bag. I added a small tab to the end of the bottom straps to cover the raw edges and to add another detail element to the bag. I love how it turned out!
Lately, I've taken to upcycling purse hardware when I can, or in the case of the slider buckles on the Retro Rucksack, I had to! I searched lots of stores locally and online and could not find the 1 1/2" slider buckles needed for the adjustable straps. Instead, I visited my local Goodwill Outlet store and found a couple of luggage or messenger bag straps that had matching buckles. I also salvaged the matching teal blue zipper from a bag I found there! The only new hardware I purchased were the d-rings for the front and back of the bag.
For more tips on upcycling purse hardware, read my blog post HERE!
I made sure to do one final thing though before I started using it. I treated it with Scotchgard Fabric Protector! Now liquids will roll right off of the fabric and dirt will wash off easily with a damp rag.
The Radiant Home Studio Retro Rucksack was a fun sew, and I am enjoying the bag already. Be sure to check out all the other amazing Retro Rucksack bags on the Inspiration Tour. I've seen a few that I would love to call my own for sure!
Retro Rucksack Inspiration Tour:
Tuesday, July 15th
Quarter Incher || Dandelion Drift
Wednesday, July 16th
Glitter + Wit || EmmylouBeeDoo
Thursday, July 17th
Casa Crafty || Behind the Hedgerow
Friday, July 18th
SewVery || Raspberry Sunshine
Saturday, July 19th
Mia's Creations || Made By Sara
Be sure to grab a copy of the pattern for yourself and make your own, too!
Pattern: Retro Rucksack from Radiant Home Studio
Fabric: Echino Decoro Bee in Blue and Echino Decoro Pipi in Blue both purchased from Low Price Fabric.com plus Duck Cloth from Joann's
Hardware: D-rings purchased at Walmart and at Textile Fabrics while all other pieces were salvaged using my
Difficulty: Challenging but not difficult. Best for an intermediate sewer.
Would I Sew This Pattern Again: Most definitely!
Have fun sewing!


I really love the variety of fabrics that you used on this one! Thanks for showing how you used the seam on the bottom to work with the directional print. I like the way it looks with the rolled top too! Cindy did the same thing :)
ReplyDeleteYour bag looks amazing. I adore the fabrics and love the modifications you made to it especially not including the recessed zipper. It gives even more room if needed. I've really enjoyed seeing everyone's version of this bag.
ReplyDeletenicely done! Love the colours!
ReplyDeleteI love echino! and I like what you did with the zipper. I considered that as well!
ReplyDelete