
Has anyone else caught the Made by Rae Washi Dress/Tunic fever?! I know I have! This tunic is my second Washi pattern item, the first was a Washi dress, and I think I love it even more than the dress!

And I just learned that Rae has added a pattern piece for adding long sleeves! I can't wait to try that out.
If you recall from my post on making the Washi dress, I didn't make a muslin before I jumped right in and made the real thing. The fit of that dress was quite good, but there were a few things I wanted to do differently when I put together the tunic.
First of all, I lowered by about a half inch the dart for the bust. In order to do this, I just traced the pattern bodice piece again and adjusted the dart location accordingly. This made the bodice of the top fit better on me for sure.


Secondly, I started the rows of shirring about 3/4" to 1" lower than where the pattern specified. This adjustment also provided me with a better fit by preventing the back from having that "riding up my back" feeling.


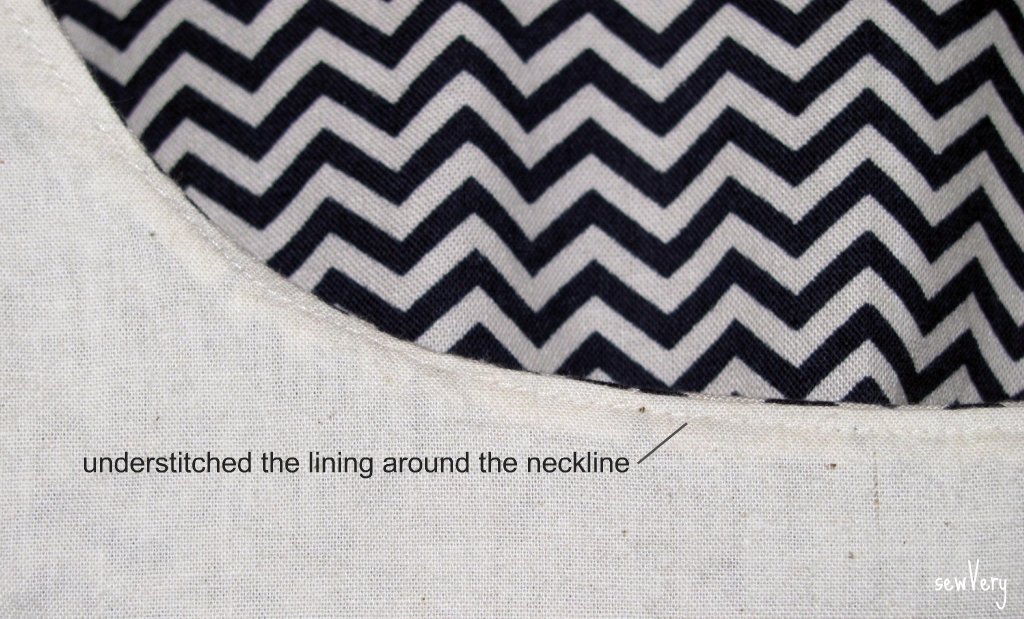
I don't remember Rae's tutorial including under stitching of the lining along the neckline, but I added this in order to help keep the neckline seam nice and smooth.
I'm not a big fan of hand sewing, so if you are one of those people that wants the inside of a garment to look as lovely as the outside, then you better skip this next picture!

From now on, I'll definitely be lining the bodice instead of using facings. This method was just as quick and easy, but in the end, you don't have to worry about the facing pieces trying to pop out the neck opening.


And the final adjustment I tried to make didn't work out like I had hoped. When I made the dress, I went with the U-shaped cutout along the neckline, but I felt like the top was constantly gaping open. For the tunic, I decided go with the basic scoop neckline and cut the shoulder width and neckline by the XS size of the pattern while using the M size for everything else. Sadly, this didn't resolve my problem as you can see in some of the pictures.

If anyone has any suggestions on what I should try next, please leave me a comment! The gaping is not a huge problem, but I am definitely aware of it, especially when I have to bend over.
When I wore this top and the dress at Sewing Summit, I had people constantly saying they loved it and asking me if I made it. This time, I was proud to say, "Yes, I made it!", and I know for a fact that a few people immediately pulled out their phones or ipads and looked up the pattern!

So you'll definitely be seeing more Washi dresses and tops from me in the future--most likely very soon! I've got some beautiful voile fabrics that I've been hoarding, and I'm going to be totally selfish and make myself a long-sleeved Washi tunic with it.

SO cute, V! I really like the mini chevrons! I just ordered some jersey chevrons, but had thought about the chevron dress! Is this just quilting cotton fabric/where did you get it? Just wondering so I know a good source! Thanks for sharing!
ReplyDeleteThanks, V! Yes, it is just quilting cotton that I picked up at Joann's a while back. Not sure I've seen anymore there since then though. Can't wait to see your chevron dress!
DeleteThat is very cute. It doesn't loot like it was too hard to make. I am going to check out Washi Patterns.
ReplyDeleteThanks for commenting on my Washi :) I love yours too- it's so versatile and will look so cute with a pair of jeans too! As for the gaping, (and i haven't done a whole lot of adult-sewing, so... maybe i'm clueless) maybe try scooping out the neckline more so it's rounder? I cut my neckline about 1" deeper than the pattern suggests (i followed what kristin at Skirt As Top did- read her two washi posts... i think she said her first maybe gaped a bit.) so the bottom part of my neckline is wider and rounder, but eventually comes back up to the same place at the shoulders as the original design does. I don't know. Could work? Anyway, I gotta get on a washi dress!!!!
ReplyDeleteThanks for the tips! My only concern is that if I cut it deeper, it will be too low and my bra will show! I'll check out the posts you recommend, too, and see if I can figure out what to do!
DeleteA very flattering top, Veronica!!!
ReplyDeleteSo cute! I've never heard of "washi" related to clothing...so cool. I'm a beginner sewist, so this may not be my next project, but one to shoot for down the road. Thanks for sharing. Found you at the Project Inspire linky party. -Lauren
ReplyDeletehttp://thethinkingcloset.wordpress.com
Beautiful job! Thanks for sharing! Love the fabric choice. :)
ReplyDeleteVery cute! Found this via Train to Crazy linky and hey look, Erin already gave me a plug! Sweet! ;) Yes i think if you scooped out the lower sides of your neckline a bit, it may help it lay better on your chest? I think going a little lower wouldn't hurt either. I think if you eliminate the gaping with a deeper neckline, your bra will be LESS likely to show...kinda counterintuitive...maybe try a muslin? Interesting how different everyone's bodies are!
ReplyDelete