I got together with a few friends for a Secret Santa Gift Swap recently, and this is what arrived in the mail for me!
Stacey from Boy, Oh Boy, Oh Boy! sent me this amazing gift filled with all the things I like! She sent pretty fabric by Anna Maria Horner with a matching purple zipper...
and this fabulous leather--yes, I said leather--clutch that she made using See Kate Sew's Tutorial.
She even threw a little treat inside the bag for my children--lots of lollipops! I would have shared a picture of those, but the kids quickly confiscated them!
Thank you so much, Stacey! I look forward to using the clutch and to making something wonderful with the beautiful fabrics and zipper.
Oh, and just a little side note. Stacey just released her first ever pdf pattern for sale TODAY--the Bond Top Pattern! Congratulations! Be sure to show her some support and check it out!
Check back tomorrow to see what I sent my Secret Santa recipient. I liked it so much that I made one for myself, too!
Are you participating in any fun holiday gift swaps? If so, I'd love to hear about it! Happy holidays!
Wednesday, December 18, 2013
Saturday, December 14, 2013
War Eagle Norah Dress!
Some of you may already know this about me, but I am an Auburn fan. For others, you may have no idea what that means. I'll try to explain it briefly.
You see, I grew up in Alabama where there is a huge football rivalry between the two major universities in the state: Auburn University and the other school, the University of Alabama. When I was a little girl, it was a family tradition for my family to go to the home football games in Auburn and tailgate before the game. We would picnic, walk up to the bookstore to buy a game t-shirt or some other item emblazoned with the AU symbol, toss around a nerf football for a while, and then walk on over to the game. At the time, I cared little for the game itself and mainly wanted to see and hear the band at halftime. This is where I first dreamed of becoming a majorette and twirling a baton while wearing a sparkly, sequined uniform. But I digress.
Auburn is where I (as well as my mother, father, brother, and sister-in-law) attended college and where my brother and his family now live. It's more than just a town or a university to me. It's a place where I first lived on my own, dated my husband, and made friends I'll have for the rest of my life. It's a place where a lifetime of good memories for me were formed. And while I may not always know the name of every football player on the team or even who they are playing next week, I am as much a fan as ever and always will be.
So come January 6th, 2014, I'll be watching the BCS National Championship game rooting yet again for my Auburn Tigers to win! I wish my mom and dad (but especially my dad because he was a HUGE Auburn football fan) were still alive to see it, too.
Now, you might ask what all this Auburn football talk has to do with another Norah Dress. Well, I have a friend who asked me recently to make an Auburn dress for her niece. I've been hoarding this adorable orange and blue tiger head and polka dot fabric from Fabric Finders forever! Since we don't live near Auburn or ever get to go to the games, I hadn't used it to make Ella a dress. I was super excited to finally sew with it and make it into this adorable reversible War Eagle Norah Dress version for that special little girl!
As you may have seen yesterday, I made Ella a Christmas dress using the Norah Dress pattern from Welcome to the Mouse House. While the pattern provides you with instructions on how to make a partial lining for the dress, I chose to fully line (or make reversible) this sleeveless version in the Auburn fabric and a navy/white flower print on the reverse.
This pattern is a joy to sew with and super simple. No zippers or buttonholes to make.
I'm even considering making a reversible version with a collar that could flip to either side. Again, I'm impressed with everything about the Norah Dress pattern from the pattern pieces and instructions themselves, to the styling options, to the fit. It's a pattern that should be in every seamstresses' collection.
I think this 2T version may be a slightly big on the little girl for the upcoming game, but I hope it fits her perfectly for the Auburn football season all next year.
War Eagle! Hey!
You see, I grew up in Alabama where there is a huge football rivalry between the two major universities in the state: Auburn University and the other school, the University of Alabama. When I was a little girl, it was a family tradition for my family to go to the home football games in Auburn and tailgate before the game. We would picnic, walk up to the bookstore to buy a game t-shirt or some other item emblazoned with the AU symbol, toss around a nerf football for a while, and then walk on over to the game. At the time, I cared little for the game itself and mainly wanted to see and hear the band at halftime. This is where I first dreamed of becoming a majorette and twirling a baton while wearing a sparkly, sequined uniform. But I digress.
Auburn is where I (as well as my mother, father, brother, and sister-in-law) attended college and where my brother and his family now live. It's more than just a town or a university to me. It's a place where I first lived on my own, dated my husband, and made friends I'll have for the rest of my life. It's a place where a lifetime of good memories for me were formed. And while I may not always know the name of every football player on the team or even who they are playing next week, I am as much a fan as ever and always will be.
So come January 6th, 2014, I'll be watching the BCS National Championship game rooting yet again for my Auburn Tigers to win! I wish my mom and dad (but especially my dad because he was a HUGE Auburn football fan) were still alive to see it, too.
Now, you might ask what all this Auburn football talk has to do with another Norah Dress. Well, I have a friend who asked me recently to make an Auburn dress for her niece. I've been hoarding this adorable orange and blue tiger head and polka dot fabric from Fabric Finders forever! Since we don't live near Auburn or ever get to go to the games, I hadn't used it to make Ella a dress. I was super excited to finally sew with it and make it into this adorable reversible War Eagle Norah Dress version for that special little girl!
As you may have seen yesterday, I made Ella a Christmas dress using the Norah Dress pattern from Welcome to the Mouse House. While the pattern provides you with instructions on how to make a partial lining for the dress, I chose to fully line (or make reversible) this sleeveless version in the Auburn fabric and a navy/white flower print on the reverse.
This pattern is a joy to sew with and super simple. No zippers or buttonholes to make.
I'm even considering making a reversible version with a collar that could flip to either side. Again, I'm impressed with everything about the Norah Dress pattern from the pattern pieces and instructions themselves, to the styling options, to the fit. It's a pattern that should be in every seamstresses' collection.
I think this 2T version may be a slightly big on the little girl for the upcoming game, but I hope it fits her perfectly for the Auburn football season all next year.
War Eagle! Hey!
Friday, December 13, 2013
A Christmas Norah Dress
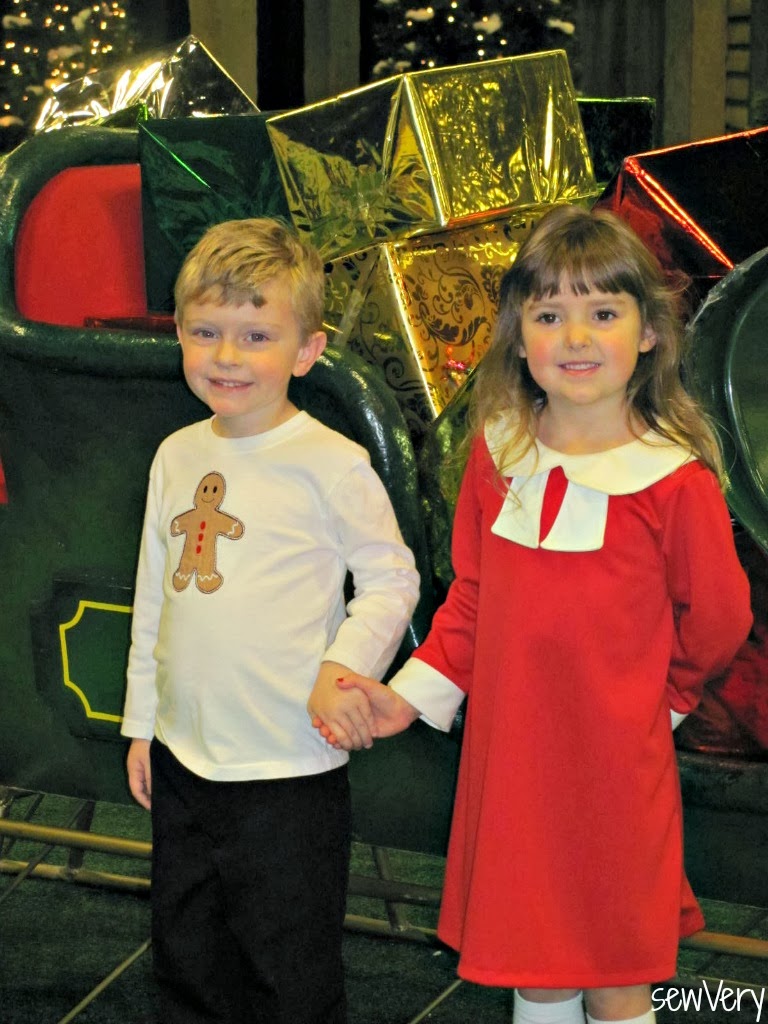
I absolutely love the Norah Dress I made for Ella to wear this Christmas season! It turned out exactly as I envisioned and has become one of my favorite pieces for her to wear!
In case you've been living in a hole for the last couple of months, then you've seen the Norah Dress pattern from Welcome to the Mouse House all over the pdf pattern world.
The talented and funny Hayley designed this adorable dress/tunic pattern with a vintage flare that I simply adore! I was super excited that she invited me to join in on the pattern tour.
For my Christmas Norah Dress version, I used tango red ponte roma fabric for the dress and sleeves, a white ponte roma fabric for the collar and sleeve cuffs, and white muslin for the lining--all purchased at Joann's.
The ponte roma knit has such a beautiful drape and feel to it, and it was pretty easy to sew since this type of knit is a little thicker and doesn't curl on the cut edges. I just used a slightly longer stitch length when I used my regular machine for topstitching or hemming, but I mainly used the serger with both needles in to sew the interior seams together. Just be sure to use a scrap of fabric to test the differential setting and tensions to get them just right for your fabric before you attempt to sew the dress!
I made Ella the size 6 dress and used a size 3 (I think) sleeve length but then added the 2 1/2" white cuffs to the end (my own addition and not included in the pattern). I compared these measurements to a t-shirt that fits her well before I cut out my fabrics.
The back has a slit at the top with a button loop closure that is hidden under the collar.
Ella loved wearing this dress literally all day long. She had so much fun walking around and looking at Christmas decorations and meeting Santa with her good friends Christian and Eva Mae, Sewing Mama RaeAnna's children. I had a blast watching them hold hands and posing in strange positions (not sure why Ella keeps holding her leg up and why Christian is poking out his lips) while RaeAnna and I tried to snap pictures and our friend, Lindsay of Lindsay Sews and Craft Buds, kept chasing after Eva Mae!
So, in case you haven't purchased the Norah Dress pattern from Welcome to the Mouse House, I strongly suggest you do! It has several sleeve options, length options, and collar options. The fit is spot on and the pattern is suitable for wovens or knits! The only thing I may do differently next time is make the facing a full length lining. You can't go wrong with this classic design, and I promise you will use this pattern over and over again. I know I will!
Merry Christmas, and have fun sewing!
Tuesday, December 10, 2013
A sewVery Simple Christmas Tree Ornament Tutorial
I'm joining in the fun today at Scattered Thoughts of a Crafty Mom's Holiday Sewing Blog Tour. With Christmas just around the corner, I'm finding that my sewing time has become very limited since I have additional shopping and baking to do plus school programs and events to attend. I needed a quick project that would help me keep my sanity during this stressful time plus help me decorate the tree and add a little something extra to wrapped gifts.
Using my sewVery Simple Christmas Tree Ornament Tutorial, you can make over a dozen of these cute decorations in a matter of minutes! Here's how:
See how simple that was? I wasn't kidding! If you like the Christmas Tree Ornament, then you'll love the entire collection of my sewVery Simple Ornament Tutorials! Just click the pictures to go to the tutorials.
There are lots more projects coming up in the Holiday Sewing Blog Tour over at Scattered Thoughts of a Crafty Mom. Plus, be sure to enter Jamie's giveaway of a Brother 1034D Serger (same kind I use) before December 20th!
If you missed yesterday's project, then head over to Welcome to the Mouse House to see Hayley's Picture Pocket Pillow, and be sure to check in tomorrow with Domestic Bliss Squared for an American Girl doll skirt tutorial.
Monday, December 2, 2013
A sewVery Simple Stocking Ornament Tutorial
I probably have more Christmas tree decorations than any other individual on the planet, but that doesn't stop me from making new ones each year! Here's the latest one that I came up with, and I think it's the easiest one yet: A sewVery Simple Stocking Ornament Tutorial!
First, you'll need to download my stocking ornament pattern from my Craftsy pattern shop (affiliate link). Then, assemble the remaining supplies.
To make a dozen of these Stocking Ornaments, you'll need 1/4 yard of fabric and about 3 yards of ribbon or twine. I bought my double sided quilted holiday fabric at Joann's: Christmas Metallic Plaid. It will take you about 30 minutes to make them!
That's it! You're done! These are going to look great on my tree this year, plus I plan to add one or two to each present that I wrap.
Here's another version I made using some holly decorated quilted fabric. You can add some ric rac or ribbon or even sew on a button to add a little more detail to the stocking. Plus, they were so much fun to make!
If you like my sewVery Simple Stocking Ornament Tutorial, then you should check out my sewVery Simple Santa Hat and Candy Cane Ornament Tutorials, too! With a yard of fabric, you could make an entire collection of festive holiday decorations for your tree!
Happy holidays, and have fun sewing!
Subscribe to:
Posts (Atom)