home tutorials features parties custom orders
Showing posts with label shorts. Show all posts

Wednesday, June 8, 2016

How to Add Ruching to a T-Shirt Hem

Recently, I sewed Ella a new casual, summer outfit using the Vintage V-Neck pattern by Blank Slate Patterns (affiliate links) and the free Sycamore Shorts pattern by Sew Like My Mom. Both patterns were quick to sew and the end results made Ella (and me) very happy!


Disclosure: This post contains affiliate links. I am a Contributor to the blog, Melly Sews, and was provided the shirt pattern and compensated for writing a post about the pattern. I was also provided some fabrics for use in a project of my choosing. All opinions stated in this post are honest and my own.

Since summer is upon us, Ella really needed some new t-shirts. Personally, I'm not always a fan of a basic, boxy tee on girls, so I was excited to discover the Vintage V-Neck pattern.

Monday, September 22, 2014

Clean Slate Shorts for School

School has been in full swing here now for almost two months, and this year, Ella started kindergarten while Connor moved on to middle school. Our public school system requires children to wear standard school attire which amounts to any solid color shirt with a collar plus black, navy, or khaki pants, shorts, skirts, or rompers. While Connor's wardrobe was fully stocked of acceptable items, Ella's closet was really lacking! As you know, I sew most of her clothes, and very few are solid colors!

Well, rather than go out and buy all her school clothes, I decided I would sew as many as I could. We purchased a few knit polo style shirts, and then I made her a khaki and black pair of shorts using the Blank Slate Clean Slate Pants Pattern (affiliate link). These shorts fit the bill perfectly!


Tuesday, September 3, 2013

How to Make Scalloped Edge Shorts

So a lot of you want to know how I made those sweet scalloped edge shorts to match Ella's Fly Girl tops (Read about Version 1 and Version 2)! It's really very easy to do, and I'm going to tell you how you can make them with pockets without even buying a pattern!


First, head over to Elegance & Elephants (affiliate link) and download her free Pleated Playsuit pattern. Print and cut out the pattern pieces for the pant front, pant back, pocket, and pocket lining.

Next, download and print out my scallop pattern from my Craftsy pattern shop (affiliate link).


When I made Ella's blue pair of shorts, I didn't consider that the pattern for the shorts part of the pattern is designed to sit at the natural waist since the pieces are really for a romper.  I made a separate waistband and attached it, so her shorts ended up being really high-waisted in the front which is fine. Now, the next time I make these, I will cut off at least  1 1/2" from the top of all the pattern pieces before attaching the waistband.  Just something to keep in mind when you cut out your fabrics.

Now cut out of your fabric two of each of the pattern pieces listed above and assemble the shorts according to the pattern instructions. Measure the opening at the top for the waistband.  Cut out a piece of fabric 3" wide x (the length you just measured + seam allowance).  Sew the short ends together, press the seam allowance open, and then fold in half so wrong sides are together.  Press. Attach to the shorts using your preferred method but be sure to leave a 2" opening for inserting the elastic.  Use a piece of 3/4" to 1" elastic that is your child's waist measurement minus 1".  After inserting the elastic and securing the ends, sew the opening closed.

To make the scalloped edge, print out the scallop templates and tape them together.  Then measure the leg opening and cut four strips of fabric 2 1/2" wide x (the leg opening length + seam allowance).  Now follow the instructions in my Scalloped Edge Shorts Tutorial on how to make and attach the scalloped edge to your shorts.


I used this same tutorial last year to make Ella the pink pair of shorts she's wearing with the Fly Girl Top - Version 2 and this cute halter top I made last year.


That's it!  I love the extra detail that the scalloped edge adds to the shorts and the way it mimics the ric rac on the Fly Girl top sleeves.  Plus, Ella thinks it's fun to have pockets to put her hands in or to load up with toys!


Be sure to enter my giveaway HERE for a $35 gift card to Little Lizard King Sewing Patterns! Winner will be announced next Monday!

Follow on Bloglovin

Monday, September 2, 2013

Fly Girl Pattern - Version 2

Hello again!  Did I peak your interest yesterday with the promise of revealing my second Fly Girl Pattern Top and a Little Lizard King gift certificate?!  I certainly hope I did!  And I'm here today to deliver.  (In case you have no idea what I'm talking about, yesterday I shared the first Little Lizard King Fly Girl Pattern top that I made.  You can read the review HERE.)

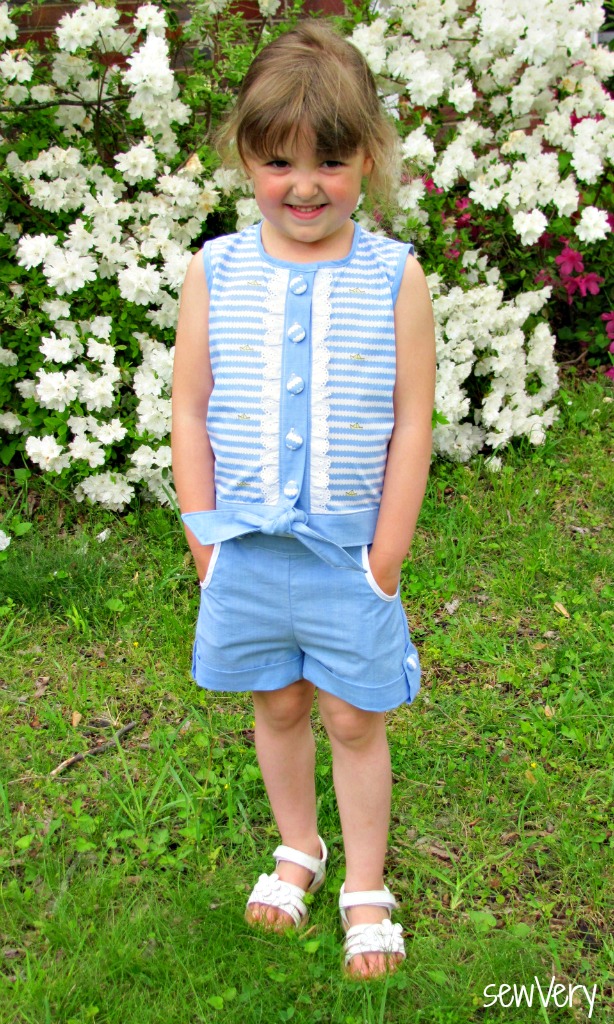
Here it is!  My Fly Girl with a closed back and button closure!  Ta-da!


The first one didn't take too long to make, but the second one always goes together so much faster! I finished this one in about an hour and a half!

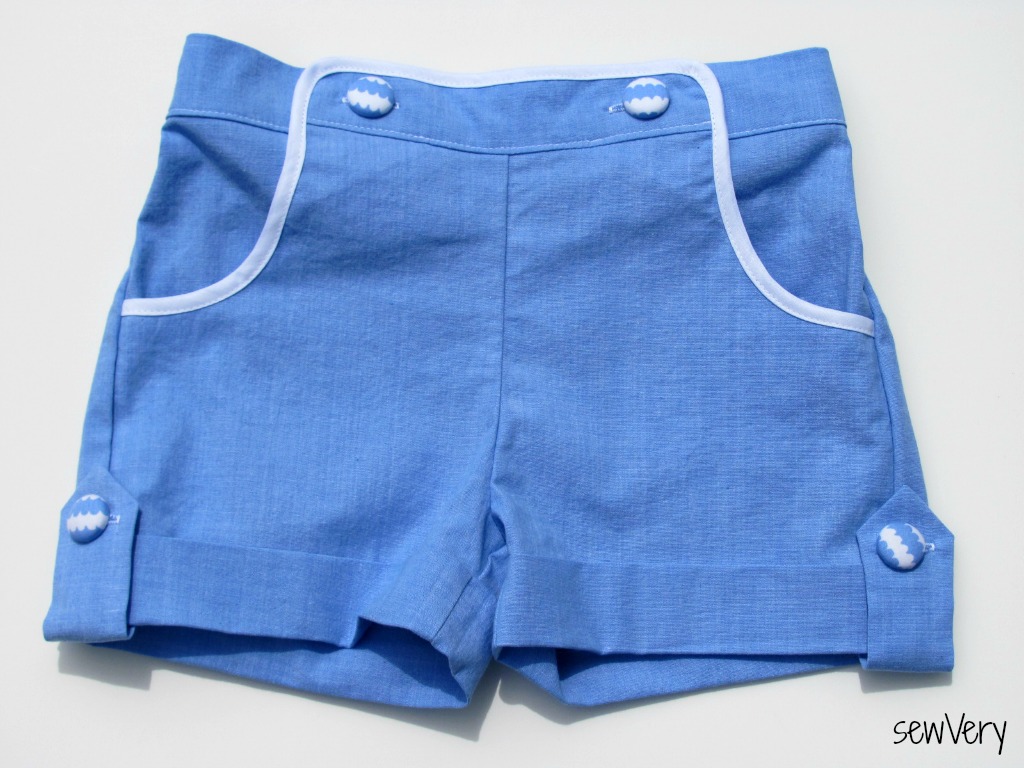
With the first Fly Girl top I made, I sewed up a pair of shorts to match.  But this time, I really didn't want to make another pair of shorts.  Lucky for me that I found enough of these fabrics that I used to make Ella a top and matching shorts with last year (she looks so tiny back then).  The shorts still fit, but the old top is now too small.  Now she'll have another cute coordinating outfit with me just doing half the work! Yay!


For Version 2 of the Fly Girl, I chose to use a smaller size since the first one was a little large.  This one is a perfect fit!  The sleeves are just right and the length is short enough to show off more of her shorts but not too short that her belly is exposed.


Here are a couple of quick comparison pics so you can see the difference between the Size 6 Open Back/Bow closure Fly Girl and the Size 4 Closed Back/Button Closure Fly Girl.


My Version 2 of the top has a closed back, and I opted to use the button closure in lieu of the bow. This is definitely my preferred option for the Fly Girl Pattern.


And instead of using elastic for the button loop, I whipped up a quick little tab using a left over piece of bias binding.


I found this giant green button that I've been dying to use on just the right project.  The button looks a little brighter in the photo below, but it really is a great match to the green in the fabric.


I hope you like both of my Fly Girl Tops as much as Ella and I do!  This design is so fun and whimsical and a treat to sew.  Buy your copy of the pattern from the Little Lizard King Shop today!

Be sure to come back on Tuesday for more info on the scalloped edge shorts with pockets that I made to go with the first Fly Girl Top.

But now, onto the giveaway!  Little Lizard King has generously offered up a $35 shop credit to one lucky sewVery reader!  You could pick out a lot of great LLK patterns with that prize!  Here are few of my favorites:

Marilyn Halter Pattern

Retro Glam Skirt Pattern

Roundabout Pattern
(Read about my test version of the Roundabout HERE.)

Seaside Romper Pattern
Just enter through the Rafflecopter widget below for a maximum of 6 entries, and I'll announce the winner next Monday, September 9th, here on the blog and on my sewVery Facebook page. Thanks for stopping by today!  Have a great week!

a Rafflecopter giveaway
Follow on Bloglovin

Thursday, May 9, 2013

How to Add a Button Tab to Cuffed Shorts Tutorial

Yesterday, I showed you the adorable Hattie Button-Up Tank and Sailor Shorts I made using patterns from Peek-a-Boo Pattern Shop (affiliate link).


This post contains affiliate links. All opinions are 100% my own.

As promised, I am going to show you today how you can add a button tab to any pair of cuffed shorts. It's super simple, so let's get started!


Cut off any extra length from the raw edge of the tab and then finish the edge by either serging or using a zigzag stitch.


There you have it!  What a fun little detail to add to your shorts, plus it helps to keep those cuffs from unrolling!  I already have plans to make more of these great Sailor Shorts from Peek-a-Boo Pattern Shops! (affiliate link)


And I just might have to buy the latest Thrifty Thursday $4 pattern from Peek-a-Boo Pattern Shop:  the Pier 49 Convertible Pants!  (affiliate link)

Wednesday, May 8, 2013

The Hattie Button-Up Tank Pattern Test & Sailor Shorts

Last week, I had the opportunity to pattern test the Hattie Button-Up Tank Pattern for Peek-a-Boo Pattern Shop.  Just so you'll know, I am an affiliate for Peek-a-Boo Pattern Shop, but all opinions provided in this post are 100% my own.


I also made a pair of Peek-a-Boo Pattern Sailor Shorts with the pattern I bought a few weeks ago on the Shop's Thrifty Thursday sale.  Most Thursdays, Amy offers up one of her patterns for just $4! Aren't these cute?!


As soon as it was confirmed that I would test the Hattie Button-Up Tank pattern, I knew which fabrics I would be using for this ensemble.  I recently purchased for next to nothing at Joann's a nearly yard remnant of Little Lisette's Sailboat Waves Stripes on Poplin.  Plus, I picked up a couple of yards of stretch chambray fabric at Hancock's.  These were perfect pairings for this fresh summer outfit, plus I still have plenty of both fabrics left over for another project!


The Hattie Button-Up Tank appealed to me from the start because of the ruffled button placket and the tie at the bottom.  I love details!


Instead of making the ruffles along the placket, I chose to use eyelet trim instead.  However, the pattern does provide measurements and instructions on how to cut out and make your own ruffle pieces.


There was something about this little outfit that just reminded me so much of my youth. One of my mom's favorite fabrics to sew with was chambray, and just thinking about the dresses and jumpers she made for me using this fabric made me smile.  Also, the azaleas were in bloom, and my mom used to always have me stand in front of them for spring-time photos.


Instead of using plain buttons, I made covered buttons out of the blouse fabric to match.  Don't you think it's a nice addition to this look?  


I made Ella's Hattie Button-Up Tank and Sailor Shorts in a size 5T, and I'm very pleased with the overall fit.  The only thing I will do differently for the next pair of Sailor Shorts I make is use a shorter piece of elastic for the back waistband. I used the measurement provided in the pattern, and the shorts were just a little loose on Ella, especially after a lot of running around and squatting to pick flowers.


Both patterns provided photos and written descriptions for every step of the construction making them a cinch to sew together.  I completed this entire outfit in an afternoon.

For the Sailor Shorts, I used store bought narrow bias tape to trim the pockets.  The inside of the pockets is lined with the shirt fabric, and the buttons on the front and side tabs are also covered buttons made using the blouse fabric.


The great thing about this Sailor Shorts pattern is that the pockets and front buttons are all functional.  


One thing lacking from the Sailor Shorts pattern (in my opinion) was the addition of a button tab to keep the cuffs from unrolling.  Now, Amy, the pattern designer, suggests in the pattern that you tack the cuffs in place in a couple of spots to prevent the cuffs from unfolding, but I thought the shorts really needed a little tab to help hold the cuffs up and to add another design element to the whole look.


So, I decided to make my own cuff tabs and write up a tutorial so you, too, can add them to your Peek-a-Boo Pattern Sailor Shorts.  Come back tomorrow for the full pictorial tutorial!

I already have plans to sew up another Hattie Button-Up Tank and pair of Sailor Shorts because I know this is going to be a favorite summer time outfit in our house!

Thanks for stopping by, and don't forget to come back tomorrow to see how to add a Button Tab to a pair of Cuffed Shorts!  If I don't see you here, this is how I will feel...


Don't forget to enter the two contests I have going on this week as part of Sew Mama Sew's Giveaway Day!  Giveaway No. 1 is for 24 Yards of Fabric from 18 of your favorite sewing bloggers plus a terrific pdf pattern bundle, and Giveaway No. 2 is for a bag made by me using some of my favorite Joel Dewberry fabrics.

And as always, I hope you'll decide to become a follower of my blog and my Facebook page!