My friend, Melissa, from the blog
Sew Like My Mom has dipped her toe into the pdf pattern design making pool and developed the
Darling Daisy Dress Pattern. This is one that you'll definitely want to own.
When the pattern first debuted a few weeks ago, I knew this style would be perfect for my very active little one to wear for play dates in the hot, southern sun! I'm so glad that Melissa offered to let me try out her new pattern!
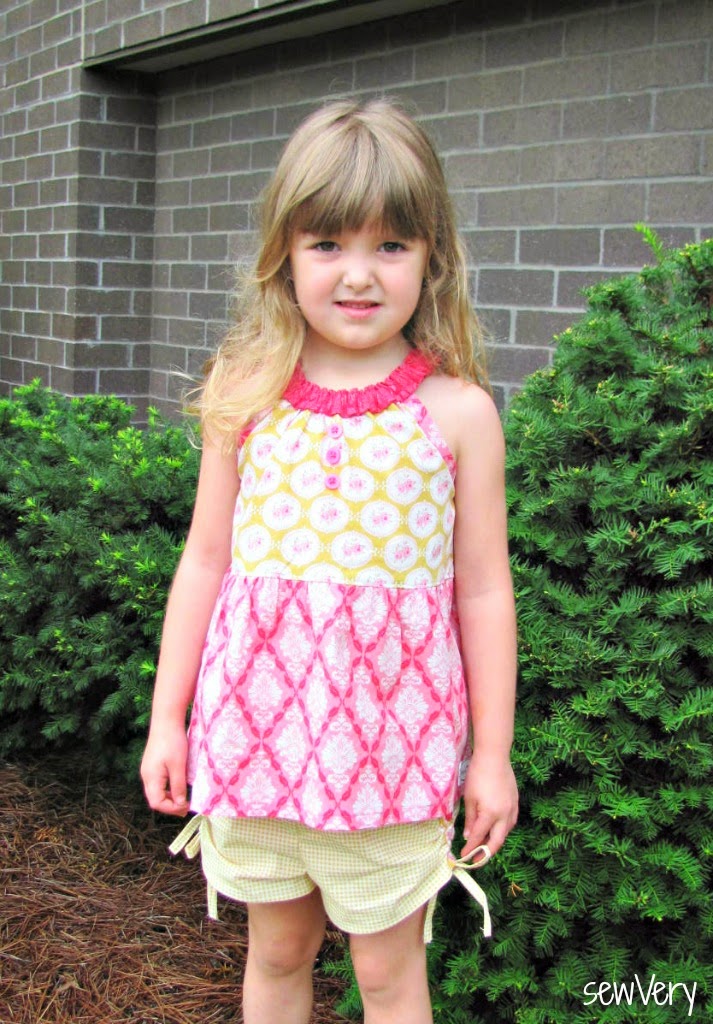
I had every intention of making a two-tiered dress for Ella, but after I attached the first tier and had her try it on for fit, I fell in love with it as a top! I decided instead to just hem the bottom and then make her a cute pair of matching shorts with the fabric I planned to use for the bottom tier.
Let me just say I am in love with this outfit! The
Darling Daisy Dress Pattern couldn't be simpler, and because of the different tiers, you can obviously make a variety of looks like a top, a dress, or even a maxi dress with this one pattern! Melissa's technique for adding the ruched neckband was a cinch, and resulted in the perfect fit!
For the top above, I used the sizing chart as my guide to compare to Ella's measurements and decided to go with a size 6.
The bodice of this top could easily be monogrammed for a personal touch or embellished with buttons like I added. Since the front and back are identical, the buttons also help make it easy for Ella to know the front from the back when she is getting dressed by herself.
For the shorts, I used a basic Butterick shorts pattern (Butterick B4503 View E)
that I have used many times before when I want to jazz up a design. For instance, I've used this several times with my
Scalloped Edge Shorts Tutorial!
I cut out the fabric according to the shorts pattern (but did shorten them a little at the shorten/lengthen line) and assembled them per the pattern instructions. I then decided to add ruching to the edge of the shorts using this simple tutorial I found over at
Daisy Chain Creations.
I will be using this tutorial on lots of other pieces (including tops, pants, you name it) in the future for sure!
Don't you think the ruched edging on the shorts ties the outfit together since the neckline of the Darling Daisy Top has that ruched effect?
To make the two pieces look even more like an ensemble, I sewed a matching button on the top of the ruched edging on the shorts. It also add a little pop of color.
And I couldn't be more pleased with the fit of the shorts, too.
 |
| If you are wondering why Ella looks a little nervous, it's because mosquitoes were after her! |
If you'd like you hand at making a similar top or maybe an adorable dress using the
Darling Daisy Dress Pattern by
Sew Like Your Mom, then you are in luck! Melissa has graciously offered up one copy of her pattern for a
sewVery reader! Just be sure to enter below.
a Rafflecopter giveaway
But if you just can't wait until the contest is over and want to get started on your own outfit right away, then grab a copy of the
Darling Daisy Dress Pattern in her shop
HERE! You'll be glad you did!
Thanks again, Melissa, for providing me with the pattern to try out! Now to find some more cute coordinating fabrics in my stash to make another great summer outfit!