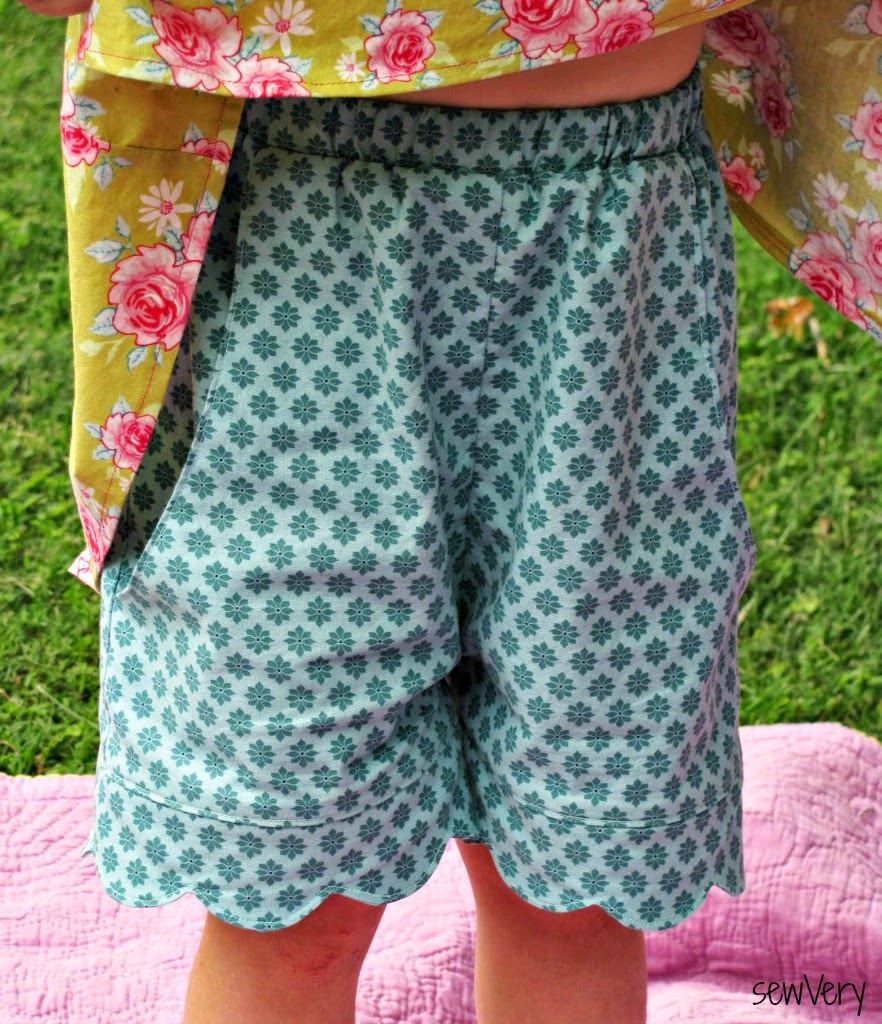
So a lot of you want to know how I made those sweet scalloped edge shorts to match Ella's Fly Girl tops (Read about Version 1 and Version 2)! It's really very easy to do, and I'm going to tell you how you can make them with pockets without even buying a pattern!
First, head over to Elegance & Elephants (affiliate link) and download her free Pleated Playsuit pattern. Print and cut out the pattern pieces for the pant front, pant back, pocket, and pocket lining.
Next, download and print out my scallop pattern from my Craftsy pattern shop (affiliate link).
When I made Ella's blue pair of shorts, I didn't consider that the pattern for the shorts part of the pattern is designed to sit at the natural waist since the pieces are really for a romper. I made a separate waistband and attached it, so her shorts ended up being really high-waisted in the front which is fine. Now, the next time I make these, I will cut off at least 1 1/2" from the top of all the pattern pieces before attaching the waistband. Just something to keep in mind when you cut out your fabrics.
Now cut out of your fabric two of each of the pattern pieces listed above and assemble the shorts according to the pattern instructions. Measure the opening at the top for the waistband. Cut out a piece of fabric 3" wide x (the length you just measured + seam allowance). Sew the short ends together, press the seam allowance open, and then fold in half so wrong sides are together. Press. Attach to the shorts using your preferred method but be sure to leave a 2" opening for inserting the elastic. Use a piece of 3/4" to 1" elastic that is your child's waist measurement minus 1". After inserting the elastic and securing the ends, sew the opening closed.
To make the scalloped edge, print out the scallop templates and tape them together. Then measure the leg opening and cut four strips of fabric 2 1/2" wide x (the leg opening length + seam allowance). Now follow the instructions in my Scalloped Edge Shorts Tutorial on how to make and attach the scalloped edge to your shorts.
I used this same tutorial last year to make Ella the pink pair of shorts she's wearing with the Fly Girl Top - Version 2 and this cute halter top I made last year.
That's it! I love the extra detail that the scalloped edge adds to the shorts and the way it mimics the ric rac on the Fly Girl top sleeves. Plus, Ella thinks it's fun to have pockets to put her hands in or to load up with toys!
Be sure to enter my giveaway HERE for a $35 gift card to Little Lizard King Sewing Patterns! Winner will be announced next Monday!

Showing posts with label Fly Girl. Show all posts
Tuesday, September 3, 2013
Monday, September 2, 2013
Fly Girl Pattern - Version 2
Here it is! My Fly Girl with a closed back and button closure! Ta-da!
The first one didn't take too long to make, but the second one always goes together so much faster! I finished this one in about an hour and a half!
With the first Fly Girl top I made, I sewed up a pair of shorts to match. But this time, I really didn't want to make another pair of shorts. Lucky for me that I found enough of these fabrics that I used to make Ella a top and matching shorts with last year (she looks so tiny back then). The shorts still fit, but the old top is now too small. Now she'll have another cute coordinating outfit with me just doing half the work! Yay!
For Version 2 of the Fly Girl, I chose to use a smaller size since the first one was a little large. This one is a perfect fit! The sleeves are just right and the length is short enough to show off more of her shorts but not too short that her belly is exposed.
Here are a couple of quick comparison pics so you can see the difference between the Size 6 Open Back/Bow closure Fly Girl and the Size 4 Closed Back/Button Closure Fly Girl.
My Version 2 of the top has a closed back, and I opted to use the button closure in lieu of the bow. This is definitely my preferred option for the Fly Girl Pattern.
And instead of using elastic for the button loop, I whipped up a quick little tab using a left over piece of bias binding.
I found this giant green button that I've been dying to use on just the right project. The button looks a little brighter in the photo below, but it really is a great match to the green in the fabric.
I hope you like both of my Fly Girl Tops as much as Ella and I do! This design is so fun and whimsical and a treat to sew. Buy your copy of the pattern from the Little Lizard King Shop today!
Be sure to come back on Tuesday for more info on the scalloped edge shorts with pockets that I made to go with the first Fly Girl Top.
But now, onto the giveaway! Little Lizard King has generously offered up a $35 shop credit to one lucky sewVery reader! You could pick out a lot of great LLK patterns with that prize! Here are few of my favorites:
![]() |
| Marilyn Halter Pattern |
![]() |
| Retro Glam Skirt Pattern |
![]() |
| Roundabout Pattern |
![]() |
| Seaside Romper Pattern |
a Rafflecopter giveaway
Sunday, September 1, 2013
The Fly Girl Pattern - Version 1
Several weeks ago, I was asked to test the Fly Girl Pattern by Little Lizard King. I couldn't start sewing fast enough on this one! The Fly Girl top is super adorable, and my little girl looks so fresh and feminine wearing it!
The Fly Girl Pattern originally only offered an open, tie-back option, but during testing, the designers decided to add a closed back, button closure option. I've made both, but today, I'm sharing just the first option with you.
Ella has grown a lot this summer, so I opted to make the size 6 for her. It is a little big, but she'll definitely be able to wear it next summer and maybe even this winter with a long sleeve t-shirt underneath! The fabrics are all 60" wide cotton Tilda that I picked up at the online Martha Pullen Store clearance sale last month for a steal (like $2 to $3 a yard)! Love the quality and the colors!
All the pattern pieces fit on one sheet of paper, while the measurements for the rectangular shaped pieces are specified in a chart saving you time and money from printing and taping those pieces together. Gotta love that!
The bodice is fully lined, and at first, I thought it would be tricky putting it together. However, the pattern instructions have great photos and written descriptions that walk you through the process with ease. Another thing I like about LLK patterns is that they use a large font and page formatting that isn't crowded which makes reading their patterns so much easier.
I love the flutter sleeves with the ric rac trim, but I do wish I had used a shorter length of elastic. I believe based on tester comments that the designer did modify the elastic requirements in the final pattern.
As for the open back, I like the look of it with the big bow, but I personally prefer a closed back. In my opinion, the bow can be heavy and is prone to coming untied on an active child, plus it adds bulk to the back.
I think if I had made the size 5 instead, it would have been more fitted and perhaps the weight of the bow would not have pulled the front of the top up and to the back.
Ella certainly doesn't mind. She's worn this outfit several times, and always receives compliments! She even loves wearing it to ride her bike!
I prefer the closed back, button closure option, and I'll be sharing that version of the Fly Girl top with you tomorrow. I also made it in a smaller size, so you'll be able to compare the fit of the two and see how much of a difference it made. I really appreciate the fact that Little Lizard King chose to add two different back closure options to this top and gave me the chance to test them both! I'll be using this pattern lots in the future since it's pretty easy and quick to sew!
Be sure to come back tomorrow to not only see the second Fly Girl Top I made, but to also enter a giveaway to win a gift certificate to Little Lizard King! But if you just can't wait and have to have the Fly Girl Pattern today, then click over to the Little Lizard King shop and purchase the pattern HERE!
Oh, and if you are wondering about the shorts Ella is wearing with this Fly Girl Top, I'll be sharing more info on how you can make a pair like them later in the week using a free pattern and tutorial.
Happy Labor Day weekend!
The Fly Girl Pattern originally only offered an open, tie-back option, but during testing, the designers decided to add a closed back, button closure option. I've made both, but today, I'm sharing just the first option with you.
Ella has grown a lot this summer, so I opted to make the size 6 for her. It is a little big, but she'll definitely be able to wear it next summer and maybe even this winter with a long sleeve t-shirt underneath! The fabrics are all 60" wide cotton Tilda that I picked up at the online Martha Pullen Store clearance sale last month for a steal (like $2 to $3 a yard)! Love the quality and the colors!
All the pattern pieces fit on one sheet of paper, while the measurements for the rectangular shaped pieces are specified in a chart saving you time and money from printing and taping those pieces together. Gotta love that!
The bodice is fully lined, and at first, I thought it would be tricky putting it together. However, the pattern instructions have great photos and written descriptions that walk you through the process with ease. Another thing I like about LLK patterns is that they use a large font and page formatting that isn't crowded which makes reading their patterns so much easier.
I love the flutter sleeves with the ric rac trim, but I do wish I had used a shorter length of elastic. I believe based on tester comments that the designer did modify the elastic requirements in the final pattern.
As for the open back, I like the look of it with the big bow, but I personally prefer a closed back. In my opinion, the bow can be heavy and is prone to coming untied on an active child, plus it adds bulk to the back.
I think if I had made the size 5 instead, it would have been more fitted and perhaps the weight of the bow would not have pulled the front of the top up and to the back.
Ella certainly doesn't mind. She's worn this outfit several times, and always receives compliments! She even loves wearing it to ride her bike!
I prefer the closed back, button closure option, and I'll be sharing that version of the Fly Girl top with you tomorrow. I also made it in a smaller size, so you'll be able to compare the fit of the two and see how much of a difference it made. I really appreciate the fact that Little Lizard King chose to add two different back closure options to this top and gave me the chance to test them both! I'll be using this pattern lots in the future since it's pretty easy and quick to sew!
Be sure to come back tomorrow to not only see the second Fly Girl Top I made, but to also enter a giveaway to win a gift certificate to Little Lizard King! But if you just can't wait and have to have the Fly Girl Pattern today, then click over to the Little Lizard King shop and purchase the pattern HERE!
Oh, and if you are wondering about the shorts Ella is wearing with this Fly Girl Top, I'll be sharing more info on how you can make a pair like them later in the week using a free pattern and tutorial.
Happy Labor Day weekend!
Subscribe to:
Posts (Atom)


