
School is back in session which means tons of papers being sent home and lots of homework. In years' past, the completed worksheets, art work, and notes from school would pile up on the kitchen counter or dining room table, but this year, all those papers will be stored in this new chair pocket I made for my daughter's chair.
What's even better is that I created a matching double zipper pencil pouch that detaches from the chair pocket when she needs to sit at the table to work on a project. All of her pencils, crayons, scissors, and other supplies will be conveniently at hand and can be stored away when she is done with them.

Help organize your home when you make my Chair Pocket Tutorial with a detachable pencil pouch. It's easy to sew and your child will love it when you use fun fabrics like the Wonderland Collection by Josephine Kimberling for Blend Fabrics.
Disclosure: I was provided the fabrics used in this post in exchange for sharing a project I sewed with them. All opinions are my own.
Who doesn't love Alice's Adventures in Wonderland with it's many memorable phrases and recognizable details like the chesire cat, the rabbit, Alice's dress, or the Queen of Hearts? Wonderland--the latest fabric line from Blend Fabrics--incorporates all the fun and whimsical details from this story into a collection of prints in two different colorways perfect for a boy or a girl.
For the next 8 weeks, you can follow along with the Late for a Date Blog Hop featuring the Wonderland fabric and be inspired to create something wonderful! The full listing of blog stops are shown at the bottom of the post.

As you follow along each week with the Late for a Date Blog Hop, be sure to enter the contest for a free fat quarter bundle of Wonderland that each blogger will be giving away. See the Rafflecopter link near the bottom of the post to enter my giveaway.

My daughter, Ella, was so excited when I finished this chair pocket for her. She's able to come home each day and put school papers in the pocket for me to look at later, or she can take out her crayons and pencils to draw a picture or practice her writing.

Instead of creating the chair pocket with a second built-in pocket for pencils, crayons, and supplies, I made a separate, detachable double zipper pencil pouch. She can remove it by unhooking the clips and have the pencil pouch on the table while she works. When she is finished working, she hangs it back on the chair pocket!


Plus, she loves that I added padding using Pellon Thermolam to the back of one side of the chair pocket. Now when she leans back, she says the chair is soft and cozy!

Are you convinced you need this awesome chair pocket for your child? Then follow the Chair Pocket Tutorial below!
This Chair Pocket Tutorial was designed to fit my dining room chairs which measure 15 3/4" wide x 14" tall x 2 1/4" thick. Please measure your chair back and make any adjustments to the measurements shown below for a custom fit to your furniture.
Please note that the detachable double zipper pencil pouch is optional and the tutorial for the pouch will be posted later next week. If you choose not to sew a chair pocket with the detachable pencil pouch, then omit the optional supply items and assembly steps for the hook tabs.
CHAIR POCKET SUPPLIES:
1/2 yard for Outer Fabric
1/2 yard for Lining Fabric
1/2 yard for Pocket
2" x 12" for Hook Tab (optional)
1 3/4 yards Pellon SF 101
1/2 yard Pellon Sew-In Thermolam
(2) 1/2" D-Rings (optional)
(2) 1/2" Swivel Lobster Claw Hooks (optional)
CUT:
(2) 21" wide x 16 1/2" tall from Outer Fabric
(2) 21" wide x 16 1/2" tall from Lining Fabric
(2) 21" wide x 13" tall from Pocket Fabric
(1) 2" wide x 12" tall for Hook Tabs (optional)
(2) 20" wide x 16" tall from Pellon SF 101 for Outer Fabric
(2) 20" wide x 12" tall from Pellon SF 101 for Pocket
(1) 20" wide x 16" tall from Pellon Sew-In Thermolam for Outer Fabric Back
ASSEMBLE:
If choosing to add the optional detachable pencil pouch, first prepare the Hook Tabs by taking the 2" x 12" piece of fabric and folding it to form a piece of double fold binding. Fold in the two long outer edges to the center and press.

Fold in half again to encase the raw edges. Press well then sew together along the long, open edge.

From this sewn strip, cut (2) 2" long pieces and (2) 4" long pieces. Slide a D-ring onto each smaller cut piece, match fabric ends, and sew together. Next, slide the longer cut piece through the lobster hook ring, fold over the fabric end, and sew in place being sure to backstitch at the beginning and end. Repeat for the other hook.

Close up of the finished D-ring tab. Set these aside for the pencil pouch (tutorial posted separately next week).

Close up of the finished lobster hook tab.

Fuse the SF101 to the wrong side of the two Outer fabric pieces. Now sew the Thermolam onto the wrong side of one of the Outer fabric pieces using a 3/8" to 1/2" seam allowance. Sew along all four sides of the Thermolam.
Next, remove the Thermolam from the seam allowance by trimming the Thermolam as close as possible to the stitch line without cutting through the stitch line or cutting the Outer fabric. This will reduce bulk in the seam allowance.

Place the two Outer fabric pieces right sides together and pin along the top edge. Sew using a 1/4" seam allowance. The Thermolam should be just outside of your seam. Finger press this seam open.

Prepare the Pocket by fusing the SF101 to both Pocket fabric pieces. Place the Pocket fabric pieces right sides together and pin along the top and bottom edges (long sides). Sew the top and bottom edges together using a 1/4" seam allowance. Turn the pocket right side out and press.
Lay the Outer fabric out flat with right sides up.
Place the Pocket on the right side of the Outer fabric that only has the SF101 fused to it. The bottom edge of the Pocket should be 1/2" from the bottom edge of the Outer fabric and the sides should match the sides of the Outer fabric. Pin in place along the left and right sides of the Pocket.

If you are making the optional detachable pencil pouch, pin each long lobster hook tab to the left and right sides of the pocket 1 1/2" down from the top of the pocket.

Fold the other half of the Outer fabric on top of the Pocket. Now right sides of the Outer fabric should be together. Carefully remove the pins used to pin the Pocket in place and re-pin through all layers.

Sew the sides together using a 1/4" seam making sure to stitch over the hook tab a time or two for extra support. Turn the Chair Pocket right side out.

Now sew the bottom edge of the pocket in place. If you prefer, you can sew the bottom in place before pinning and sewing together the side seams of the Outer fabric.

Fuse the SF101 to the wrong side of both Lining pieces. With wrong sides together, pin the top and side edges of the Lining pieces together then sew all three sides using a 1/4" seam allowance. Leave the Lining pieces wrong side out and place the assembled Outer chair pocket inside the Lining. Match the side seams and bottom edges and pin together. Sew the Outer fabric to the Lining using a 1/4" seam allowance but leave a 5"-6" opening for turning right side out.
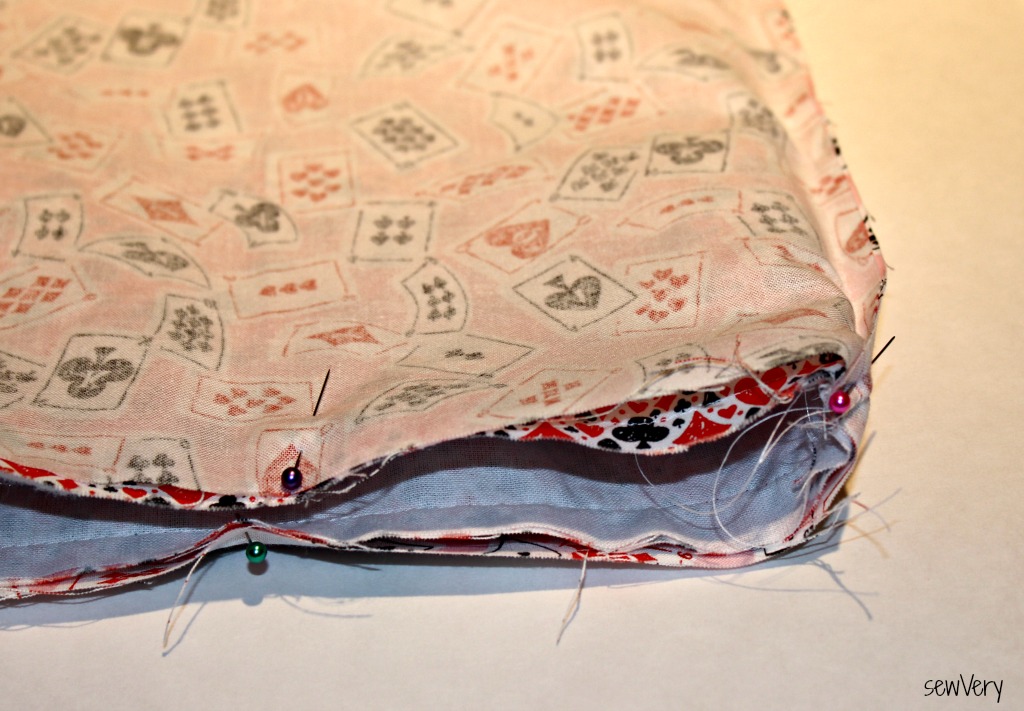
Turn the Chair Pocket right side out through the opening in the bottom. Turn the raw edges at the opening to the inside and sew the opening closed. Your Chair Pocket is now complete!

Be sure to stop back by my blog next week for the double zipper pencil pouch tutorial that you can attach to the optional hooks on the chair pocket.
Want to win your own fat quarter bundle of the fabulous new Wonderland collection? Simple enter the Rafflecopter giveaway below (U.S. Residents only), and a winner will be randomly chosen on Friday, September 2, 2016.

Remember to follow along on the Late for a Date Blog Hop for more Wonderland sewing inspiration and great, free tutorials! Plus, each stop on the tour will be giving away a FQ Bundle of Wonderland, so be sure to enter them all!
SewVery – August 26
Emily Ann's Kloset – September 2
Tie Dye Diva – September 9
Sew Can She – September 16
Jedi Craft Girl – September 23
Flamingo Toes – September 30
A Bright Corner – October 7
CapturedThreads – October 14
Have FUN sewing!
Super handy! Wish I'd made something like this when my kids were small.
ReplyDeleteLovely! I have made something similar before for a kindergarten teachers class.
ReplyDeleteLove the fabric! Would love to sew up some purses and pouches for my three granddaughters with this!
I would love to make a scrappy apron with this beautiful fabric.
ReplyDeleteI would love to make a scrappy apron with this beautiful fabric.
ReplyDeleteThanks for the tutorial! I will definitely be sewing some of these up for my grandkids!!!! Beautiful!!!
ReplyDeleteI love this idea - thank you for the tutorial! I would love to make one for my daughter and myself for our sewing room!
ReplyDeleteThat's wonderful! I've got a Craft Gossip post scheduled for later today that features your tutorial:
ReplyDeletehttp://sewing.craftgossip.com/?p=89456 --Anne
I'm collecting fabrics for an Alice quilt for one of my daughters, these would make a perfect addition! Kristy
ReplyDeleteMy girl has been singing some of the wonderland songs all week so i'd love to see her something with those fabrics. :)
ReplyDeleteI would make a really cute skirt for my grand daughter and one to match for my daughter, using bluejeans for the waist to hip, then strips of this fabric for the rest of the way down! How cool!
ReplyDeleteoops! accidently hit that button! I hand carve stamps, and my grand daughter stamped some fabric that would just go great with this!
DeleteI'd make a table topper for a teacher in town that put on a Wonderland musical at our school last year:)
ReplyDeleteI love your chair pocket. I would make a disappearing nine patch quilt. Thank you for the tutorial.
ReplyDeleteI would LOVE to win!!!!! I'd make a mini quilt ;)
ReplyDeleteI would make a movie night quilt! -liZ
ReplyDeleteI would love to win! I'd probably make some cloth napkins. You can never have enough!
ReplyDeleteI'd put it toward a quilting project!
ReplyDeleteI'm making patchwork skirts for my girls at the moment, and want to try my hand at a purse. Oh boy!
ReplyDeleteBags!
ReplyDeleteThis would make some very cute Christmas gifts. Or, I could just hoard it all! It's such happy fabric!
ReplyDeleteI would use the fabric to make doll clothes!
ReplyDeleteI'm presently taking a quilting class, I would like to make a throw for my sister for Christmas.
ReplyDelete