Today I'm featuring the Hosh Pants Pattern by Lou Bee Clothing and a ladies' turtleneck refashioned into a girl's turtleneck using the Skater Dress Pattern by Kitschy Coo.

First, the pants are incredibly simple to make using Sarah's Hosh Pants Pattern. The pattern has one piece for the legs, so there are no side seams. Plus she shows you in detail in the pattern photos how to make an adjustable waistband using buttonhole elastic. Since the pants have a flat front and my daughter's waistline measurement hasn't changed much, I opted to keep things even simpler and just make a casing to run regular elastic through the back waistband.
After consulting the pattern's sizing chart, I opted to make Ella the size 4T and added about an inch and a half to the length (she's tall for her age). The fabric is a polyester/spandex suiting remnant that I bought from Joann's ages ago. The fabric is so soft and was a breeze to sew. Another plus is that it does not wrinkle! I wash them and then hang them up to dry. They have never needed ironing!
To make these pants look a little dressier, I added a pocket flap to the back.

All I did was take two rectangles of fabric, place them right sides together, and sew around the edges leaving an opening for turning. Turn right side out, press, and then topstitch all the way around the rectangle closing the opening in the process. I then stitched it on the back of the pants and sewed a button on it to keep it down. No buttonhole required!

Since the legs are tapered and narrow at the bottom, these are perfect to wear inside tall boots. The whole outfit looks like she is ready for a horse riding lesson!

I have a lot of sweaters that were once my mom's, but they are too big for me. I've been holding on to them for so long and just can't seem to part with any, so I decided I would take some and try to refashion them into things for Ella.
The sweater started out as a Land's End Fine Gauge Turtleneck Sweater in a women's size medium.

I thought about using the Bimaa Sweater Pattern from Lou Bee Clothing for the refashion, but I didn't have enough fabric from the sweater to make it. It's a great pattern, too. You can see the first one I made here, and I'll be blogging about a second one I made later this week.
Instead, I decided to use the Skater Dress Pattern from Kitschy Coo for the turtleneck refashion. The Skater Dress is an awesome pattern that I got to try out as part of the pattern blog tour earlier this month. Here is the link to the Skater Dress I made for Ella.
Sorry I didn't take pictures of the process, but it was really simple to do. First, I cut off the sleeves along the armhole seam. Then I used the bodice pattern piece and matched up the existing shoulder seam to the top of the shoulder on the pattern while positioning the pattern fold line along the center of the sweater. This allowed me to keep the original turtleneck.
Next, I used the Skater Dress skirt pattern piece to determine the top and bottom width of the skirt and estimated the length needed. Ella had tried the sweater on before I began cutting, so I knew roughly how much of the length I needed to remove.
I then cut the seam of the sleeves open so to give me flat pieces of fabric. I then used the sleeve pattern piece by cut out the sleeves that fit Ella. I made sure to use the hemmed edge so I wouldn't have to do any hemming!
Sewing the sweater together was quick (like maybe 30 minutes) and all on the serger. When I finished the ensemble, Ella exclaimed that she now had a Moma outfit! She was so giddy!
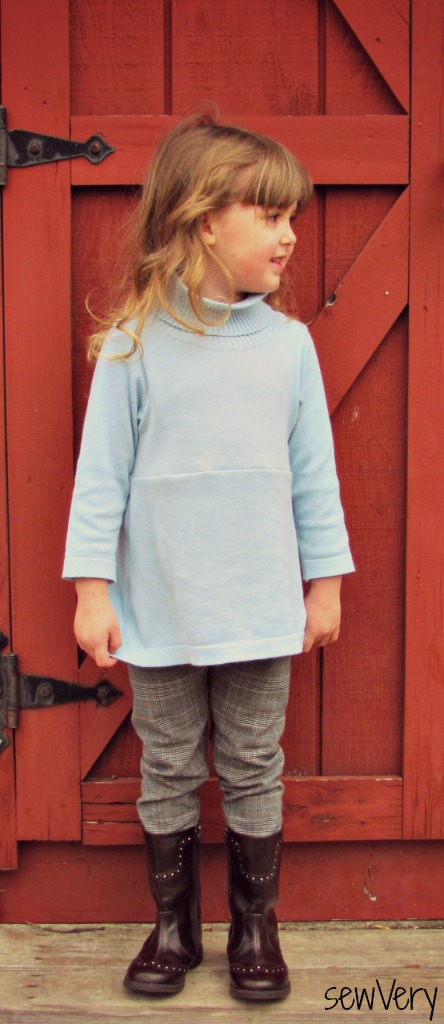
I just love the fit and overall look of this entire outfit. It quickly became one of Ella's favorite things to wear, so I hope it will all still fit in the Fall. She loves the softness of the pants fabric, and the fit is so good that she does not constantly tug at the back to pull up the pants after she squats down to play.
I'll definitely use both of these patterns--the Hosh Pants and the Skater Dress--again in the near future. In fact, I might just make a pair of Hosh Shorts and a Skater Tank Sweater for this Spring/Summer.
I hope you'll come back all this week to see other pants I've made Ella recently. At the end of the week, I'll post a round-up of all of the pants posts I've done on sewVery! See you tomorrow!