home tutorials features parties custom orders
Showing posts with label Hot Pads. Show all posts

Tuesday, January 7, 2014

Happy 2014, Updates, and a Project That Will Keep You Warm

Happy New Year, everyone!  Yes, I'm still here.  It's just been rough around my house the last three weeks.  My kids and I all had the flu which started for my son the day before school break. I caught it two days later, and Ella got it a week after me (two days after Christmas while we were out of town visiting family).  My son recovered the quickest (like in 4 days) while Ella and I are still dealing with chest congestion, coughing, and fatigue.

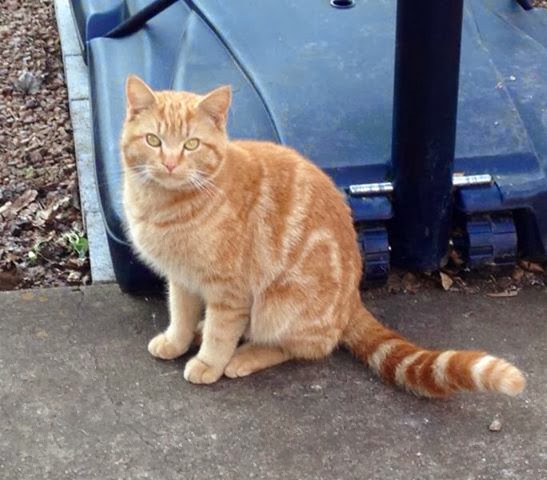
Oh, and did I mention we adopted a second cat during all this?  Well, it's more like he adopted us! He showed up at our back door two weeks before Christmas, and after chasing down a lead on a missing kitty we thought was him but wasn't, we resolved to keep him.  He's named Aubie (surprisingly, my Alabama fan husband came up with it) and sometimes called Pumpkin, and we all love him dearly.  As my son says, "He's the cutest kitty in the world!"  I must agree, Aubie is pretty cute and one of the sweetest cats I've ever owned.  Our 15 year old female cat is not as pleased about this family addition as we are, and we are hopeful that she will finally come to accept him and share her space with him.

The past couple of days, I've finally had the energy to get back into a routine of sorts.  I've managed to sew up two or three things for Ella for some upcoming posts later this month.  Please be sure to check back here often or sign up to follow sewVery through the Bloglovin' button in the sidebar to your right.

One project I'm very excited about is the Snowflakes & Lace series that I will be co-hosting with my friend, RaeAnna, from Sewing Mama RaeAnna.


Starting on January 13th, RaeAnna and I will be introducing at least two bloggers each day with links to their amazing projects that involve lace! RaeAnna and I will share our own creations at the end of the series on January 18th.  The series will include a link-up party so you, too, can share your lace creations, and we'll even have a giveaway for patterns and a little sewing kit!

We'd love for you to help us all find lace inspiration by pinning projects you've made with lace or pictures you've found of clothing, accessories, or home decor that is adorned with lace.  Just be sure to include the hashtag #SnowLaceSew when you pin the item so we can find it and add it to our Pinterest board.  It should be a lot of fun!


And speaking of Snowflakes, there are still a few on the ground here and the temperatures have plummeted to the single digits for the high.  Definitely not what we are used to here in the South. Our heat pump is just not designed to heat extremely well in temperatures this low.  As a result, it's running constantly to try and keep the house just barely warm, and my feet are freezing still!

If you are experiencing the same sort of weather right now or even colder temps, then I highly recommend you make up a few of these--my sewVery Simple Hot Pads!


My sewVery Simple Hot Pad Tutorial is my No. 5 most viewed post, and I thought it was definitely worth sharing again today.  It's a really quick project that you can use with rice or dried corn.  I use them to warm up our beds at night or to warm our feet while watching tv or while sitting at the computer to blog. Our new cat is even enjoying the warmth they provide!

There you have it.  An update of sorts.  Sorry for the long absence, but I hope everyone had a terrific Christmas with many wonderful blessings.  I wish you all the best 2014 possible, and I thank you for following my blog and leaving me comments every now and then.  I love hearing from those of you who have used a tutorial of mine!

See you soon, and have fun sewing!

Friday, January 25, 2013

Sweetheart Dress and a Giveaway!


Today I'm sharing this playful dress I made for Ella using the Sweetheart Dress Pattern from Luvinthemommyhood.  Update:  To see the second Sweetheart Dress I made, click here.


Isn't it just adorable?  And it's absolutely perfect to wear for Valentine's Day which will be here before we know it!


This pattern is professionally written and full of excellent illustrations and photographs to easily guide you through the entire construction process.  It's one of the best pdf patterns I've found so far.  I would rate it appropriate for a confident beginner sewer.

The pattern includes a size chart for sizes 2T-6T that I found to be extremely helpful in determining the size that would best fit my Ella.  Ella's height and chest measurements were right in the middle of a 4T and 5T, but her waist was more like a 4T.  In the end, I decided to go with the 5T.  I feel like the fit was spot on for the length and chest, but the waist is a tad big (and I knew it would be since I went with the larger size).  I'm not worried about it though!  Overall, I'm very pleased with the fit and look on her.  She loves it and should be able to wear it this year and next year as well!


Months ago, Ella and I bought this sweet, edgy fabric on the clearance aisle at Joann's.  Ella loves anything with hearts and pink and purple, so there was no way she would let me leave the store without some!  It's a nice cotton twill that was easy to sew and worked well for the Sweetheart Dress Pattern. For Ella's 5T version, the pattern called for 1 3/8 yard of the main fabric and 1/2 yard for the bodice lining.  I even had enough of it left over to make a new set of hot pads for me and Ella (get the tutorial here).

I used some quilting weight cotton that color coordinates with the main heart skull fabric.


The pattern has three pieces and then a measurement chart for cutting out the skirt rectangle, so there is no piecing and taping together sheets of paper!  Just print and cut them out and you are ready to go!

I remember when I first saw this dress on Luvinthemommyhood, I thought it would be tricky to make the heart cutout in the back, but it was anything but that!  Shannon's pattern instructions made adding this detail a piece of cake (or actually a heart)!  And I learned a new way to make a lined bodice for a dress!  I love learning new sewing tricks and methods.  Don't you?

Ella striking a pose!
I will say that I found it a little tricky sewing together the fabric after I cut out the heart per the pattern instructions.  Even though I had the fabric sufficiently pinned together, the fabric was flimsy and difficult to manage.  I think the next time I make the dress I'll trace the entire heart out and sew around it with the seam allowance before cutting out the heart shape. To me, I think that might be easier.  I know this may sound a little confusing, but once you see the pattern, I think you'll understand what I mean.

I try to avoid buttonholes when possible, so normally, I would use a fabric loop for the button closure.  But this time, I decided to try Shannon's tutorial on how to make a hand sewn loop using embroidery thread for the button closure.  It took me four tries to make it the right length and nice looking!


I'm glad I tried it because I learned another sewing trick that I'm sure I will use all the time now!  Of course, you can make a fabric loop instead, and the pattern instructs you when to sew it in if you go that route.

I used a covered button for the closure using a 3/4" button and the lining fabric.  I wish they still made these covered button kits the way they did back in my grandmother's day.  I found a few in her stash, and they are so much easier to use because no tools or plastic pieces are needed!  The old ones have teeth around the back edge of the button that grip the fabric and a back that just snaps into place.  With these new kits, I sometimes have a difficult time getting the back on without the use of a hammer, and then I'm afraid I'm going to smash my thumb or finger!  Anyway, sorry to get sidetracked about covered buttons!

This Sweetheart Dress was such a quick sewing project--only a couple of hours if you don't count the time it took me to get the hand sewn loop just right!  And the best part, Ella absolutely loves it!


This is the type of dress that can easily be dressed up or down, and this version is definitely a play dress!  Great for running, jumping, twirling, and climbing.


She wore it three times the week I made it despite the chilly weather outside. I know I'll be making more Sweetheart Dresses in the near future. In fact, I may have already made a second one!

If you want to make your little Valentine her own Sweetheart Dress, then here's your chance.  Two lucky sewVery readers will each receive their very own copy of the Sweetheart Dress pattern from Shannon at Luvinthemommyhood!  To enter, follow the instructions below.  The winners will be announced here on Wednesday, January 30th!

a Rafflecopter giveaway
Of course, you can always go ahead and purchase the pattern from Shannon at Luvinthemommyhood!  You'll be glad you did!

Oh, and just to clarify things, this review is 100% my own.  Although I received the pattern free of charge as part of a swag gift at Sewing Summit, I was not compensated for my opinion of this pattern.  In fact, I have never been paid for a pattern review!  Have a great day!

Linking up at these parties as well as others shown here.

Sumo's Sweet Stuff

125

This dress was featured at Threading My Way and The Train to Crazy!  

Threading My Way_Featured Photobucket

Thursday, January 17, 2013

A sewVery Simple Hot Pad Tutorial


I am off to a slow start with blogging this year, but I have been very busy at home sewing and working on projects.  One project in particular is a tutorial on how to make your own rice filled hot pads with a removable cover.


You may remember my original hot pad post from last year where I made some smaller sized hot pads with a velcro closure.  This velcro closure allows you to remove the inner rice bag and wash the exterior cover.  We use hot pads to warm up our feet in the bed, so being able to wash the outside cover is a necessity!

We've been using these smaller hot pads all year, but I've been wanting to make a larger version with a simpler bag closure for a while now.  So today, I'm sharing with you my tutorial for making these oversized hot pads with an overlap closure for the exterior bag.  This method is by far the easiest way to make a hot pad cover.  So, gather your supplies, and let's get busy!


Sew the pieces together using a 1/4" hem along the three sides that you pinned.


At this step, you have an option to sew a 1" piece of velcro to the overlap closure to help keep it secure when the rice filled bag is inserted.  I did not do this, although I thought about it at first, but my bag stays closed just fine.  For a narrower, smaller bag, this would definitely not be needed.


Now to make the inner bag that will hold the rice. Take your two pieces of muslin, pin together, and sew together using a 1/4" seam allowance.  Just make sure you leave a 2" or 3" opening in order to turn the bag inside out. Press the bag flat making sure to press under the raw edges at the opening. This will make it easier to sew closed in a minute.

Using a funnel, fill the muslin bag with your rice.  For these large hot pads, I used roughly 18 oz. of white rice to make the bag full but not overstuffed. Carefully pin the edges of the bag opening shut and sew together using a 1/8" seam.


Insert the rice filled bag into the hot pad cover, heat the bag in the microwave for 2 to 3 minutes, and remove the bag from the microwave using the handy dandy twill tape handle.  Place the hot pad under the covers in your bed a few minutes before you jump in, and by the time you crawl into bed, you'll have a nice toasty warm spot to put your feet.


This oversized hot pad will stay warm for more than half an hour when you heat it up for 3 minutes.  Just be careful when you first remove it from the microwave because it will be very hot!

This tutorial can be used to make any size hot pad.  Just adjust the measurements to fit any scrap pieces of fabric you have lying around.  Make small ones to keep your hands warm or medium ones to use on sore muscles, but please remember to always make sure the pads are not too hot before letting a child or elderly person use them.  These things can be extremely hot when first removed from the microwave, especially if you hold them in one spot on your body for more than a few seconds.

Now I just need a day or two off really nice, sunny weather so I can make pictures of Ella outside wearing all the new things I've made her!  I have a lot of blogging to do!  Come back soon to see the two Sweetheart Dresses I made using LuvintheMommyHood's pattern, a pair of leggings using the Go To Leggings pattern by Andrea from The Train to Crazy, plus a few other things I put together since the new year began.

See you soon!  Have a great day!

Sunday, February 12, 2012

Some Like It Hot!


Just before Christmas, I came across a tutorial for making rice hot pads, and I thought these would make some great gifts for family.  I whipped up a couple of sets for my husband and kids, and they were an instant hit.  My mother-in-law is now crazy about them as well and wants to place an order for more!

I had had hopes of starting my Etsy store well before now and offering some of these for sale for Valentine's Day, but I am still working on getting things organized.  I made the hot pads shown above for the soon-to-be (hopefully this week) sewVery shop as well as these.


I also have a couple of sets made using Spiderman fabric.  And as a side note, just because I made some hot pads using University of Alabama fabric in no way means I am a Bama fan!  My blood runs orange and blue (and cotton Auburn fabric is difficult to find where I live)!

Rice hot pads are pretty simple to make, but I added a couple of extra features to make mine more decorative and easier to clean.  As you can see, some have rick rack trim or piping on the edges, and all of them have a looped ribbon on one end in case you want to hang them on a hook for storage or to carry them with after they are heated in the microwave.

A lot of the hot pads I've seen online don't provide the user with an easy way to remove the rice so the outer bag can be washed.  On my hot pads, I left one end open and added a velcro closure so the interior muslin rice bag can be easily removed and reinserted after the cover is cleaned.  This was a really important feature to me since in my house, we primarily use the hot pads to warm up our feet!


My version of rice hot pads are made using left over fabric from other projects.  Most end up being roughly 4" x 6" in the case of the Heart and Love ones above, but the Alabama hot pads are slightly bigger measuring 5 1/2" x 7".  I like to make them in sets so we can have one for each foot, or we can warm up a couple of spots in the bed, or we can put them on our achy muscles!

My two kids love these, and every night they request we have a "Hot Pad Party" and read books.  Then, before bed, we reheat the pads and put them in the bed to warm it up while we brush our teeth!  It's wonderful crawling into a nice warm bed.  

I usually heat up our hot pads for 60 to 90 seconds on high in the microwave.  They are very hot at first, hence the need for the ribbon so you can safely carry them to the bed or sofa.  Heated this long on high in the microwave, they will stay warm for at least a half hour or sometimes a little longer.  I am always very careful not to let my kids have them until they are a safe temperature to touch, and I would recommend that anyone who uses these do the same.

I've read where these work great as cold packs, too, but I have yet to put one in the freezer.  Maybe I'll get around to trying that next.  But for now, I think we'll keep them hot around here!