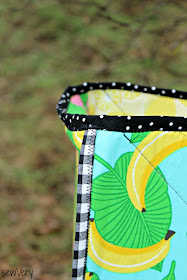
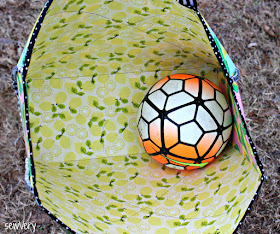
I had recently received a half yard bundle of the latest collection from Blend Fabrics-- Tutti Fruitti by Maude Asbury. When we saw the That's Bananas fabrics in pink and blue, Ella immediately said those were perfect for her class because they were wild and kooky like monkeys! We decided to use the Lemon Drop in yellow fabric as part of the lining simple because it was yellow like a banana! What we came up with we dubbed the Go Bananas Bag!
Disclosure: I was provided some fabrics used in this post in exchange for sharing a project I sewed with it. All opinions are my own.
Now, I didn't take photos for a tutorial because I needed to make this bag in a hurry, but I will give you basic measurements and instructions for the construction in case you want to make your own Go Bananas Bag. This is a very large tote bag that is perfect for carrying a variety of items, especially recess equipment likes kickballs, soccer balls, jump ropes, and a first aid kit.
Keep reading for the details!
After measuring the old bag, we cut the blue That's Bananas and yellow Lemon Drop fabrics to 19" x 42" each. I then placed Pellon Peltex double-sided fusible interfacing between the fabric layers approximately 3/4" from the fabric sides and 1" from the top and fused them using an iron. The Peltex pieces were roughly 17.5" wide x 20" high and were cut slightly narrower than the fabric on each side and at the top to make sewing the binding easier later. Trust me. It's difficult working with Peltex sewn in the seam allowance!
Next, use a ruler and measure 4" to the left and right of the joint in the Peltex. Use a fabric marking pen or chalk to score this line. Now fold the fabric along the two lines to create the bottom of the bag. If you prefer, sew a topstitch seam along each line.
Now, use your ruler and fabric pen or chalk to score a giant X across what will be the front and back exterior panels of the bag. Topstitch along these lines.
To prepare the sides of the bag, cut four fabric pieces (I used the That's Bananas in pink for both the exterior and interior) 8" wide x 17 3/4" high. Also cut two pieces of Peltex measuring 6.5" wide x 16" high. Place one piece of Peltex between two pieces of the side fabric. The Peltex should be 3/4" away from the sides and bottom of the fabric and 1" away from the top. Fuse it to the fabric with a hot iron. Repeat for the other side panel.
Now, use your ruler and fabric pen or chalk to score a giant X across the side panels of the bag. Topstitch along these lines.
Place one side panel piece along the bottom edge of the bag with lining sides together. Pin or clip in place. Sew together using a 1/4" to 3/8" seam allowance. Next, starting from the bottom corner, begin matching the raw edges of the side panel and the front panel and pin or clip together. Don't worry if the top edges don't match up perfectly. These can be trimmed even later. Sew this seam using a 1/4" to 3/8" seam allowance. All the seams should be facing out.
The seams are finished on the interior. Repeat these steps for the remaining side panel.
Begin matching the raw edge of one folded binding strip to the raw side seam of the bag. Start at the top of the bag and work your way down toward the bottom and back up to the top at the opposite side. This works best if you pin or clip the binding from the front and back panel. Sew the binding to the seam from the side panel side of the seam using the side seam stitch line as a guide. It gets tricky near the bottom of the bag, especially since it is so stiff and you have to turn the corner. Work slowly.
Fold the binding over the raw seam and pin or clip in place so that the edge just covers the stitching. Use a wide zig zag stitch to secure the binding in place. Again, it is easiest to sew from the side panel side of the seam.
Repeat for the other side seam. Use the remaining binding piece to cover the top raw edge on the bag. It may be necessary to trim the top edge of the front and back panels to be even with the side panels before attaching the binding.
Finally, using 2 pieces of 1" wide webbing cut 24" long for the handles, place the straps in your desired loaction with roughly 2" to 2 1/2" of each end being placed on the bag front and back panels. Secure those ends using 3 rows of a zig zag stitch evenly spaced as shown below. Go back and forth over each row several times.
Now your Go Bananas Bag is complete! Fill it with sporting equipment, blankets, groceries, or whatever! The sides are stiff enough to hold the bag's shape yet flexible enough to expand to hold larger items.
Be sure to check out all the other fun Tutti Fruitti prints by Maude Asbury for Blend Fabrics. I hope to share another project or two using this collection soon. I love it!
Have FUN sewing!


Looks awesome! Love it!
ReplyDelete