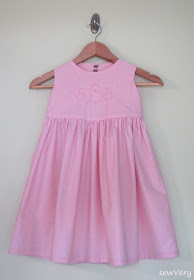
As promised, I made a second Sweetheart Dress using Luvinthemommyhood's terrific Sweetheart Dress pattern!
To see the first fun, playful Sweetheart Dress I made, click here.
Before I actually made the first dress, I had the idea to monogram the bodice, but I didn't have any yardage of solid cotton on hand. It took me a few days to make it to the fabric store to pick some up, and I just love how this turned out! This style of bodice is just perfect for embroidering either a monogram or a fun design.
Since the bodice is fully lined, I used my Brother PE770 embroidery machine to stitch out the monogram on the outer bodice piece before I sewed the top of the dress together. I chose to go with a monochromatic look by using a thread the same color as the dress.
For the back closure, I opted to use two hooks instead of a button. I really like the look of the heart with this type of closure, plus it was faster for me to sew than the hand sewn loop I did with the first dress!
I was much more careful with the finishing touches of this dress. For instance, I made sure I did a neater job of topstitching the bodice down to the skirt.
When we were at the store picking out the solid pink fabric for the dress, Ella spotted this cute pink netting type fabric that has small hearts all over it. It was like it was meant to be! I immediately thought about adding this to the skirt of this version of the Sweetheart Dress, but after getting home with the fabric, I began to worry that it might not hold up as long as the rest of the dress. Instead of making the netting a permanent part of the dress, I opted to make it a separate skirt (similar to an apron) that maybe she can wear with something else in the future.
To make the heart skirt, I cut out the fabric the same width as and then a few inches longer than the skirt of the main dress. Fold over and hem the raw edges (if you want to, but it's not necessary with this type of netting material) and then gather the top of the skirt to match the skirt of the dress.
I then cut out two pieces of the cotton fabric that were 4" long x the width of the fabric. I sewed them together so that the seams were on the sides and would match up with the side seams of the dress. I then ironed the sash like when you make double folded bias tape (so that both raw edges are encased). Insert the gathered edge of the heart skirt into the folded sash, pin like crazy, and then starting at one of end of the sash, sew the sash closed and the heart skirt all at once using a 1/8" seam allowance.
The next "extra" I decided to add was the jacket. Since it's still pretty cool/cold here, and Ella doesn't have a cardigan sweater that would work with this outfit, I made this sweet, simple jacket to go with her second Sweetheart Dress.
To make the jacket, I used Simplicity pattern 2270.

I've had this pattern for a while but had never taken the time to try it out. It was very simple to make, and I mostly followed the pattern instructions. I think the only thing I did differently was sew the sleeves on to the bodice pieces first and then sew the side seam of the sleeve and bodice all at once. I used the size 5T for the jacket just like I did for the Sweetheart Dress.
I think this jacket looks like it was meant for this dress!
And since I still had plenty of both fabrics, I whipped together this simple little bag because special outfits need a special bag--right?! The jacket pattern (Simplicity 2270) comes with the pattern pieces and instructions for making this bag. However, I did add the heart skirt to the bag as an afterthought, and I constructed it the same way I did the heart skirt for the dress with one exception--the bag skirt is not removable. It is sewn on to the bag permanently.
There you have it! My dressed up version of the Sweetheart Dress with a few extras thrown in for fun! Now Ella is all dressed up and ready for Valentine's Day! She is definitely my sweetheart!
Also, check out my latest pattern purchases. You can read all about them and buy them for your own here.
I'll be showing you later this week a couple of items I've already made from these patterns. One is the Commuter Cowl, another great pattern from Luvinthemommyhood.
Thanks for stopping by for a visit! Please sign up to follow the blog by GFC, email or by liking my Facebook page. See you again real soon! Have a great day!
Linking up at these parties as well as others shown here.


Awww, I love this one too! Great job! She looks so pretty in it!
ReplyDeleteOMG my daughter NEEDS one of these! Totally had to pin this!
ReplyDeleteAdorable! We would love it if you would link up at our new linky party: Two Girls and a Party Hosted by:
ReplyDeleteDana @ This Silly Girl's Life
Parrish @ Life with the Crust Cut Off
We hope to see you there!
Absolutely adorable outfit! I love the overlay and the purse too! Super cute!
ReplyDeleteI love your dress and all the extras! The hook closure and monogram are really nice touches, and the overskirt is so delicious!
ReplyDeleteThis is too cute (the dress and the model)! What a creative idea. I would love to have you share this at my link party today. Hope you can make it!
ReplyDelete-Angie
www.easylivingmom.com
Wow,the only thing prettier than the dress is the model! I LOVE the beautiful apron you made.....it makes the dress so fancy and special! I'm so glad you shared this at Loving Valentines Day!
ReplyDeleteTGIF!
Marilyn
This is totally cute! lovely dress for little girls!
ReplyDeletemisselayneousthings.blogspot.com
Oh, Veronica, I love the heart skirt overlay!!! Making it as an overlay not only gives you more options, it looks totally adorable in the apron style with the big bow. And the little bag is so cute.
ReplyDeleteHi Veronica, I've featured your Sweetheart Dress today... Threading Your Way Features
ReplyDeleteLove, love, love!!
ReplyDelete