home tutorials features parties custom orders

Wednesday, June 12, 2013

Win 100 Size & Care Labels from Forever Threads 2!

Are you in the mood for a giveaway?  I thought so!  Keep reading to find out how to enter to win 100 size and care labels from Forever Threads 2!


About a year ago, I decided it was time to start putting some size and care labels in the items that I make for my daughter.  Her handmade wardrobe was growing exponentially, and I could no longer keep track of when I made what and by what size!  Plus, if I ever decide to sell or give away any of these pieces, I wanted to correctly represent their size.

So I went in search of a good online source for size and care labels that could be purchased in small quantities and not cost a fortune.  That's when I came across Forever Threads.  I ordered a variety pack of 100 labels for sizes 2T through 8 plus three different care labels.

I use them in almost every item I make now, and they hold up perfectly wash after wash.  They are woven labels that are soft and not scratchy, and Ella has never complained about them making her itch.


Fast forward several months when I saw a post on Facebook announcing that the Forever Threads' shop was closing so that the owner could spend more time teaching sewing classes through My Sew for Hope!  I immediately began counting labels to see what I needed to replenish, but to my relief, the owner Rita, decided to transfer the business on to her sister, Elise.

Since Etsy would not allow her to transfer the business name to her sister, Elise opened a new shop called Forever Threads 2!  She is now open for business selling the same size and care labels at the same amazing prices.  And to kick off the grand opening, all labels and buttons are 25% off through June 30th with coupon code WELCOME.  When you order labels from Elise, you'll also receive a coupon code good through June 30th for 25% off all items remaining in Rita's original shop Forever Threads (which will be closed after June 30th).


And since Rita was feeling so generous, she's offering up a 100 label assortment pack to two of my sewVery readers!  Thanks, Rita and Elise!

Two winners will each receive their choice of size and care labels in multiples of 10, 25, or 100 for a total of 100 labels.  Here's the selection to choose from...


Just enter the Rafflecopter widget below and two winners will be announced next Wednesday, June 19th!

a Rafflecopter giveaway

Follow on Bloglovin

If you can't wait that long or don't want to take the chance, you can always go ahead and purchase a pack of labels from Forever Threads2 and use coupon code WELCOME through June 30th for 25%!

Friday, June 7, 2013

Skirt Week Final Call

Today's the last day to enter your skirt creations into the Flickr pool for judging in Crafterhours Skirt Week 2013 competition.  You have until tonight (June 7th) at midnight EST to upload your photos for consideration.

crafterhours

To read all the rules and find links to the Flickr groups, click here or on the photo above.

And let me just tell you.  There are tons of awesome entries so far!  So much inspiration.  I am very impressed thus far which is making my job as a judge (you heard me, I'm a judge) even more difficult!

This is my first time judging a sewing competition, so I'm a little nervous especially with so many amazing entries to consider.  Sew hurry (pun intended)!  Get your skirts finished, photographed, and uploaded by tonight at midnight EST for a chance to win some amazing prizes!  To check out the prizes, follow these links:  Prizes Part 1 and Prizes Part 2

Good luck!

Thursday, June 6, 2013

Junebug Pattern Top & Best of Summer Series

Today I'm blogging over at Caila-Made as part of her Best of Summer Series.


I'm sharing with Caila's readers two of my favorite children's summer clothing patterns:  the Junebug Top Pattern by Craftiness is Not Optional (CINO) and the Class Picnic Shorts Pattern by Oliver + S.


For my full pattern review of the Junebug Pattern Top and Class Picnic Shorts, head over to Caila's Best of Summer Series, and don't forget to follow along for the next three weeks for more great summer pattern inspiration.

To read my original post from last year about the Class Picnic Shorts, click here!

If you are visiting my blog for more info on how I made my Junebug Pattern Top with velcro closure, then keep reading!  More info on that topic is below.  Thanks for stopping by, and I hope you'll decide to check out some other outfits I've made recently.  To follow along in the future, please consider becoming a follower through Bloglovin by clicking the button below or by any of the other social media outlets by clicking the icons at the top right of my blog page.

Follow on Bloglovin

To make the top with velcro closure, I sewed the soft half of the velcro to the lining side of the bib (about an inch from the raw edge so it will end up 1/2" from the finished edge) before assembling the bib.  After assembling the rest of the bodice, I then marked where to sew the remaining rough velcro pieces onto the side bodice.  Each of my velcro tabs is roughly 1" square.


Alternatively, I could have sewn a strip of velcro down each side of the bib, but I felt like the smaller pieces were sufficient to keep the bib secured to the bodice.

The velcro washes just fine.  I can't recall ever sewing velcro on clothing before, but I know I've bought coats and jackets with it on it and it always works great.  I found it a great alternative to buttons and snaps for this particular application.

By using the velcro in lieu of buttons and buttonholes or snaps, I was able to sew this beautiful vintage trim to the front of the bib where the buttonholes would normally be.


Just days before I even thought about making this top, I picked up a yard of this trim for 50 cents at a yard sale near my house!  The colors match perfectly right down to the burnt orange flowers, green leaves, and navy blue.  It was meant to be!

If you want to make your own Junebug Top or Dress, head over to Craftiness is Not Optional to purchase your copy of the pattern.  Be sure to tell Jess that Veronica at sewVery sent ya!  Thanks for stopping by!

Oh, and thought I would mention another great pattern that is on sale today--Peek-a-Boo Pattern Shop's Bubble Shorts Pattern (affiliate link).  Just $4 this Thursday only!  Grab it while you can at this fantastic price!  Just click the picture to purchase at Peek-a-Boo Pattern Shop.


Tuesday, June 4, 2013

Junebug Dress Pattern Test

Jess from Craftiness is Not Optional just released her first children's clothing pattern, The Junebug Dress Pattern, and I was lucky enough to test it out for her.  Jess is the sweetest person, and she's pretty talented, too.  You are going to love this pattern!


I know Jess has been wanting to develop her design into a full-blown graded pattern for some time now, and I am sure it is going to be wildly popular!  Really, this pattern is amazing not only for the design but also because of the simple instructions and great photos.  The way the instructions are worded, you'll feel like Jess is there personally talking you through each step!

For my pattern test, I made Ella the size 5T dress with sleeves.  The pattern also offers a sleeveless option and measurements to make a tunic length top.  Check back tomorrow to see the Junebug Top I made using velcro for the bib closure instead of buttons!


The pattern pieces included are for the bodice and the sleeves, while the skirt dimensions for the dress and top are in tabular form by size in both the instructions and repeated on the pattern page that you print out.  Measurements for the elastic used on the sleeves is also provided so there is no measuring your child or guessing about what length to use!

The bodice is fully lined, and Jess's pattern instructions walk you through step by step on how to do this for both the sleeveless and sleeve versions.  A simple gathered skirt and cute little puff sleeves round out the look for a relatively quick sewing project.  I completed this dress from start to finish (including printing, taping and cutting the pattern, cutting the fabric, and sewing) in roughly 3 hours!


The fabric I used is some Robert Kaufman quilting cotton I purchased last year and had been hoarding for just the perfect project.  The dots have a touch of hot pink on each of them hence the extra large hot pink buttons on the bib.  Ella loves them because the button fabric has a touch of glitter in it!


I normally make Ella size 5T, and according to the pattern measurement chart, she was somewhere between a 4T and a 5T.  When that is the case, I usually make the larger size so she will have some growing room.  The 5T in this dress will definitely give her that and she should be able to wear it next year, too.


For the Junebug Top I tested (remember to check back tomorrow for the blog post about it), I made a 4T and felt the fit was spot on for Ella right now.  Here's a little sneak peek of the top.


I'm extremely happy with both the dress and the top, and Ella has loved wearing them both multiple times in the last two weeks.  I have the feeling this pattern is going to be our summer favorite!

If you are as excited about this pattern as I am, then head over to Craftiness is Not Optional to purchase your own copy of the Junebug Dress Pattern!  Tell Jess that Veronica at sewVery sent ya, and I'll see you tomorrow for more on my Junebug Top!

Have a great day!

Thursday, May 30, 2013

Patriotic Hopscotch Top

Now that Memorial Day is over, it's time to gear up for the 4th of July.  I've got the perfect top for your little girl to wear to celebrate our nation's independence--the Patriotic Hopscotch Top!


To make this adorable and festive top, I used the Hopscotch Top/Tunic/Dress Pattern from Peek-a-Boo Pattern Shop and the Happy 4th of July embroidery design from Embroitque.

Disclosure:  I am an affiliate of Peek-a-Boo Pattern Shop and was provided both the pattern and embroidery design for free, but all opinions in this post are 100% my own.

I've been wanting to try out the Hopscotch Top Pattern for a while now.  It has such a classic, simple style with a fit that is ideal for active little girls.  Now, the pattern designer provides instructions on how to add a center decorative placket down the front bodice, but when I saw this design, I thought the front bodice was just the perfect pallet for an applique or embroidery design.


So, in order to make the Patriotic Hopscotch Top, I embroidered this Happy 4th of July design to the bodice.  To make it easy to center, I first traced the pattern bodice piece onto my white fabric and marked the center.  Next, I hooped my fabric and then stitched out this design.


I'm finding that I really enjoy basic embroidery designs so much better than applique designs, and Embroitque has lots of really cute designs.  All the stopping and starting and removing the hoop from the machine to trim fabrics is a little stressful and time consuming in my opinion.  With this embroidery design, I just had to switch out the thread colors and trim a few threads.  The entire design took maybe 20 to 25 minutes to stitch out!

Next, I decided the bodice needed a little pop of color, so I trimmed the waist, the neckline, and the back button placket with red piping.  This added a little time to the construction of the top, but it was well worth it.


For the rest of the top, I stuck with the original pattern design.  The bodice is fully lined and those little flutter sleeves just add the perfect touch of femininity and sweetness to the piece.


The Hopscotch Pattern offers pattern lengths for three styles--Top, Tunic, and Dress--and comes in sizes 3 mo. to 8 years, so I know I will be getting lots and lots of use out of this design!

Plus, as I mentioned earlier, you can do so many things with this pattern to make it all your own. Add the center placket (as provided in the pattern) but maybe add some ric rac or other trim down the center of it to jazz it up even more.  Sew a ruffle strip down the center of the bodice or maybe leave off the the flutter sleeves.  And finally, I can just see this as an adorable dress with a monogrammed bodice!  Can't you?

I made Ella a size 5T based on her actual measurements compared to the pattern sizing chart.  The fit of the top is perfect and comfortable on her.  She squealed when I showed it to her the first time and insisted on wearing it right away.  Always a very good sign when that happens!


So by now you know I am a big fan of Peek-a-Boo Pattern Shop patterns, and it's not just because I am an affiliate.  I am an affiliate because I like her patterns so much, and I've made quite a few with plans to make lots more.

If you are also a fan of Peek-a-Boo Pattern Shop or would like to try out one of her designs, then today you can pick up the Lazy Days Romper Pattern for just $4 for Thrifty Thursday!


Happy sewing!  Have a great day!

Tuesday, May 28, 2013

Retro Romper Pattern

Last week I tested the Retro Romper Pattern by Blank Slate Patterns .  It has officially been released for sale here as of today!

Disclosure:  I am an affiliate of Blank Slate Patterns, but all opinions regarding this pattern are 100% my own.


I love rompers, and apparently, so do a lot of other people!  It's just a shame that adults don't look quite as adorable in them as children do.  Well, I can still get my fix of rompers by making lots for Ella to wear this summer.  This has already become a favorite of hers.

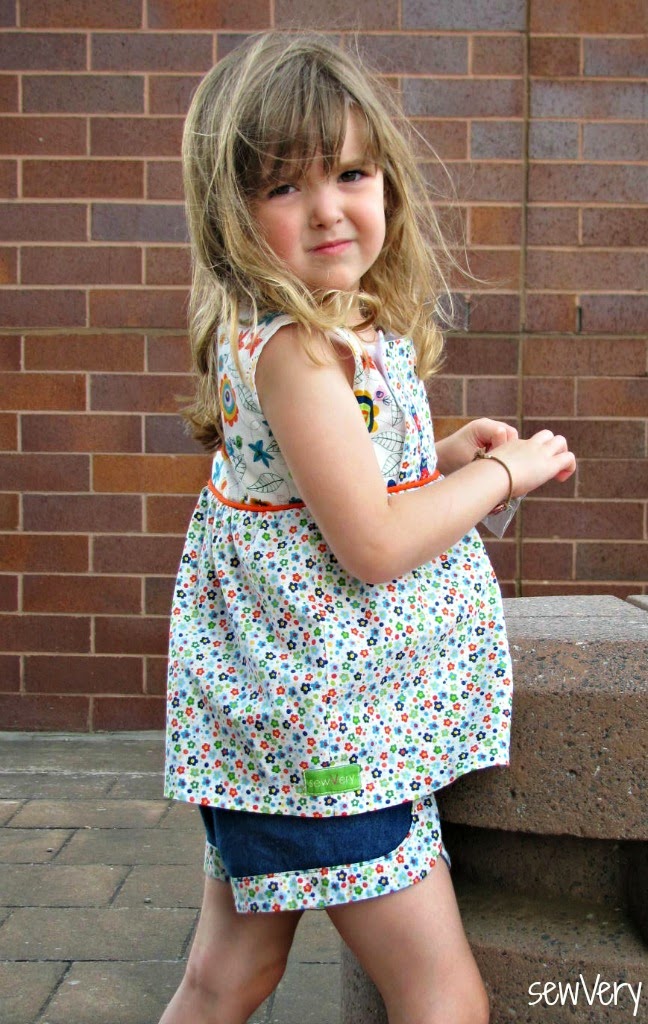
The Retro Romper Pattern is appropriately named.  This design so reminds me of the '80's, and I could swear I had a terry cloth version of this exact design when I was a child.  I've even looked through a few old photo albums searching for a photo of me wearing it.  Hopefully I'm not thinking of someone else, but I have not come across the photo--yet!  When I do, I'll be sure to post an update.

This pattern is such a simple design and the perfect piece of clothing for summer!  It's cool and comfy for running around outside in the hot sun and ideal for playing/bending/squatting both indoors and out.  The Retro Romper Pattern offers both a shorts and skort version, and I think the latter would make a great swimsuit cover-up for little girls!

There are absolutely no seams to hem on this romper since everything is trimmed with bias binding!


I made all my binding out of quilting cotton in order to coordinate with the floral main fabric of the romper. It took a little extra time to fold and iron it all out without the use of a bias tape maker or using pre-made bias tape, but it's always well worth it.  I use bias binding often to hem skirts, dresses, or even tops because it is an easy way to add color or a visual interest to the garment.

For my shorts version of the Retro Romper, I used quilting cotton; however, the pattern is suitable for wovens or knits and includes sizes 18 months to 8.  I made Ella a size 5T and think it fits her perfectly.


The waist is gathered using elastic, and the pattern shows you an easy way to create the casing when you sew the shorts to the bodice.  Although not included in the pattern, you could easily shirr the waist with a couple of rows of elastic thread to create the same fit in lieu of an elastic casing.


I considered adding some pockets to the bum, but after making one and pinning it on to the shorts part, decided to just keep it plain and simple.  One great thing about the Blank Slate Patterns is that the designs are such that you can add all kinds of personal touches to an outfit with the use of trims, buttons, a ruffle placket down the front, pockets in the front or back, a sash around the waist, a ruffle across the front, and I could go on and on.  The bodice could even be appliqued or embroidered to personalize the look. The options are endless!


This pattern was a joy to test!  It was simple, it was a quick sew (roughly 2 hours), it fits perfectly, and it's adorable on!  I can't tell you how many compliments Ella received when she wore this out to my son's ballgame.  Even a few moms said they wish they had one in their size, so obviously, I'm not the only one with a romper crush!

Blank Slate Patterns also released two additional patterns today as part of their Summer Vibe collection--the Big Island Board Shorts and the Baja Hoodie.


And if you love rompers like I do, then be sure to check out some of the others I've made--


I'll also be participating in Romper Week at Sewing Mama RaeAnna starting June 19th!  Be sure to follow along the entire week for some amazing romper inspiration.  You can also check out our romper inspired pinterest board.

Romper Week

Have a great day!

Follow on Bloglovin

Sunday, May 26, 2013

Last Minute Teacher Gift

My son finished up third grade last week, and in normal fashion, I waited to the last minute to make his teacher a gift!  I had decided earlier in the week that I would make her an embroidered zipper pouch, but with all the extra activities at school and Ella's dance class during the week, I just didn't make the time to get it done before the last day of school!

So, on the morning of my son's last half day, I cut out a piece of duck cloth and set up my embroidery machine to stitch out this cute bird in a nest of leaves design.  The design is from Hang to Dry.  I purchased it a few weeks ago when they had a sale.  I'm finding that I enjoy embroidery designs much better than applique designs.  I get a little frustrated with all the stopping and starting and removing the hoop from my machine for applique work.


Anyway, I had not tested out this design before, so it was a make it work no matter what kind of moment!  The design stitched out pretty good, but because it jumps from leaf to leaf so quickly, I didn't stop each time to trim the threads and instead waited until it was finished to do all the trimming.  Well, as you can see, that made it difficult in some spots to get a close snip, and some of the threads frayed or fuzzed up on the ends as a result.  Also, some of the outline stitching was off from the fill.  All in all I really like the design and will use it again.


I then used a piece of Amy Butler's Lark Floral Couture in Berry for the lining paired with a pink zipper and a matching zipper pull.  Project complete!


Ella and I were able to leave the house with enough time to run by the store and purchase a gift card to The Cheesecake Factory to go inside the pouch.  When we got to the school, Connor was already outside waiting, so we ran back in to find his teacher.  He gave her the gift and she loved it!  Whew!  Next year, I hope I don't wait to the very last minute to make the teacher gift, but I'm glad I finished this one in the nick of time.  Mrs. Fields was a wonderful teacher and my son loved her class!

Now it's on to the fourth grade--already!  Hope you have a great summer!